Mounting the QS138 v3 in taotao dbx1 140cc

Joined
Apr 25, 2014
Messages
2,800
Location
Sausalito
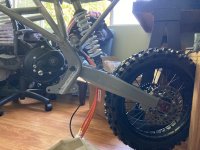
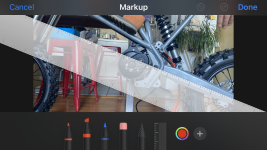
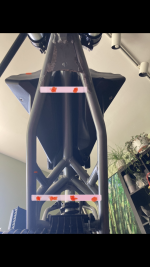
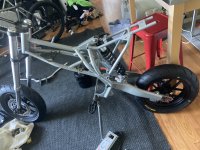
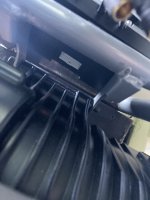
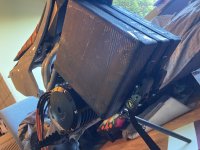
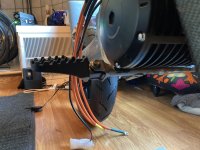
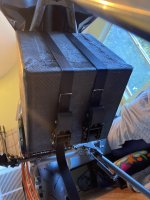
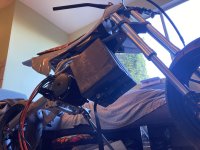
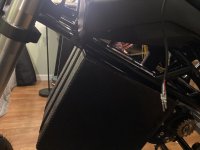
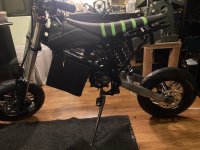
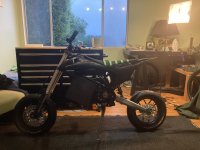
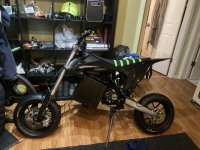
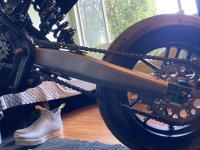
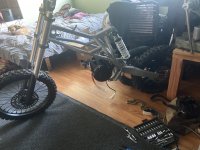
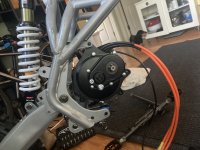
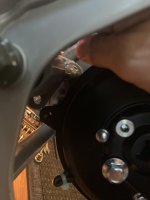
It seems good in this position but is the shaft too far from the swing arm?


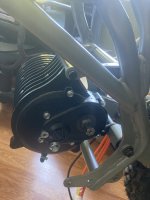
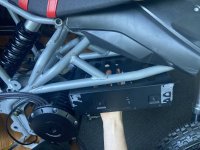
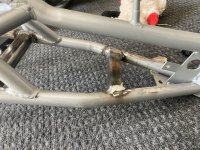
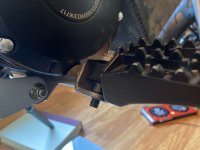
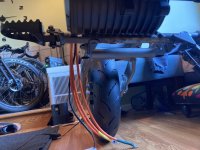
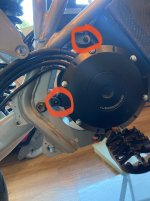
In the pics the motor is hanging by one bolt. It seems ideal there with the oil tube on the bottom and there’s another mounting point that needs a bracket to get to I’m trying to show in a bad pic. The mounting holes are on a free-spinning part held on by the same bolt as the swing arm. Are two mounting bolts enough?


@Eastwood
There’s a link in one of your threads for a French place that makes brackets to mount this motor but can’t find it now. Please post the name of the place if you remember and trying to mount this as simply as possible


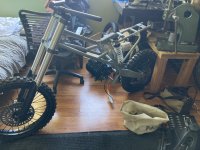
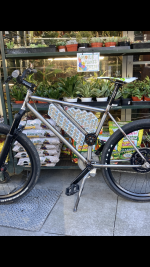
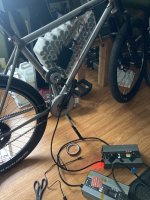
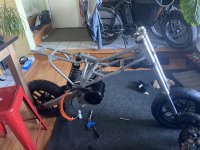
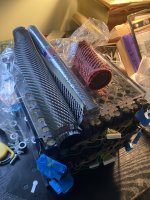
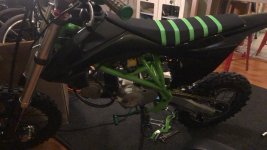
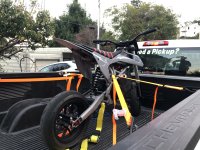
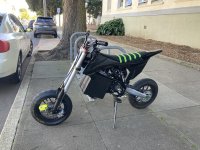
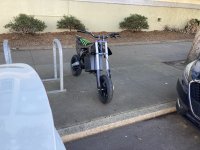
This is a new Taotao dbx1 140cc dirt bike. (Selling the remaining parts on eBay)
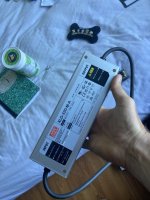
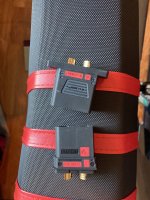
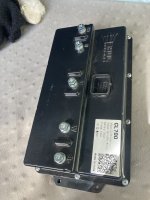
Controller:
3shul cl350
Will be doing 200 battery amps and 400 phase amps. Maybe the esc can do more but I’m at least limited to 220 battery amps with my battery
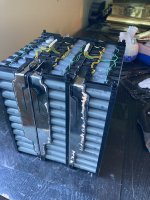
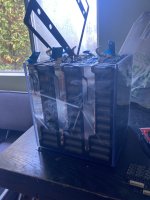
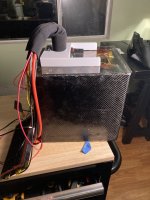
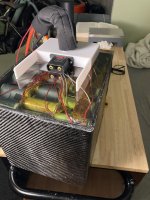
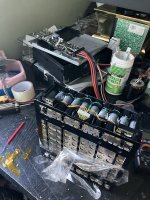
Battery:
30s11p (3 “robot” batteries in series from batteryhookup). Hopefully the batteries don’t need added nickel or copper and don’t want to take them apart)

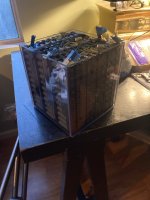
Will weld a steel box to the frame to hold the batteries
 

Attachments

  • FA575888-0B2E-4018-8F27-95EB571E9D5A.jpeg
    FA575888-0B2E-4018-8F27-95EB571E9D5A.jpeg
    2 MB · Views: 38
  • 93171134-1557-4FF0-9B5A-38378BE9E3CB.jpeg
    93171134-1557-4FF0-9B5A-38378BE9E3CB.jpeg
    2.2 MB · Views: 46
  • BFA5E55E-9CC7-4796-81FA-48AA621DEEAC.jpeg
    BFA5E55E-9CC7-4796-81FA-48AA621DEEAC.jpeg
    2 MB · Views: 49
  • B3233164-F82B-4B4D-9252-D9FA895731BD.jpeg
    B3233164-F82B-4B4D-9252-D9FA895731BD.jpeg
    3.9 MB · Views: 52
  • A8DCA9F7-5401-400E-B511-484AB0760E77.jpeg
    A8DCA9F7-5401-400E-B511-484AB0760E77.jpeg
    1.5 MB · Views: 42
Last edited:
That motor position is really bad. When the suspension moves your chain will rub the underside or the upside of the swing arm all the time, the tension on the chain will also vary a lot. You should have the sprocket close to the pivot point of the swing arm, so you have to turn the motor around or flip the rear wheel so you get the chain on the other side.
 
@Eastwood
There’s a link in one of your threads for a French place that makes brackets to mount this motor but can’t find it now. Please post the name of the place if you remember and trying to mount this as simply as possible

For my Rmz build, I’m using mounts from Mighte.me, although, I don’t recommend this company. My motor mounts needed all sorts of sanding and refinishing, had metal burs on the edges that were sharp. Then the sprocket fit horrible. I had to add all sorts of spacers to get rid of the wiggle between the motor shaft, and the sprocket. Emailed that company and they said that this was normal lol
If I could do it over again, I would’ve just made my own motor mount seeing how simple it is to mount the QS 138 in the traditional Japanese Dirtbike Frame.
 
great news and flipped the motor and now takes two mounting bolts with no extra parts needed! I wouldn’t have thought to simply do that thanks.


What you think of the distance between axle and swing-arm pivot point? Hopefully good. I’m going to put a big sprocket on the back, hopefully that helps. It’ll squat down when I sit on it but plan to tighten the shock a lot

It will have slicks n only go on the road.


I hope the thread is done. Looks mounted

I can get a brake bracket welded on the other side of the swing arm but I’d rather find a way to use the two-way throttle and make a strong rear brake.. going beyond my battery charge limit.

data sheets 11p of M50LT 21700:
If above 77f the cells are stated to be chargeable (to full charge) at 3.6 amps. (From 0 to 77f stated to do 1.4amps.). No graph is shown. But what of high bursts?


They do high discharge tests
 

Attachments

  • 26F40E1D-D95A-4E79-8C5F-E7FC7C197CA6.jpeg
    26F40E1D-D95A-4E79-8C5F-E7FC7C197CA6.jpeg
    2.1 MB · Views: 21
  • ADD94350-D8A3-46D8-BDF8-F0B0718975D2.jpeg
    ADD94350-D8A3-46D8-BDF8-F0B0718975D2.jpeg
    1.8 MB · Views: 22
  • 0DA0605D-B883-4272-9897-05529B74549F.jpeg
    0DA0605D-B883-4272-9897-05529B74549F.jpeg
    1.6 MB · Views: 21
  • FBBBFBD9-E1D6-4EBF-9EA3-D20D0EA1A868.jpeg
    FBBBFBD9-E1D6-4EBF-9EA3-D20D0EA1A868.jpeg
    1.7 MB · Views: 20
Looks like you need to lower the motor to have it more in line with the pivot bolt on the swing arm. It looks like a simple fix, you could just make two small brackets for that top mount that drops the motor down by inch or two.
0E2EF94C-6218-4BDF-9328-EA65B9EB5AF1.jpeg

What kind of frame is that? Is it 19” front 16” rear or?
 
It’s 17” front and 14” rear

From the looks of it designing and adding a part to lower the motor seems pretty simple but I put the longer shock that came with the bike back on. Looks good with my weight on it.
Seems a perfect fit with no mods needed, no?

I’ll have to get a laser to confirm the chainline and it’s hard to get in there with a straightedge but the chainline also seems very good.

It’s seeming a drop-in motor replacement!
 

Attachments

  • 664F2FB7-93F7-42DE-B128-3CAFD8401BDD.png
    664F2FB7-93F7-42DE-B128-3CAFD8401BDD.png
    2.3 MB · Views: 23
Last edited:
It’s 17” front and 14” rear

From the looks of it designing and adding a part to lower the motor seems pretty simple but I put the longer shock that came with the bike back on. Looks good with my weight on it.
Seems a perfect fit with no mods needed, no?

I’ll have to get a laser to confirm the chainline and it’s hard to get in there with a straightedge but the chainline also seems very good.

It’s seeming a drop-in motor replacement!

OK yeah, The chain line looks decent after you put that line in the picture.

Yeah, the QS 138 is a drop in motor for a lot of pit bikes. Makes the conversion a lot more simpler 👍

Keep posting pictures I would like to see your progress. Curious of how you will mount the batteries since the frame doesn’t have a cavity like space. The only other thing, maybe the motor was a part of the actual structure of the bike, not sure. If so, you need to reinforce the frame because a lot of these bikes, the actual motor is a part of the structural frame.

Your bike will have lots of torque if you do end up going with a large rear sprocket with that small 14 inch rear wheel. It’s going to be a wheelie machine 😀
 
Id planned to weld a box on the bottom. Today I planned to instead put two steel U tubes. And now I’m back to just straps, velcro, polycarbonate, thru-beams with small stand-offs to hold the three batteries together, and give the straps prongs to work around to hold the polycarbonate sushi roll strapped up against the frame. And some kind of labyrinth seal air filter on front and back of the polycarbonate roll. Like toothpicks though sushi

That’s the lightest and simplest. Probably cheapest. Maybe not safest n needs a bumper somehow. I’ll weld a small block on the motor-side pedal, so it won’t can’t bend all the way and can protect the motor.
 

Attachments

  • FCCD3EA8-74B4-43B4-90D5-8CC7564327CB.jpeg
    FCCD3EA8-74B4-43B4-90D5-8CC7564327CB.jpeg
    1.7 MB · Views: 18
Last edited:
Why dont I want to put 12” fat slicks on it?
I’ve never had a motorcycle and only high powered bikes (latest in pic below) so I don’t know much. On paper it makes sense because it’s a dirt bike frame and I’ll only ride it in the slow flat city. Also, since doing 126v, even with a 13t in front and the biggest I can find in back, it’s still going to have a top speed I’ll almost never get to. It’s inefficient to have some high no-load speed I’ll never see and a waste. It needs to be geared down hugely and convert the speed to torque. It’s like 40 or 50kv (I still can’t find a sure answer).


Im going to add extra beams to the frame and hang a polycarbonate box with other boxes for bms n esc glued on top. I’ll put waterproof-enough air inlets (labyrinth seal out of glued polycarbonate) on front and back.

Any good reason to not get a low amperage 30s bms and bypass it when discharging and add a fuse of some sort? Cheaper.

I like simple loopkeys. I had fourty QS8 antispark plugs made with high 15ohm resistors (surprised they would). That was for this pictured 87v vehicle and this new bike being 126v it’s especially under what’s needed. I’m going to see if they will/can fit some high resistor in QS10 and maybe do a group buy w people here hopefully but other than that what’s a good simple on/off?


My other bike is hugely more practical for me but I couldn’t help myself and crave fast acceleration
 

Attachments

  • F53BA5E2-B8A6-489B-9A74-8C7AC736538A.png
    F53BA5E2-B8A6-489B-9A74-8C7AC736538A.png
    2.9 MB · Views: 25
  • 6CEF9C5D-E05C-4F79-B12A-9A4AD767D350.jpeg
    6CEF9C5D-E05C-4F79-B12A-9A4AD767D350.jpeg
    2 MB · Views: 27
  • 3AB3F822-20E3-4B8C-9190-1ECD57D74613.jpeg
    3AB3F822-20E3-4B8C-9190-1ECD57D74613.jpeg
    2.5 MB · Views: 26
  • 3E3397FD-33BB-4A2D-9AE4-E3D6F1F90AC1.png
    3E3397FD-33BB-4A2D-9AE4-E3D6F1F90AC1.png
    2.6 MB · Views: 26
  • F35908FE-A6F6-4E19-9E6A-2DB863C82E9F.png
    F35908FE-A6F6-4E19-9E6A-2DB863C82E9F.png
    1.5 MB · Views: 24
Last edited:
I’ll put a stopper in the fork and another reason to use small wheels. But it’s not as close as it looks and at least 5” of travel possible with that wheel.
 
Just going to use straps with winch buckles to hold the battery up against two square tubes that were added to the frame. I’ll put the battery in a polycarbonate box, seems safest and possibly lightest.

The battery is 53lbs

Still can’t find what firmware to use with this 3shul cl350 esc

I don’t trust using just these two motor mounting points and it rocks a bit and also think needs some thin sleeves around bolts to get rid of play

Got 12” wheels.
With using the coming higher voltage escs it feels like wheels are going to have to get smaller to utilize all the extra speed. Supposedly cast wheels are stronger and stiffer.

Meanwell makes a nice cheap high voltage adjustable power supply (310watts 75$)

Ground off the turn-stop or whatever it’s called on the frame under the fork that limits the turn angle. I’ll glue some semihard polyurethane half-spheres on the fork arms where they would contact the frame instead

Cut the kickstand down.

Went down to 420 chain. Seems strong enough and maybe needs to be replaced more but more efficient and quieter
13x47 gear
 

Attachments

  • D75A002D-DA27-4AE9-AD45-13A7F0CBDA53.jpeg
    D75A002D-DA27-4AE9-AD45-13A7F0CBDA53.jpeg
    2 MB · Views: 23
  • 7DB214C4-8224-4DA7-990F-08AB465C8517.jpeg
    7DB214C4-8224-4DA7-990F-08AB465C8517.jpeg
    3.2 MB · Views: 16
  • A9226E27-79F1-447E-A9D8-B01CC49F2AF9.jpeg
    A9226E27-79F1-447E-A9D8-B01CC49F2AF9.jpeg
    1.1 MB · Views: 17
  • 13771919-65E7-49FC-8A4E-F1B0923695F5.jpeg
    13771919-65E7-49FC-8A4E-F1B0923695F5.jpeg
    4.1 MB · Views: 22
  • 7082B403-5954-4D7C-B827-A6511E950B08.jpeg
    7082B403-5954-4D7C-B827-A6511E950B08.jpeg
    2 MB · Views: 21
Last edited:
Need to add a 6mm spacer/bracket to the front brake caliper and the rear sprocket to fit these pit bike wheels. I like these little wheels

Will wrap the battery in Kevlar/carbon/fiberglass to give it more strength and abrasion resistance.


Not as easy to put together as I thought and luckily had an angle grinder for a bit. Will glue the motor and this main tube with resin and fiberglass/carbon and end up a solid motor mounting point better than the others which slightly rattle
 

Attachments

  • E549C6CB-8847-4C3E-BE6D-4D1E0EF14FEC.jpeg
    E549C6CB-8847-4C3E-BE6D-4D1E0EF14FEC.jpeg
    2 MB · Views: 21
  • 040E9005-7712-45E5-9AC3-286DFCE1B0E5.jpeg
    040E9005-7712-45E5-9AC3-286DFCE1B0E5.jpeg
    3.2 MB · Views: 22
  • 61CD66CE-C12D-4C8E-B98B-F90387DB8394.jpeg
    61CD66CE-C12D-4C8E-B98B-F90387DB8394.jpeg
    1.8 MB · Views: 25
  • E6623F52-93B3-468E-BB4F-78D550F8E235.jpeg
    E6623F52-93B3-468E-BB4F-78D550F8E235.jpeg
    1.9 MB · Views: 22
  • ADC60E7B-BB6D-4C8A-8FD5-1C04FEA52920.jpeg
    ADC60E7B-BB6D-4C8A-8FD5-1C04FEA52920.jpeg
    2.3 MB · Views: 22
  • 90D18D38-D936-4B52-91DD-FF7248ABAEED.jpeg
    90D18D38-D936-4B52-91DD-FF7248ABAEED.jpeg
    2.3 MB · Views: 20
  • 0B76ED37-8E7D-42FF-B504-7680DC0F1922.jpeg
    0B76ED37-8E7D-42FF-B504-7680DC0F1922.jpeg
    1.4 MB · Views: 19
Last edited:
Had to grind down the motor and steel tube where they meet a lot more otherwise the pedals would be rotated and not flat.
Carbon fiber n epoxy seems to be decreasing in price the same rate as electronics.
Polycarbonate is cheap too.
 

Attachments

  • image.jpg
    image.jpg
    2.1 MB · Views: 20
  • image.jpg
    image.jpg
    2.8 MB · Views: 20
Last edited:
That should be a fun bike! I have a similar build using the v3 motor, but at 96v and a full size motorcross frame and knobby tires. It's nice and torquey! I imagine with those smaller wheels, you'll have no problem getting up to speed as fast as you want! That battery looks like a beast, though. Keep the pictures coming!
 
I’ll have another shot working with a found laser beam figuring where to position the motor getting it in-line with the rear sprocket. Then glue it to that pedal beam. The two bolts that connect the motor, allow the motor to wobble back n force a couple degrees if I move it with my hands. There was a mounting plate that had a couple bolts (4?) I cut off to fit the motor. It aligned the motor. Relying on these other bolted .. I’m going to use a laser n glue it w aluminum filled epoxy n chopped carbon mixed in and longer fiber wrapped around.

The motor sprocket is intended to be super loose so I think obsessing on chainline, like it’s a velodrome racer is wasted effort. Brake rotors rubbing pads seems kinda normal and no one is counting watts. They sit forward in the saddle sucking up the watts full frontal. A cyclist is far other end spectrum. aerodynamics are out the window on a dirt bike.

Put bms in gas tank.

I like the lower bars probably because I’m a cyclist who never rode a dirt bike.

And put loop key on the gas tank. It panel mount.4C51743F-2364-47BC-80FB-4CFDF1E210FD.jpeg
 

Attachments

  • 80A23375-D224-44EA-97D6-0167FABFC3A6.jpeg
    80A23375-D224-44EA-97D6-0167FABFC3A6.jpeg
    1.8 MB · Views: 9
  • 31DE3384-95B5-4ABC-BBE1-10642C811FCD.jpeg
    31DE3384-95B5-4ABC-BBE1-10642C811FCD.jpeg
    3.4 MB · Views: 8
  • 05809911-BC56-4659-9D34-3EEA74B92B41.jpeg
    05809911-BC56-4659-9D34-3EEA74B92B41.jpeg
    1.8 MB · Views: 8
  • 9BC53E20-EB12-403B-8ADC-FA63022BEF00.jpeg
    9BC53E20-EB12-403B-8ADC-FA63022BEF00.jpeg
    1.8 MB · Views: 7
  • 13329B33-572F-4CB2-BFE2-D9EAC6559FCD.jpeg
    13329B33-572F-4CB2-BFE2-D9EAC6559FCD.jpeg
    3.4 MB · Views: 10
  • 12CB75D0-0210-4A72-B3D2-69E45A921216.jpeg
    12CB75D0-0210-4A72-B3D2-69E45A921216.jpeg
    1.8 MB · Views: 11
  • F333EAB1-0378-40FA-B0A1-0A923EBDD7AD.jpeg
    F333EAB1-0378-40FA-B0A1-0A923EBDD7AD.jpeg
    787.9 KB · Views: 11
  • C6EE4527-3146-4606-AAC7-22D2B823C291.jpeg
    C6EE4527-3146-4606-AAC7-22D2B823C291.jpeg
    1.9 MB · Views: 11
  • 312FDEE2-BC3B-4A1C-A114-4BF849FF690C.jpeg
    312FDEE2-BC3B-4A1C-A114-4BF849FF690C.jpeg
    1.6 MB · Views: 10
  • image.jpg
    image.jpg
    2.8 MB · Views: 11
Last edited:
Sold.
Making another


13x47 gearing and 123v gets to 50mph before any field weakening.
 

Attachments

  • 4086FE5F-C90F-45ED-A3D9-1A96A9D754B7.jpeg
    4086FE5F-C90F-45ED-A3D9-1A96A9D754B7.jpeg
    431 KB · Views: 8
  • 6F6FAC4D-EF51-4E0D-B53A-78E6FC1BCF25.jpeg
    6F6FAC4D-EF51-4E0D-B53A-78E6FC1BCF25.jpeg
    365.3 KB · Views: 8
  • 295A0100-FE3E-474A-AEAB-155205D3F6BA.jpeg
    295A0100-FE3E-474A-AEAB-155205D3F6BA.jpeg
    2 MB · Views: 8
Last edited:
I think this kind of frame where you are forced to mount to the frame’s upper bar, makes it easier and can just use cinching belts. I had this and the last frame welded adding the two cross bars the belts strap across but I think u don’t need to do that and can orient the straps going perpendicular. Straps can clamp down and hold it as much as need be. If drop the bike it will move. I can move it with a bit of effort. Having the battery solidly held isn’t necessary

Just have to put in plugs but it’s wet n dark so I stare at it.
 

Attachments

  • IMG_9391.jpeg
    IMG_9391.jpeg
    1.7 MB · Views: 13
  • IMG_9392.jpeg
    IMG_9392.jpeg
    2.1 MB · Views: 10
  • IMG_9387.png
    IMG_9387.png
    338.1 KB · Views: 7
  • IMG_9364.jpeg
    IMG_9364.jpeg
    2.1 MB · Views: 6
  • IMG_9363.jpeg
    IMG_9363.jpeg
    2.2 MB · Views: 9
  • IMG_9362.jpeg
    IMG_9362.jpeg
    2.3 MB · Views: 11
  • IMG_9393.jpeg
    IMG_9393.jpeg
    3 MB · Views: 9
Last edited:
That motor position is really bad. When the suspension moves your chain will rub the underside or the upside of the swing arm all the time, the tension on the chain will also vary a lot. You should have the sprocket close to the pivot point of the swing arm, so you have to turn the motor around or flip the rear wheel so you get the chain on the other side.
The closer you get counter sprocket to fit as the gas motor was the better off you'll be
 
Selling another of these in the “for sale” section here. This one is 33s9p lifepo4 and 3shul cl700.
 

Attachments

  • IMG_9426.jpeg
    IMG_9426.jpeg
    1.9 MB · Views: 5
  • IMG_9571.jpeg
    IMG_9571.jpeg
    2 MB · Views: 9
  • IMG_9654.jpeg
    IMG_9654.jpeg
    2.3 MB · Views: 9
  • IMG_9655.jpeg
    IMG_9655.jpeg
    1.8 MB · Views: 9
  • IMG_9753.jpeg
    IMG_9753.jpeg
    1.8 MB · Views: 5
  • IMG_9772.jpeg
    IMG_9772.jpeg
    1.1 MB · Views: 4
  • IMG_9799.jpeg
    IMG_9799.jpeg
    1.6 MB · Views: 5
Back
Top