Hugh-Jassman
1 kW
- Joined
- Jun 20, 2015
- Messages
- 407
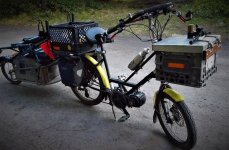
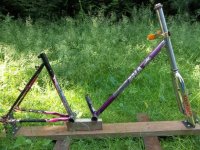
About eight years ago I needed a new utility bicycle [my old mountain bike was worn out] so I did about a years worth of research and measured design work. Then took a summer to file the tubes to fit for welding, and paid a professional welder to stick all the parts together. And took the frame over to the next town to have it powder-coated with baked-on enamel. Then last fall I put a motor on it because my knees are wiped out from arthritis.

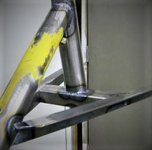
Mounting bracket
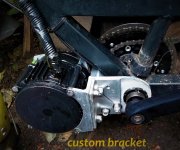
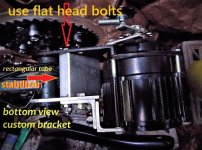
To mount this motor so it would not wobble I just had to have fun making a new bracket. The tube between the flat plates is the thing that holds the whole assembly rigid.
3/16th inch thick 6061 aluminum angle bar and 1 x 3 inch rectangular tube, with flat bar; it all came together just right to stiffen up the bracket arms with no wobble at all. Both of the brackets sides, are held together with 4 inch long [5/16th inch] carriage-head bolts [these really need to be flat head bolts] because the hex heads of the regular bolts didn't give enough room for the chain.
Using a drill press was essential to use the hole-saw for the big hole. I decided it was easier to use a hack saw and files than to keep going to town to get more jig saw blades.
I used Red JB thread locker on the bolts. All bolts should be stainless steel in a wet climate. But maybe varnish could keep the heads of the flat headed bolts from rusting. And of course plenty of grease in the threads.
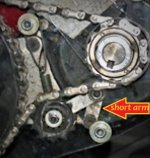
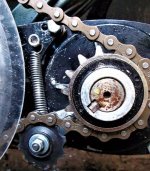
Idler assembly
After having to move the motor over a little to lineup with the chainring, I had to adjust the idler to keep it from grinding against the motor sprockets. And ended up moving the idler arm over a bit. Then later found that I should have used the short arm first before adding the longer arm.
Wire Connectors
I found waterproof aircraft connectors for the hall sensor wires. And used bullet connectors for the phase wire extensions up to the front box. And butt-splice connectors covered with friction tape, to connect pre-soldered XT90 connectors to the CycleAnalyst's shunt [between the battery and the controller].
Triple chainwheel crank
My MTB crank spider is about 3mm [⅛”] between the smallest and middle chain-ring. So I found 11mm ID split-ring lock-washers that are 3.3-3.5mm thick, and had to be bend them back to flat [long handled pliers and vice] to bolt them down with round head 5mm x .80 pitch threads 25mm long. Nylon spacers are a different thickness and can compress, so I had to use steel.
The space between the outer chainwheel [motor-chain driven] and the middle does not need a spacer if using luna's heavy duty “chainwheels” because the heavy duty 40t chainring will not flex like the computer engineered chainrings will.
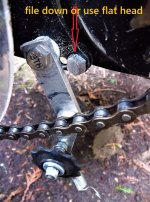
However there is a problem of the chain getting stuck between the sprockets when it jumps off the sprockets. I may need something to prevent that. And the carriage bolts I used to hold the plates together gets in the way of putting the chain back on. So I am going to have to replace them with flat head bolts. Even if they are black rustable steel with varnish on them.
I think I could use regular chainring bolts if I could get them 16mm long, then the 5mm bolts would not be needed. But the chainring bolts interfere with the chain on the 32t chainring. The lock-nuts will not fit under the crank arm. But they do-not rub against anything on the bike side.
These “chainwheels” may not shift as easy as the computer engineered kind but they will last much longer. So I slow down and shift by pedal power only before I start climbing our 16% grade hills drawing about 1400watts from the battery pack.
The sprocket tips are 5mm apart [disc to disc]. But the spacers are 3 to 3.5mm thick. Since the teeth tips are now 5mm apart, maybe the spacers need to be 1.5mm for the sprocket tips to be 3mm apart.
Gear ratios[23” moped tire on 19” motorcycle rim]
These are the gears I use most for hauling a total combined weight of 400-450lbs with a 52 volt battery. I should have bought a 60v pack with 32Ah because I am averaging 43Ah per mile without pedaling. And a larger battery would last longer.
I like using only two gears because shifting the rear gears makes the chain jerk against the sprockets, even if I let go of the throttle and spin the crank to shift before accelerating again.
14T sprocket on the rear gives me a mid gear of 6.59:1 for over all cruising. Then if I shift down to the 32t chainwheel on the crank I get a low gear of 8.25:1....I should get luna's 24t chainwheel for a lower gear of 11:1.....it looks to me like I better not get rid of my cassette, I may need to shift the rear gears once in a while.
If I wanted a single gear ratio I would need a 44t sprocket on the rear with the 14 on the motor. For the 8.25:1 or 32t sprocket for the 11:1 that I would get from using a 24t chainwheel on the crank in place of the 32. unless my math is all wrong.
Would the 72volt difference make up for the lack of a higher gear from 6.6:1 to the 11:1? That would be a lot of extra watts from the battery.
The lowest Mt.Goat granny gear is 20:1 with the 32 on the crank and the 34 on the cassette. That is probably enough to haul 600lbs up a 16% grade, but I have not been able to test the limits because my battery is too small to achieve maximum wattage and still get home.
Tires
If children weigh about 50 to100lbs each? [three children and one over sized adult could easily weigh 600lbs then there are the groceries and the weight of the vehicle] When I build one of these bikes I am going to engineer it for at least 650lbs [On two wheels]; but maybe I really should build a three wheeled vehicle for 750lbs max. That will probably need at least three solid wheels with motorcycle tires, and a larger motor with a very low gear. And I think it may need a belt drive for motor. How strong can spoked wheel be made for such a low gear? Interesting how the trust force goes from the chain to the spokes when using a very low gear. Maybe I could still use a chain drive then? [But not for tractor pulling competition.]
Hauling 550lbs [250kg] on 4 tires will need to handle at only 150lbs each [68kg] but for a bicycle with trailer or even worse a long box bike with only two tires a minimum of 275lbs each that would require larger than 2.25” motorcycle tires I think 2.75” to 3 inch 4ply tires are needed. [never engineer to only the minimum needed] Two 16inch x 2.5” diameter tire on the front and one 17inch x 3D tire on the rear should do it.
I will need a 42t sprocket on the rear cassette with the 32t chainwheel on the front.And the rear derailleur may need a longer hanger.
Single freewheel bearings
my old cheap crank freewheel bearing is rusted up from too much rain so now I need to spend another $120 yeash....but worth the money.
http://sickbikeparts.com/front-freewheel-ultra-heavy-duty/ or this one a little cheaper:
http://sickbikeparts.com/front-freewheel-heavy-duty/ but which is best fro being rainproof?
Warning!
Do Not use a whimpy Bicycle frame rear end like I did. The motor can pull the rear end over and you will have to have the frame straightened like I did. It is much more sensible to build a rear end out of rectangular tubing. Even if you must have it welded rigid to use a mid-drive kit with.
I am now going to have to build a bolt on rear end out of stainless steel rectangular tubes. Like work hardening 304 or 316 stainless steel. No painting needed.
Exploration of possibilities:
https://endless-sphere.com/forums/viewtopic.php?f=1&t=94449
https://endless-sphere.com/forums/viewtopic.php?f=1&t=99337
Mounting bracket
To mount this motor so it would not wobble I just had to have fun making a new bracket. The tube between the flat plates is the thing that holds the whole assembly rigid.
3/16th inch thick 6061 aluminum angle bar and 1 x 3 inch rectangular tube, with flat bar; it all came together just right to stiffen up the bracket arms with no wobble at all. Both of the brackets sides, are held together with 4 inch long [5/16th inch] carriage-head bolts [these really need to be flat head bolts] because the hex heads of the regular bolts didn't give enough room for the chain.
Using a drill press was essential to use the hole-saw for the big hole. I decided it was easier to use a hack saw and files than to keep going to town to get more jig saw blades.
I used Red JB thread locker on the bolts. All bolts should be stainless steel in a wet climate. But maybe varnish could keep the heads of the flat headed bolts from rusting. And of course plenty of grease in the threads.
Idler assembly
After having to move the motor over a little to lineup with the chainring, I had to adjust the idler to keep it from grinding against the motor sprockets. And ended up moving the idler arm over a bit. Then later found that I should have used the short arm first before adding the longer arm.
Wire Connectors
I found waterproof aircraft connectors for the hall sensor wires. And used bullet connectors for the phase wire extensions up to the front box. And butt-splice connectors covered with friction tape, to connect pre-soldered XT90 connectors to the CycleAnalyst's shunt [between the battery and the controller].
Triple chainwheel crank
My MTB crank spider is about 3mm [⅛”] between the smallest and middle chain-ring. So I found 11mm ID split-ring lock-washers that are 3.3-3.5mm thick, and had to be bend them back to flat [long handled pliers and vice] to bolt them down with round head 5mm x .80 pitch threads 25mm long. Nylon spacers are a different thickness and can compress, so I had to use steel.
The space between the outer chainwheel [motor-chain driven] and the middle does not need a spacer if using luna's heavy duty “chainwheels” because the heavy duty 40t chainring will not flex like the computer engineered chainrings will.
However there is a problem of the chain getting stuck between the sprockets when it jumps off the sprockets. I may need something to prevent that. And the carriage bolts I used to hold the plates together gets in the way of putting the chain back on. So I am going to have to replace them with flat head bolts. Even if they are black rustable steel with varnish on them.
I think I could use regular chainring bolts if I could get them 16mm long, then the 5mm bolts would not be needed. But the chainring bolts interfere with the chain on the 32t chainring. The lock-nuts will not fit under the crank arm. But they do-not rub against anything on the bike side.
These “chainwheels” may not shift as easy as the computer engineered kind but they will last much longer. So I slow down and shift by pedal power only before I start climbing our 16% grade hills drawing about 1400watts from the battery pack.
The sprocket tips are 5mm apart [disc to disc]. But the spacers are 3 to 3.5mm thick. Since the teeth tips are now 5mm apart, maybe the spacers need to be 1.5mm for the sprocket tips to be 3mm apart.
Gear ratios[23” moped tire on 19” motorcycle rim]
These are the gears I use most for hauling a total combined weight of 400-450lbs with a 52 volt battery. I should have bought a 60v pack with 32Ah because I am averaging 43Ah per mile without pedaling. And a larger battery would last longer.
I like using only two gears because shifting the rear gears makes the chain jerk against the sprockets, even if I let go of the throttle and spin the crank to shift before accelerating again.
14T sprocket on the rear gives me a mid gear of 6.59:1 for over all cruising. Then if I shift down to the 32t chainwheel on the crank I get a low gear of 8.25:1....I should get luna's 24t chainwheel for a lower gear of 11:1.....it looks to me like I better not get rid of my cassette, I may need to shift the rear gears once in a while.
If I wanted a single gear ratio I would need a 44t sprocket on the rear with the 14 on the motor. For the 8.25:1 or 32t sprocket for the 11:1 that I would get from using a 24t chainwheel on the crank in place of the 32. unless my math is all wrong.
Would the 72volt difference make up for the lack of a higher gear from 6.6:1 to the 11:1? That would be a lot of extra watts from the battery.
The lowest Mt.Goat granny gear is 20:1 with the 32 on the crank and the 34 on the cassette. That is probably enough to haul 600lbs up a 16% grade, but I have not been able to test the limits because my battery is too small to achieve maximum wattage and still get home.
Tires
If children weigh about 50 to100lbs each? [three children and one over sized adult could easily weigh 600lbs then there are the groceries and the weight of the vehicle] When I build one of these bikes I am going to engineer it for at least 650lbs [On two wheels]; but maybe I really should build a three wheeled vehicle for 750lbs max. That will probably need at least three solid wheels with motorcycle tires, and a larger motor with a very low gear. And I think it may need a belt drive for motor. How strong can spoked wheel be made for such a low gear? Interesting how the trust force goes from the chain to the spokes when using a very low gear. Maybe I could still use a chain drive then? [But not for tractor pulling competition.]
Hauling 550lbs [250kg] on 4 tires will need to handle at only 150lbs each [68kg] but for a bicycle with trailer or even worse a long box bike with only two tires a minimum of 275lbs each that would require larger than 2.25” motorcycle tires I think 2.75” to 3 inch 4ply tires are needed. [never engineer to only the minimum needed] Two 16inch x 2.5” diameter tire on the front and one 17inch x 3D tire on the rear should do it.
I will need a 42t sprocket on the rear cassette with the 32t chainwheel on the front.And the rear derailleur may need a longer hanger.
Single freewheel bearings
my old cheap crank freewheel bearing is rusted up from too much rain so now I need to spend another $120 yeash....but worth the money.
http://sickbikeparts.com/front-freewheel-ultra-heavy-duty/ or this one a little cheaper:
http://sickbikeparts.com/front-freewheel-heavy-duty/ but which is best fro being rainproof?
Warning!
Do Not use a whimpy Bicycle frame rear end like I did. The motor can pull the rear end over and you will have to have the frame straightened like I did. It is much more sensible to build a rear end out of rectangular tubing. Even if you must have it welded rigid to use a mid-drive kit with.
I am now going to have to build a bolt on rear end out of stainless steel rectangular tubes. Like work hardening 304 or 316 stainless steel. No painting needed.
Exploration of possibilities:
https://endless-sphere.com/forums/viewtopic.php?f=1&t=94449
https://endless-sphere.com/forums/viewtopic.php?f=1&t=99337
Attachments
-
 MtGoat Cycletruck.JPG200 KB · Views: 6,590
 -
 birth of cycletruck.jpg92.9 KB · Views: 6,589
 -
 front rack.jpg37.4 KB · Views: 6,588
 -
 Bracket mounting.JPG218.8 KB · Views: 6,587
 -
 Breacket mounting bottom view.JPG177.9 KB · Views: 6,587
 -
 new idler assembly finnished.jpg154.6 KB · Views: 6,587
 -
 idler assembly.jpg215.2 KB · Views: 6,587