My design for a 100Ah 7.2V module

MJSfoto1956

10 kW
Joined
Jul 28, 2010
Messages
960
Location
Boston, MA
So I'm starting to design my second battery pack. I'm toying with using Queen Battery QB26800 6800mAh li-ion cells. I've come up with a modular solution that uses a 2s15p layout resulting in a 7.2V 100Ah module. Ten of these modules in series would give me 72V 100Ah, which is my target battery pack size. Nine of these modules will (just barely) fit under my seat. Not sure where the tenth would go but I'm confident that I can find a space somewhere.

Note: I'm leaving a gap between the cells and the outside shell in order to be able to pour liquid phase change material in between. Details below. Comments welcome.
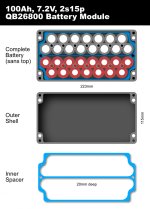
26800 7.2V battery layout.v2.1200.jpg
 
john61ct said:
sorry, 7.2V? what is this for?

Each individual module is 7.2v. Ten of these modules in series would be 72v. This is to be an “upgrade” of my current 50ah battery which powers my eScooter/motorcycle (as shown in my avatar)
 
Aha. So, 15P groups, each with its own balance lead brought out,

a pair of those per box/module

then a BMS to manage one big string at 20S?

Why not design with a smaller number of boxes, or even one big one. That might allow for everything to fit in the one spot.

The idea that 2/20 strings will have a different resistance connection seems sub-optimal, might even be worth going down to 14P to prevent that.

If necessary, a separate "supplementary" 20S1P pack could be paralleled if needed, in that case the longer wires does not matter.
 
john61ct said:
The idea that 2/20 strings will have a different resistance connection seems sub-optimal, might even be worth going down to 14P to prevent that.

If necessary, a separate "supplementary" 20S1P pack could be paralleled if needed, in that case the longer wires does not matter.

Not sure I share your concerns, but I understand where you are coming from. I am in the exploratory stages so things will certainly change. Current plan is to connect each 7.2V module to the next module with seven 10AWG cables, bolted to seven even-spaced, welded M5 bronze nuts to each pure-nickel, water-jet or laser-cut, 1s15p template. Should be able to handle 200A easily.

Something like the following:

26800 battery slice1.jpg

Basic idea is to have total flexibility where the modules go and to be able to replace a defective module as needed. I'm not worried about replacing individual cells. When this pack is done, I'll repurpose it for home energy storage, perhaps reconfiguring it to 200Ah 36V.
 
My point is not the absolute ampacity of the intra-bank wiring,

just the principle that imbalance issues arise a lot quicker when **series'd** modules or their connectors are not precisely matched.

If the "supplementary outboarded" packs are in parallel, each at the same voltage as the "main" one, then 2 or even three unequal sub-packs should present much fewer potential issues.
 
MJSfoto1956 said:
So I'm starting to design my second battery pack. I'm toying with using Queen Battery QB26800 6800mAh li-ion cells. I've come up with a modular solution that uses a 2s15p layout resulting in a 7.2V 100Ah module. Ten of these modules in series would give me 72V 100Ah, which is my target battery pack size. Nine of these modules will (just barely) fit under my seat. Not sure where the tenth would go but I'm confident that I can find a space somewhere.

Note: I'm leaving a gap between the cells and the outside shell in order to be able to pour liquid phase change material in between. Details below. Comments welcome.

I'm interested in how these cells perform.

How are you handling the cooling with liquid phase change material. You said details below but just had pictures. Definitely want to see how you're planning on cooling the cells
 
josephm15234 said:
How are you handling the cooling with liquid phase change material?

I'm only in the exploratory phase at the moment -- i.e. I'm exploring whether or not phase change material is worth it.
Here's one link: http://www.pcmproducts.net/Phase-Change-Material-Solutions.htm
I'll post more later as this is a long-term project likely to take a year or more to complete.

M
 
Back
Top