My Hybrid E-bike project

bart_dood

100 W
Joined
Jun 28, 2009
Messages
106
Hi folks, I'm pretty new to the forum, a bit of background first:

I've been toying with some kind of assisted bike for a long time, going back to when I started working on a folding bicycle with a hybrid gas/electric drive system on it, it was to have a microcontroller controlled 22cc motor and a 500W DC motor working together. I was interested in developing the complex control system to make it all work...
However it got complicated and it had lots of drawbacks, the folding bike was a cheap piece of crap so it would have made a lousy bike, also I would be risking leaking gasoline in my trunk if I folded it up in my car, then there was the issue of bikes with gas engines not being legal to carry onto the local train (BART) system here in the SF bay area.

I have a new job now and a short commute (7.8 miles) across a bridge, in the next month they are opening a new pedestrian and bike lane on the bridge, so it will be possible to walk or ride to work, previously it was impossible.
So with this idea in mind I started thinking about an electric bicycle, I sold my folder and a bunch of other stuff to raise some money and I've been putting together my "new" bike.

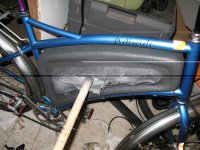
First of all I looked on CL and bought this hybrid Fuji bike for $170, it has a nice comfy riding position and a decent sized frame for my height. I found some of the components needed changing either because they weren't ebike suitable, they were poor quality or they weren't to my taste, this photo is the bike as I bought it, I'll add more photos of my changes.

So far I have a golden motor 750W rear hub motor and a cruise controller. I am about to take delivery of the correct sized spokes to build my hub motor wheel up and add a bike rack to mount my battery pack on, I'm building my own pack and am still doing some research and crunching the numbers on cost etc.

thanks!

Chris
 

Attachments

  • blue fuji hybrid-1.jpg
    509.9 KB · Views: 3,656
Here are some photos of my upgrades.
New shimano crank, single speed, 53 tooth chainring! with octalink V2 BB, new alloy pedals.
New deore front V-brake, much more powerful than the old no brand cheapo one that was on the bike. For my rear brake I'll be using regen.
Put a new seatpin, actually its a high quality old one I had, just needed the right shim to fit!
I finally got my spokes in on friday, so here's a shot of me building my wheel on the sofa, the spokes came in black as thats all they had in the right length, they look nice with the black hub motor.
I got the wheel built up quick as I've done them before, needs a little tuning after I ride it and it settles in.
 

Attachments

  • new crank pedals.jpg
    new crank pedals.jpg
    80.7 KB · Views: 3,965
  • v brake.jpg
    v brake.jpg
    68.9 KB · Views: 3,963
  • new seatpin.jpg
    new seatpin.jpg
    67.1 KB · Views: 3,963
  • wheel building.jpg
    wheel building.jpg
    96.7 KB · Views: 3,962
  • wheel built motor.jpg
    wheel built motor.jpg
    74.7 KB · Views: 3,963
E-bike project continued...

This is what happens when you have kids, 8 month break on my Ebike build, but I'm back on it now. I decided to make a custom box to house the batteries, I was inspired by the swiss guy who did something similar to his cannondale badboy. I started with two pieces of house insulating foam glued together to make a 70mm thick piece, I made a cardboard shape for the polystyrene and then cut out the foam. I used a sander and a dremel to carve the shape, I glued in a wooden post as something to hold the piece with.
I then coated my mold with 3-4 coats of latex paint, this was to create a barrier between the polystyrene and the polyester resin I used with the fiberglass, it only just worked and lasted just long enough for the first layer of resin to start setting. I glassed the whole thing with a few more layers.

Warning to anyone doing something similar!!! if you use any kind of cutting tool or high speed cutter on fiberglass take extreme care to avoid exposure to the tiny (microns) fibers you will release, you can't see or smell them but you will breathe them in, they will also accumulate on your clothes and you'll spread them everywhere. This is the reason I quit my piece when I did, even though I worked outside etc I was not convinced it was safe enough so I stopped, I could have continued to get a real smooth surface but decided it was good enough.

I primed the box and then used a textured rattle can spray to cover it, this hid some of the rough surface finish, it worked really well :)
 

Attachments

  • Mold with latex paint cover.jpg
    Mold with latex paint cover.jpg
    113.5 KB · Views: 956
  • Mold with latex paint cover2.jpg
    Mold with latex paint cover2.jpg
    203.8 KB · Views: 3,631
  • Painted with texture paint.jpg
    Painted with texture paint.jpg
    166.7 KB · Views: 3,631
  • Box in bike location.jpg
    Box in bike location.jpg
    180.7 KB · Views: 3,631
Here's a shot of the housing in place where it will fit in the bike frame.
 

Attachments

  • box in frame.jpg
    box in frame.jpg
    266.6 KB · Views: 3,548
I trimmed the excess fiberglass and now I am pulling out all the polystyrene foam.

I have about 0.8 inches hanging out either side of the bike frame tubing.
 
Here are some updates, epoxied in some plywood pieces to stiffen where the box mounts to the frame. Got my twist throttle installed and got my zippy LIPO batteries in the mail. 44.4v 10Ah total. :)
 

Attachments

  • wood stiffening.jpg
    wood stiffening.jpg
    73.5 KB · Views: 3,281
  • twist throttle.jpg
    twist throttle.jpg
    42 KB · Views: 3,281
  • 4 zippy LIPO.jpg
    4 zippy LIPO.jpg
    68.7 KB · Views: 3,281
  • batteries controller in box.jpg
    batteries controller in box.jpg
    80.3 KB · Views: 3,281
What kind of charger will you be using?
 
More updates, used scrap polystyrene foam blocks hotglued into place to constrain the batteries from bouncing around inside the box. Added cutout for my watts-up meter to be silicon glued in place. Used industrial velcro to hold the controller in place.
I'm using a basic battery charger I got from hobbyking. It does 8S lipos and has an integral BMS, during charging I will have to unplug my deans connectors and put the two pairs in parallel for 6S charging, every 5 or so charges I will unplug and charge each pack individual with the BMS enabled to balance.
 

Attachments

  • polystyrene blocks.jpg
    polystyrene blocks.jpg
    78.6 KB · Views: 3,209
  • controller in place.jpg
    controller in place.jpg
    72 KB · Views: 3,209
Loving the battery box i made one using similar technique
few pics of the one i made might be helpful to others wishing to try one, really very easy...I like the idea of the latex you use, i went with bondo and release agent, i will go with latex next time. The swiss chaps battery housing was also what made me make the decision to opt for fiberglass over custom aluminium housing.

Carving the shape from foam
Cutting and digging out the foam
Primed ready for paint
Finished battery box all mounted on bike

They are extremely light and fiberglass is so simple to work with and almost any shape can be created with your imagination the only limit. Its also extremely cheap! My box cost way less than 100 dollars (not including Paint)

Best of luck with the rest of the build *subscribed*

KiM
 
With my wife and 9mth old out the house I can make some serious progress!
 

Attachments

  • watts up outside.jpg
    watts up outside.jpg
    95.4 KB · Views: 3,164
  • door panel.jpg
    door panel.jpg
    59.7 KB · Views: 3,164
  • power key switch.jpg
    power key switch.jpg
    47.2 KB · Views: 3,164
  • motor wire grommet.jpg
    motor wire grommet.jpg
    82 KB · Views: 3,164
  • throttle wire grommet.jpg
    throttle wire grommet.jpg
    62.9 KB · Views: 3,164
It looks good, do those batteries give off hydrogen when they are being charged? I am only familiar with lead acid batteries. perhaps a breather hole on top to let out any gasses, not sure if its necessary in your case, but charging lead acid batteries in a sealed container is not recomended.
 
Got it done enough to ride, but some teething problems..

Rode 8 miles after putting it all together, but one of my packs has developed a fault, low cell voltage on two of the cells in one pack.

Apart from that the only trouble I had with it was the door being a little loose, needs some more work on the brackets and foam etc to get it tight, I also wired the key switch to the wrong place so it doesn't switch off the controller, I need to move it around, it ran nice until the pack gave out :(
 

Attachments

  • snug fit.jpg
    snug fit.jpg
    87.3 KB · Views: 2,478
  • watts up display.jpg
    watts up display.jpg
    59.5 KB · Views: 2,478
  • with cover on.jpg
    with cover on.jpg
    94.9 KB · Views: 2,478
I'm still having batteries problems and a few other niggles. One of my zippy flightmax lipo packs has 1 really bad cell in it and 1 other cell that is slightly less than optimal. I have bought a 2S pack to cut apart and use the cells to repair the bad zippy. Not looking forward to having to do open heart surgery on the pack to fix it but it's cheaper than buying a whole new pack.
I made some mods to my lid and now it's tight and doesn't rub, I also played around with the foam inserts to tighten things up to prevent things moving around, I have found my controller is getting quite warm, I can put my hand on it but it's quite hot. Would it be ok to run it like this??

I did some tests and found my batteries are totally out of juice at around 18 miles, this includes hills and some headwinds, pedalling lightly as well as electric assist.

My work is 13.5 miles away so this is good in that I can make it there with energy in reserve, but now I need to figure out a decent charging scheme, I am currently working on a custom microcontroller safety system to monitor the temperature of each pack inside the foam protective cover, it will cut the power if one of the packs temperatures spikes. I will post info in the technical forum on this. I want to create a plug and forget charging system and the only way to do this is to monitor the batteries carefully and automatically.

I wish I didn't have to do so much custom work on this charger issue, I would like to start using my bike for at least grocery runs but I still have the pack to fix and then work on improving the charger, at the moment charging is a pain and takes hours.
 
bart_dood said:
I have found my controller is getting quite warm, I can put my hand on it but it's quite hot. Would it be ok to run it like this??
Those things can run really hot. That little controller is incredibly tiny for it's power output. The cooler the better for sure. I would be most concerned about the hot controller in the same small box as the lipo :shock:
A good first step would be a thermal sensor (or two) in the box to a display on your handlebars. This way we could tell exactly how hot that is and if you're entering the dangerous range.
bart_dood said:
I wish I didn't have to do so much custom work on this charger issue, I would like to start using my bike for at least grocery runs but I still have the pack to fix and then work on improving the charger, at the moment charging is a pain and takes hours.

At least with the LiPo you have the potential for fast charging. I'm sure there are some Hobby-City chargers off the shelf that could quick charge but you're in for some serious cash...
 
grindz145 said:
bart_dood said:
I have found my controller is getting quite warm, I can put my hand on it but it's quite hot. Would it be ok to run it like this??
Those things can run really hot. That little controller is incredibly tiny for it's power output. The cooler the better for sure. I would be most concerned about the hot controller in the same small box as the lipo :shock:
A good first step would be a thermal sensor (or two) in the box to a display on your handlebars. This way we could tell exactly how hot that is and if you're entering the dangerous range.
bart_dood said:
I wish I didn't have to do so much custom work on this charger issue, I would like to start using my bike for at least grocery runs but I still have the pack to fix and then work on improving the charger, at the moment charging is a pain and takes hours.

At least with the LiPo you have the potential for fast charging. I'm sure there are some Hobby-City chargers off the shelf that could quick charge but you're in for some serious cash...


I did a 9.25 mile ride today and I added a temp sensor right near the controller (as in on top but not glued ontop), it got to around 44C, ambient was around 26C, so +18C not bad at all. I know from experience mosfets are normally rated to 150C max so they will be fine, I guess the component most vunerable would be electrolytic caps.
 
bart_dood said:
grindz145 said:
bart_dood said:
I have found my controller is getting quite warm, I can put my hand on it but it's quite hot. Would it be ok to run it like this??
Those things can run really hot. That little controller is incredibly tiny for it's power output. The cooler the better for sure. I would be most concerned about the hot controller in the same small box as the lipo :shock:
A good first step would be a thermal sensor (or two) in the box to a display on your handlebars. This way we could tell exactly how hot that is and if you're entering the dangerous range.
bart_dood said:
I wish I didn't have to do so much custom work on this charger issue, I would like to start using my bike for at least grocery runs but I still have the pack to fix and then work on improving the charger, at the moment charging is a pain and takes hours.

At least with the LiPo you have the potential for fast charging. I'm sure there are some Hobby-City chargers off the shelf that could quick charge but you're in for some serious cash...

I did a 9.25 mile ride today and I added a temp sensor right near the controller (as in on top but not glued ontop), it got to around 44C, ambient was around 26C, so +18C not bad at all. I know from experience mosfets are normally rated to 150C max so they will be fine, I guess the component most vunerable would be electrolytic caps.

45C is no big deal with respect to the LiPo. I would worry when you get greater than 60-70, the cells can start to baloon. The controller definitely sounds in good working order.
 
Got my faulty pack fixed and went for a 14.25 mile ride tonight, batteries were charged the night before. Hilly and a tiny amount of wind, used 352 watt-hours total, my cells are very well balanced now, they are within 0.01-0.02 volts and were around 3.75-3.77 volts afterwards.

I am very eager to try my bike out for commuting to work on now, I will do a few more tests to work out any niggles, I have some panniers due in the mail next week so I can take my work clothes etc.

Bike is running great!!! :) :)
 
Killer battery box! I worry a little about that watt meter in the rain though...I put 1/4" lexan over the hole and then attached my turnigy to that. We have a lot of rain here though...

I'm surprised that only 4 zippy packs will fit into that big box. Do you think you could put more in if you tried? Also what sort of texturing did you use on the glass? It looks great!
 
dequinox said:
Killer battery box! I worry a little about that watt meter in the rain though...I put 1/4" lexan over the hole and then attached my turnigy to that. We have a lot of rain here though...

I'm surprised that only 4 zippy packs will fit into that big box. Do you think you could put more in if you tried? Also what sort of texturing did you use on the glass? It looks great!

I might add something to keep water out of the meter; however I don't plan on riding in the rain. The box itself does not have any sealer on the lid; so I'll have to add that too.
I can fit more zippy packs in the box if I want but I planned on 4 for now; this meets my target mileage of getting to work (13.5 miles) on about 70-75% of the charge which means I get long life from my packs.
The paint I used on the outside was a rattle can from Home Depot, if you look for rust-oleum paint it comes in a special textured variety; I chose grey but other colors are available. Its nice because it hides a great deal of the imperfections.
 
Back
Top