• Hello ES! We could use some help to get us past the finish line on building the new knowledgebase for the forum.
    Can you donate? Please see our fundraising page. Thank you!

Ok, I guess I'll post a build, like a good Endless Spherion. Catrike 700 hubdrive.

A-DamW

Regular
Joined
Dec 19, 2019
Messages
718
Location
Idaho county Idaho
Went to bed last night with a plan, woke early and got cranking on this:
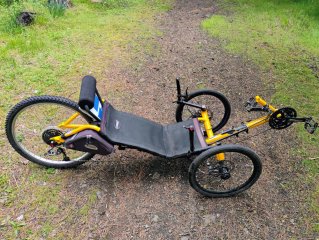
IMG_20250512_113820152_AE.jpg


Eliminated a brake lever by making a single lever dual brake combiner:
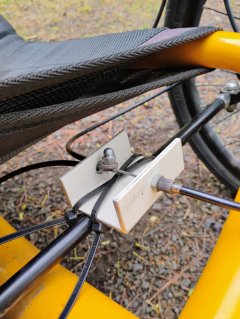
IMG_20250512_113857592_AE.jpg


Looked at some motors, and decided on......
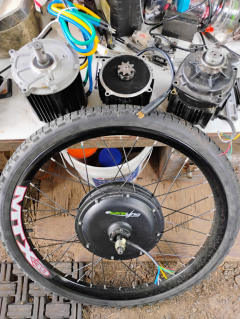
1750738138098.png


The hub motor!, that means we need some homemade clamping torque arms: (and dropout extensions)
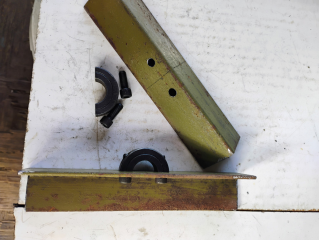
1750738493039.png


Grind some things, (I did not get a final shot of the finished surface, but it is quite flat and true)

1750738720384.png


Ooops!, random cat pic:

1750738885161.png


These are standard 3/4" split clamping collars: (I only used the bottom half)
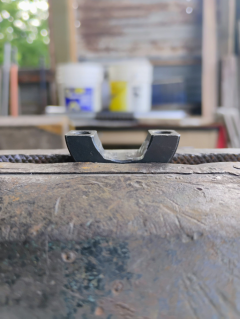
1750738998135.png


Basic concept, let's gooo!

1750739198461.png


Measure, measure, measure, cut, (look at those curly cues, thatsa' sharp drill bit)
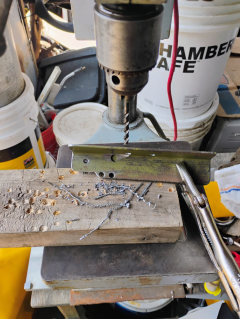
1750739252344.png


Dig through some hardware, mount it up baby!:

1750739451516.png


Left side:

1750739508019.png


Gimmie a sec, gotta take care of something...
Ok, back.


Das beeach is solid AF!:
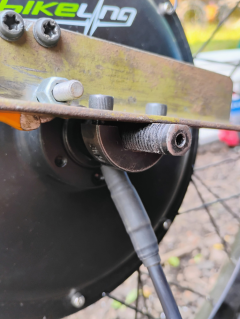
1750740200132.png


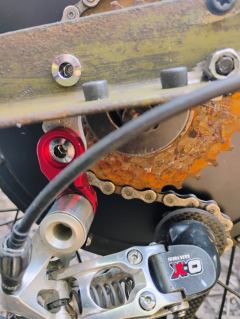
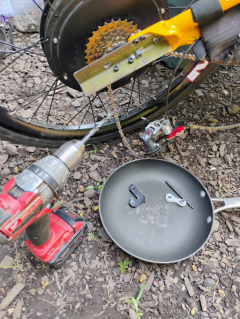
Well, what the poodagget, derailleur needs a home:
1750740343008.png


Ok, that will do:

1750740426164.png


This is what I used to mount the derailleur, two little bits of aluminum that I think were rope binding jigs for a tent,
found in the local dumpster, most of the handmade parts you see here were found in the dumpster.
(Yes, I chamfer all holes, and hand file all surfaces)
Mounted with chainring bolts:

1750740858706.png


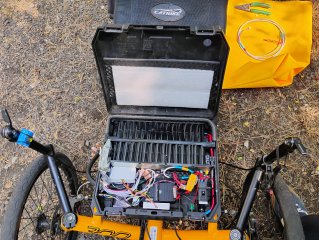
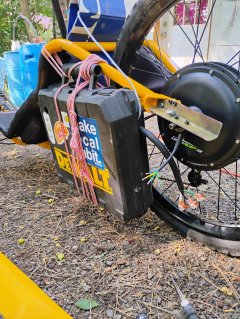
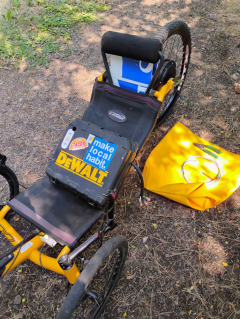
So this is my portable power pack, a DeWalt case (from the dumpster) packed with all the goodies you could hope for!
1750741430931.png


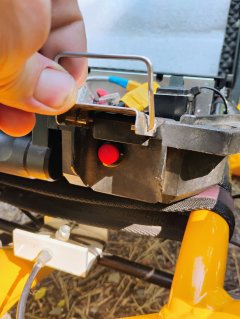
Goodies include, a VESC motor controller(of course!) VESC Express, w/GPS. A nice pre-charge button, (I call it an arming button):
(I will do a writeup soon*)

*hehe
 
Last edited:
That tad looks suspiciously like the one that sold at LH. A major score knowing the price(y), and I pondered, but not really into tads.
 
Damn, that's a nice dropout design. Never seen anything like it.

Is that a 27mm or 30mm wide stator hub?
 
That tad looks suspiciously like the one that sold at LH. A major score knowing the price(y), and I pondered, but not really into tads.
Hey, we might have to have a private conversation about this, hit me up private message if you are willing.
 
WOW. Did you start at 3AM? I know how a good idea can’t sleep. I installed a wireless charger and loud AF horn, yesterday, and that took me 4-5 hours. I had family interactions and cleaned up some wiring, but still.

3/10 needs more cat. :)
 
You did all that in one day? 🤯
Well, technically I started the day before, at least mentally.

But yes, started about 8:00 am, and by 4:00 pm was finished up for a shakedown ride @5pm, (which went very well).
This included all the usual distractions; breakfast, kids, wife, unannounced friend showing up, etc.

I would say I have a solid 4 hours into the mechanical(brake combiner, clamping dropouts).
 
Well, technically I started the day before, at least mentally.
This can take a lot of time, but saves physical headaches. So, it’s absolutely worth the mental effort.

I’m “working” now, to envision my bike’s wiring and how to consolidate it.

Those usual distractions typically derail me and my thought process, so it takes time for me to get back in the head space to tackle whatever I was doing. I naturally have a hard time focusing on my task and get side tracked often.

Awesome job on you staying in that space to accomplish this build. Kudos to you!
 
3/10 needs more cat. :)
IMG_20250503_125022621_HDR_AE
 
It is just a simple a clamping dropout extension, just what I learned from the masters on ES.
Yes, its a very simple. Wonder why i'm so impressed with it. Don't think it has been seen before. Why has no one did this or have they? I want one, No I need it.

Good job very impressed.
 
Yes, its a very simple. Wonder why i'm so impressed with it. Don't think it has been seen before. Why has no one did this or have they? I want one, No I need it.

Good job very impressed.
Thank you.
This is the closest example, partial inspiration for mine:

Mine being simpler, only 4 bolts to remove the wheel.

I aim for simplicity and universality in what I build, it has a compounding effect.
 
Last edited:
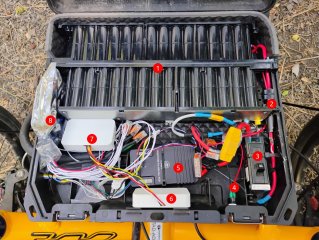
Inside the DeWalt power pack:

IMG_20250623_154637033_HDR_AE.jpg


1. 13s4p ~300wh Sanyo UR18650WX premade pack from BatteryHookup $28 shipped, ancient by today's standards, still cranks out electrons
just fine, ES link: Sanyo UR18650WX
2. 60 amp fuse.
3. 20 amp household breaker.
4. Pre-charge/arming button, concealed under external case latch.
5. Flipsky 75100 Pro from DanGT86 that I fixed: FIXED! Repairing a Flipsky 75100 Pro, Wont connect
6. GPS module connected to the VESC-Express, aimed at top of case for clear view of the sky.
7. VESC-Express, which is an ESP32-C3 and the open source VESC-Express firmware. connected via can-bus.
This thing turns an already awesome motor controller into a powerhouse of connectivity,
we're talking wifi, both as a client or access point,
bluetooth,
LISP scripting and native C libraries,
you can even open a TCP server and have someone program your controller from across the planet
(let's save the security implications for another time)
8. And last, but not least, a tiny JBD bms.
Note that I do not route power through the bms, it is only there for series cell voltage telemetry.
Because why have something else in the power path when the motor controller (VESC, of course!) is perfectly able to
limit, or cutoff power when it is aware of the battery state?: Making bms's VESC compatible

numbered.jpg


Pre-charge/arming button:

IMG_20250623_154702081_HDR_AE.jpg
 
Oh if that's the case you're underpowering it if you don't send at least 1000w continuous into it ( this is right around the efficiency sweet spot for it's more expensive cousin )

1751587008786.png
 
You have enough length in your dropout adapters to punch 4 more holes... then move your rear wheel aft just enough to create a home for your battery behind the seat... maybe? The increased wheelbase will significantly tame handling at speed. Just a wild hair-brained thought.
 
You have enough length in your dropout adapters to punch 4 more holes... then move your rear wheel aft just enough to create a home for your battery behind the seat... maybe? The increased wheelbase will significantly tame handling at speed. Just a wild hair-brained thought.
Thanks for the thoughts.

Multiple factors came into play for axle/battery placement;
1. I wanted the absolute minimum leverage on the trike's aluminum dropouts for durability and longevity.
2. Stopping, even with that heavy hub motor and battery, I can lift the rear wheel in a panic stop, so more aft weight is good.
3. Traction, I use regen alot, and can skid the rear tire on gravel/loose surfaces, so, same as above.
4. Cargo/battery, I will be building a much larger battery pack for range(that won't fit behind the seat), and a large cargo/battery rack over the entire rear end, that will bolt to the trike frame and dropout extensions.

The nice thing about modular/iterative development, things that work well live on, things that don't.......... get reconfigured.:cool:
 
4. Cargo/battery, I will be building a much larger battery pack for range(that won't fit behind the seat), and a large cargo/battery rack over the entire rear end,....

Weight distribution on most tadpole trikes is 66% on the front axle and 33% on the rear axle. On deltas it's just opposite 33f/66r. These numbers are determined at gross weight. Additional weight on the single wheel's contact patch will negatively impact handling - especially at speeds higher than the trike was originally designed for (non-motorized).

The vertical height of the CoM must also be considered. On tadpoles, placing additional mass above rear axle is strongly discouraged. Panniers are sometimes acceptable, providing the bulk of the mass is place as low as possible (preferably below the axle center line).

Use a bathroom scale under each wheel, always keeping the trike level on a level surface.
 
My apologies Adam for being so blunt.

1759096699821.png

Not at all my intent to disrupt or tell you how to build 'your' trike. Just the habitual safety snob that i am,... gets the better of me sometimes ....
 
My apologies Adam for being so blunt.

Not at all my intent to disrupt or tell you how to build 'your' trike. Just the habitual safety snob that i am,... gets the better of me sometimes ....
Hey! no problem whatsoever.

I 100% appreciate your input, I get busy and don't reply right away.

As to CoM, I think I will start with the batteries mounted low and far forward just behind the seat on either side of the wheel.
Check weight distribution, and go see how she handles.

Cheers!
 
Back
Top