
recumpence
1 GW
Hey Guys,
This is a project my 16 year old son and I came up with. He had the idea (I know we are not the first to do this. But, he had no idea anyone else had done it when he asked about it), and I built it. We did a bit of the work together. But, mostly, he watched and asked questions while I answered those questions, applied any of his suggestions that were reasonable, and did the fabricating.
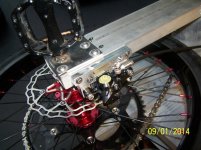
The project started with deciding on a hub. I finally settled on an Oset trials hub. This hub has a very wide axle spacing (very strong) and uses a huge diameter axle. Also, it has two disc brake type flanges. This is for one sprocket and one disc that their trials bike use. That is prefect for this application considering there are no cranks for it as a bicycle would use. I laced up the wheel with one of my proprietary 47mm wide, double wall, aluminum rims.
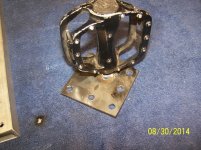
The frame is TIG welded 6061 aluminum. The main spar is 2.5 inch box tube and houses one 6s-8ah Nano-tech pack as well as various wiring. The legs are 1 by 3 inch, 1/8 inch wall tube. The pedals (rotating platforms) could not merely be screwed to the axle. So, they are welded to steel plates and those plates are bolted to the legs of the frame. This allows the wheel to be very easily removed without disturbing the pedals. This whole assembly is very strong.
The motor is an 8 turn Astro Flight 3205. It is light, powerful, and super efficient. We get around 2 hours of screwing around per charge.
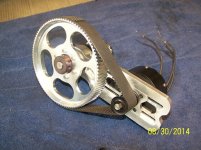
The reduction unit is my stock V4 drive (with an updated main pulley). It is 6 to 1 reduction with a 13 tooth freewheel and a 60 tooth main chainring. The controller is a Castle Creations Edge 160. It uses a Magura throttle with my PWM interface box and an additional potentiometer added to the blue throttle wire to limit throttle end point. This is critical to the ride ability of the Big Stick (B-S for short :wink: ).
The brake is a two piston Hope caliper with a 160mm rotor. I machined the caliper mount on my manual Taig mill. I must say, I am proud of that part. It turned out beautiful--- like jewelry!
There is one additional component on the Stick that I will explain by sharing the first riding impressions.......
We took the BS out for a ride as soon as it was finished. The throttle end point potentiometer was not installed yet, so, it was far too fast. The best we could do was about 10 feet before catastrophic crash would occur... (As a side note, both my son and I are highly experienced unicyclists and I can ride a wheelie on my bicycle for miles and miles. I do circles on the rear wheel and I was a freestyler in my former life. So, we have a leg up on the average person for something like this).
-----Anyway, back to the story------
So, we tried and tried and tried. I then, installed the throttle end point knob. This helped quite a bit. But, it was still very hard to ride. No, that is an understatement. This thing [was] freaking IMPOSSIBLE to ride! However, after thinking about it, I remembered my RC helicopter background (I used to manufacture RC helicopters and upgrade parts) and ran into my workshop to find........YES........A tail gyro. I had a Futaba GY401 heading hold gyro sitting on my work bench from 6 years ago! So, I installed it, along with a servo tester box to send a PWM pulse to the gyro for gain control, to the throttle between my throttle box and the ESC and, BINGO, I had very crude (but effective) augmentation. It took a bit to get used to, but now we set the endpoint know for 30%, put one foot on a pedal, kick off with the other foot and hit the throttle. As you we go forward, we hold the throttle at full (again, with the end point knob set at around 30%) and, as the stock leans forward, we push the bars forward a touch and the gyro gives additional input to the throttle and the stick stands back up. As you lean back, the throttle reduces and this slows the rearward flip over tendency enough to react in time with the brake to get back under control.
It is still quite challenging to ride. Kind of like learning a unicycle for the first time. It is hard, but you get the hang of it. Now I can ride it all the way down my street, turn around, and ride it back. However, I still cannot get both feet on the pedals. I need one leg hanging off for stabilization. But, as I get more and more comfortable on it, I believe I will be able to ride with both feet.
I have not weighted it. But, it is very light for what it is.
Riding video
http://youtu.be/SbWT93VJfuE
Walk around and short ride
https://www.youtube.com/watch?v=xFay8wXT_uk&list=UUFpVVcldY6ASGZkuWRGizEA
Matt
This is a project my 16 year old son and I came up with. He had the idea (I know we are not the first to do this. But, he had no idea anyone else had done it when he asked about it), and I built it. We did a bit of the work together. But, mostly, he watched and asked questions while I answered those questions, applied any of his suggestions that were reasonable, and did the fabricating.
The project started with deciding on a hub. I finally settled on an Oset trials hub. This hub has a very wide axle spacing (very strong) and uses a huge diameter axle. Also, it has two disc brake type flanges. This is for one sprocket and one disc that their trials bike use. That is prefect for this application considering there are no cranks for it as a bicycle would use. I laced up the wheel with one of my proprietary 47mm wide, double wall, aluminum rims.
The frame is TIG welded 6061 aluminum. The main spar is 2.5 inch box tube and houses one 6s-8ah Nano-tech pack as well as various wiring. The legs are 1 by 3 inch, 1/8 inch wall tube. The pedals (rotating platforms) could not merely be screwed to the axle. So, they are welded to steel plates and those plates are bolted to the legs of the frame. This allows the wheel to be very easily removed without disturbing the pedals. This whole assembly is very strong.
The motor is an 8 turn Astro Flight 3205. It is light, powerful, and super efficient. We get around 2 hours of screwing around per charge.
The reduction unit is my stock V4 drive (with an updated main pulley). It is 6 to 1 reduction with a 13 tooth freewheel and a 60 tooth main chainring. The controller is a Castle Creations Edge 160. It uses a Magura throttle with my PWM interface box and an additional potentiometer added to the blue throttle wire to limit throttle end point. This is critical to the ride ability of the Big Stick (B-S for short :wink: ).
The brake is a two piston Hope caliper with a 160mm rotor. I machined the caliper mount on my manual Taig mill. I must say, I am proud of that part. It turned out beautiful--- like jewelry!
There is one additional component on the Stick that I will explain by sharing the first riding impressions.......
We took the BS out for a ride as soon as it was finished. The throttle end point potentiometer was not installed yet, so, it was far too fast. The best we could do was about 10 feet before catastrophic crash would occur... (As a side note, both my son and I are highly experienced unicyclists and I can ride a wheelie on my bicycle for miles and miles. I do circles on the rear wheel and I was a freestyler in my former life. So, we have a leg up on the average person for something like this).
-----Anyway, back to the story------
So, we tried and tried and tried. I then, installed the throttle end point knob. This helped quite a bit. But, it was still very hard to ride. No, that is an understatement. This thing [was] freaking IMPOSSIBLE to ride! However, after thinking about it, I remembered my RC helicopter background (I used to manufacture RC helicopters and upgrade parts) and ran into my workshop to find........YES........A tail gyro. I had a Futaba GY401 heading hold gyro sitting on my work bench from 6 years ago! So, I installed it, along with a servo tester box to send a PWM pulse to the gyro for gain control, to the throttle between my throttle box and the ESC and, BINGO, I had very crude (but effective) augmentation. It took a bit to get used to, but now we set the endpoint know for 30%, put one foot on a pedal, kick off with the other foot and hit the throttle. As you we go forward, we hold the throttle at full (again, with the end point knob set at around 30%) and, as the stock leans forward, we push the bars forward a touch and the gyro gives additional input to the throttle and the stick stands back up. As you lean back, the throttle reduces and this slows the rearward flip over tendency enough to react in time with the brake to get back under control.
It is still quite challenging to ride. Kind of like learning a unicycle for the first time. It is hard, but you get the hang of it. Now I can ride it all the way down my street, turn around, and ride it back. However, I still cannot get both feet on the pedals. I need one leg hanging off for stabilization. But, as I get more and more comfortable on it, I believe I will be able to ride with both feet.
I have not weighted it. But, it is very light for what it is.
Riding video
http://youtu.be/SbWT93VJfuE
Walk around and short ride
https://www.youtube.com/watch?v=xFay8wXT_uk&list=UUFpVVcldY6ASGZkuWRGizEA
Matt
Attachments
-
 frame1.jpg59.4 KB · Views: 2,412
 -
 frame2.jpg73.3 KB · Views: 2,411
 -
 pedal1.jpg103.5 KB · Views: 2,411
 -
 caliper1.jpg98.5 KB · Views: 2,411
 -
 caliper2.jpg71.1 KB · Views: 2,411
 -
 caliper3.jpg74.2 KB · Views: 2,411
 -
 stickdrive1.jpg88.3 KB · Views: 2,411
 -
 stickdrive2.jpg91.8 KB · Views: 2,411
 -
 stickdrive3.jpg82.6 KB · Views: 2,412
 -
 stick1.jpg66.2 KB · Views: 2,412
 -
 stick2.jpg63 KB · Views: 2,412


