RC Mid drive project - trial/freeride style

Ok so I sketched things out in solidworks and realised the rim mounted sprocket will be quite difficult. The sprocket diameter isn't going to be as close to the rim diameter as I thought.

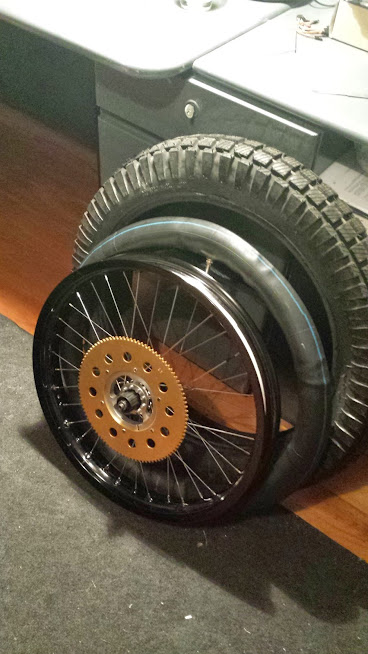
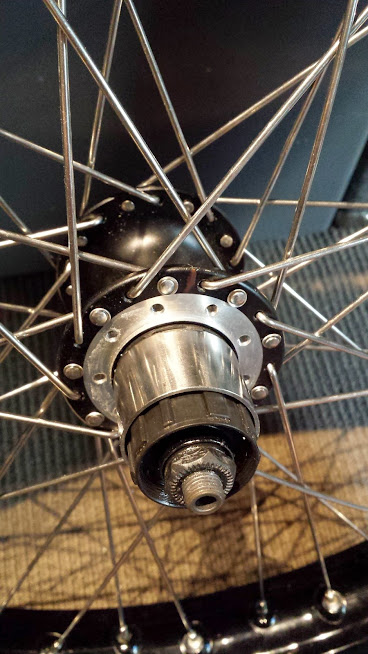
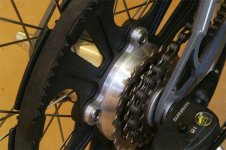
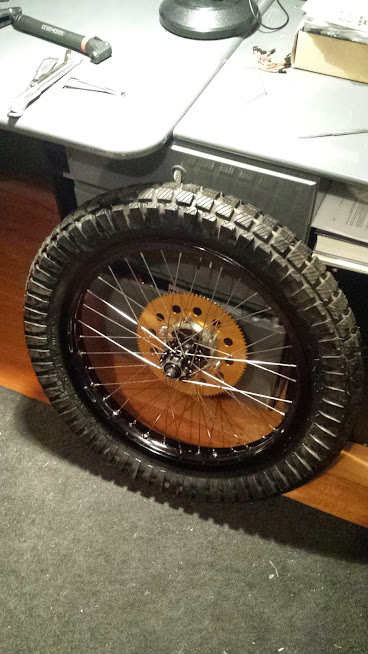
So instead it will be a hub mounted sprocket, just need to find a candidate for a hub that has a surface that I can drill through and bolt the sprocket on. Something along the lines of this photo

nuvinci.jpg

The internally geared hubs seem to lend themselves to this sort of design so that's where I'm focusing my search now. Open to suggestions and examples of this being done. Has to have a disk brake mount and preferably a good solid axle.

NuVinci CVT hubs look good just a bit heavy at 2.45kg for the n360 or 3.85kg for the n171. Or perhaps that much additional unsprung weight wont make too difference to the handling..?
 
at 2kg you start´to feel the additional weight, especially in corners. A lightweight hub is desirable.
Plus: The heavier the rim, the more likely you will damage your rim when driving over an obstacle. I damaged 2 rims since i tried to go offroad with a 4.2kg BPM hub in a 24" rim :oops:
 
Struggling to find a lightweight hub that has a decent surface to bolt a sprocket on to.

This got me wondering, how much would the case of a small hub motor weigh.. Because something like this would be very easy for mounting the sprocket and shouldn't be too heavy (after stripping out the stator and any gearing). And might be able to buy a blown motor for a cheap price.

Capture.PNG

Capture2.jpg

I dont mind having fixed speed for pedaling, just need to have it geared so I can pedal up to 50km/h or so
 
50kph is already pushing it, you will need 52T front and 12T rear, which both isn't easy to mount. On the Hub you will need a special freewheel sprocket, at the BB you may get clearance issues with you frame. 48T/11T is what fits most BBs.

The empty hub will be at ~900g without motor. The ring gear can't be taken out so easily, it's quite heavy.
 
Turns out there's a sale on the old NuVinci n171 development kit for only $125 USD.. Seems too good to miss.

I've been emailing the guy who has quoted shipping from USA to New Zealand at $105 USD for USPS Priority which kills the deal to some extent.

Its a 15lb package and the guy knows of no cheaper options.

There must be some cheaper options?

I'm not worried if it takes 3-4 weeks to arrive
 
Here is a preview of some sweet solidworks design on the way.

Unfortunately I cant take the credit for much of this work, I came across a very good solidworks model of the Giant DH Comp hosted at GrabCad..

https://grabcad.com/library/bicycle-frame-giant-dh-comp-2004

A huge thanks to Mr SG for making this freely available.

Also a few other various bits and pieces I used are from that website.

Anyway, here's the goods.

1.png
2.png
3.png

Ps. This is with 3.0x18" moto tyres
 
It seems the custom made dropout will be tricky to get a perfect fit so I am hoping to print the parts on a 3D printer before CNC machineing them so that I can check the fit first.

Dropout Fitting.png
 
How about the Sturmey archer rear drum brake hubs, available with or without an internal gear setup, single speed or cassette version, they have a nice flange you could mount to?

This picture is the x-rdc version for a cassette.

http://i253.photobucket.com/albums/hh70/thebikesmith/HUBS/SRURMEY%20ARCHER/X-RDC/STURMEYARCHERX-RDCCASM.jpg
 
Thanks Tench, that does look like a good option except that I have already brought the NuVinci N171.. Brought it when it was on sale for $125 USD.
I know it is a pretty heavy hub but compared to my current hub motored bike it should feel much lighter rear wheel unsprung weight.

PS. just checked out your project threads. That is some amazing build quality!
 
Progress has been slow as I havent had much time to work on this project. Over the last few months I've been chipping away at building this fibreglass battery enclosure. It's molded around the bike frame so fits perfectly, held on by four hose clamps.

20140602_121822.png

20140607_191439.png

View attachment 5

20141102_1529012.png

20141102_152407.png

20141102_1521522.png
 
Hi Stielz,

Good to see another Kiwi working on an exciting project. I'm just down the road in Otaki, and I am building something vaguely similar (although I have lost the pedals along the way.. not sure that was a good idea, but committed to it now).

Here's my build thread: http://endless-sphere.com/forums/viewtopic.php?f=28&t=58313

If you need anything machined or welded for your project, give me a shout.. I have lathes, milling machine, MIG & TIG welding etc.

Good luck with the project.
Dave R
 
Hi Dave,

Thanks for the offer! I'll keep that in mind.

Always good to see a similar project, looks like you'll be finished before me so I'll be keen to see how yours goes. I think you'll be fine without the pedals, with high power e-bikes they're really just for appearances :D

Cheers,
Alex
 
Just a side note - some video of my electric skateboard in action

[youtube]6cU8Hk9fzdA[/youtube]

This video was taken just moments before one of the ESCs malfunctioned in a major way. It had been running flawlessly for nearly a year however after I pull over at the end of this run and shut off the camera, smoke starts pouring out from the enclosure on the underside of the skateboard. Seems like the ESC turned on all FETs or something and just completely destroyed itself:

20141109_182411.png
 
So the idea is to mount the motor in the swingarm, to do this I needed to extent the rear wheel back to allow space for the motor. I designed these extensions using Solid Works, had them milled out of 16mm thick aluminium with a CNC milling machine. Really pleased to get a perfect fit. Both the extensions slot into the through axle dropout. The brake side extension bolts on to the two brake caliper holes whereas the chain side extension needed an additional hole to be drilled and threaded.

Stress analysis - Hopefully its strong enough..
Dropout%2B-%2BDrive%2Bside-Study%2B2-Strain-Strain1.jpg


Brake side extension
20141008_191014.jpg


Chain side extension
20141008_191025.jpg


Slot for accessing the dropout's axle clamping bolts
20141008_191123.jpg


Use the trusty eye-ometer to get the two parts level
20141008_191838.jpg
 
Put together my rear wheel over the last few weeks. Went with a 19" moto rim and 3.5x19" tyre, no difficulties getting it to fit in the swingarm but may have made things a bit trickier getting the two chains past.. Think I'll just need to make some chain guides.

I got some washers and using a punch and die, made them into coned washers. These allow me to use bicycle spokes with the moto rim.
20140823_132534.jpg


Lacing the wheel.
20140823_134822.jpg


Putting it all together.
20141015_204911.jpg


Finished wheel.
20141015_212211.jpg


Here is how the motor sprocket bolts on to the hub. Notice the spacer for the cassette, the motor sprocket takes up the space of the first 6 pedal sprockets leaving three gears for the pedal chain.
20141208_191246.jpg
 
Yep, had to space the motor sprocket out from the hub to get the chain past that wide wheel. I'm not too bothered about only having 3 gears, if its anything like my current e-bike I'll just put it in the highest gear and leave it
 
Excelent choice on components so far. I am really looking forward to seeing how you mount the motor. I wont go this route further but would like to design a frame from a scratch.

But till then it is still a long way...atm i still have trouble to get my motor run flawlessly at low rpm and high torque (wanna use the rotomax 150cc with kelly kbs-x controller which does only 16khz PWM). So good luck with yours!

I really like the suspension geometry of your frame. It reminds me of the one used in my enduro motorcycle (Suzuki drz 400). Could you be so nice to post a close up of the right side of your suspension system?
 
I found out something interesting over the weekend.. I mentioned earlier that I only have space for 3 sprockets on the cassette for the pedaling chain so I had the top three gears, 6,7,8.

After having quick ride on it with only having the top 3 gears (hard work as you could imagine) I had a thought, what happens if you skip a sprocket on the cassette? will it still change gears ok? As it turns out, yes it does :D

Now I have sprockets 4,6,8 installed so I still have a reasonable range of gearing, just has bigger steps between the gears

2015%2B-%2B1


Also, finally got some hot weather so was able to get the enclosure painted. I used 3 coats of clear coat so hopefully it wont scratch off too easily

2015%2B-%2B1
 
Stielz said:
I had a thought, what happens if you skip a sprocket on the cassette? will it still change gears ok? As it turns out, yes it does :D

Now I have sprockets 4,6,8 installed so I still have a reasonable range of gearing, just has bigger steps between the gears

Yes, I did the same.... :)
 

Attachments

  • eMoulton-hub-800-px.jpg
    eMoulton-hub-800-px.jpg
    74.4 KB · Views: 3,074
Stielz said:
Here is how the motor sprocket bolts on to the hub. Notice the spacer for the cassette, the motor sprocket takes up the space of the first 6 pedal sprockets leaving three gears for the pedal chain.
20141208_191246.jpg

Can you give more details about connecting the motor sprocket to the hub?
Did you machine, drill and tap the hub shell?

Thanks,
Avner.
 
once you send any significant motor power through the freehub it will soon break..
(first the engagement pawls then next the freehub mount bolt..)
bicycle freehub is not designed to handle motor power..
 
efMX Trials Electric Freeride said:
once you send any significant motor power through the freehub it will soon break..
(first the engagement pawls then next the freehub mount bolt..)
bicycle freehub is not designed to handle motor power..
Look closer :)
I like this design
 
Back
Top