hie2kolob
10 W
After five BBS02 conversions over a period of eighteen months I have finally come up with what I believe to be a suitable and somewhat stealthy way to carry a LIPO battery pack on my bike. At $175.00 this battery pack also happens to be the “best bang for your buck!”
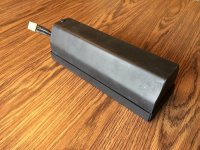
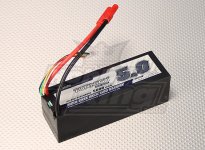
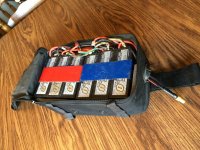
This 10AH battery pack is made using six 5000mAh 4S1P hard case LIPO packs from Hobby King. By placing four batteries as a base and stacking two batteries on top a nice angular configuration can be made.
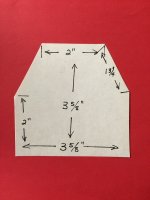
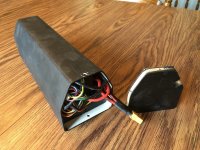
But what material would best be used for the enclosure? I thought about bending aluminum or possibly sewing something out of canvas or maybe Kydex or some other kind of plastic. But in the end I decided to try remolding PVC pipe. A mold was made by cutting a wood block to the desired size. After measuring the perimeter of the block I found the size to be close to the circumference of a 4” PVC drain pipe. Be aware that this is the thin walled stuff that is used for drainage not the schedule 40 high-pressure PVC.
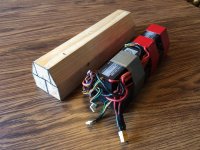
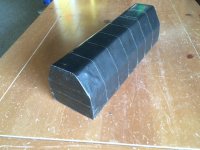
I preheated the oven to 350 degrees Fahrenheit and placed a 14” length of 4” thin walled PVC pipe on a cookie sheet. (Note: this is best done when the wife is out shopping and it is a good idea to open any nearby windows as PVC can release toxic fumes when heated.) When the oven reached temperature I warmed the PVC pipe for only three to three and a half minutes. Then wearing leather gloves I transformed the PVC pipe by pushing it over the wood block mold. In order to make this process easier I rounded off the sharp edges on one end of the block. After allowing the PVC to cool it was removed from the wood mold by placing the bottom edge of the PVC against the edge of a table and tapping the center of the wood block with a hammer.

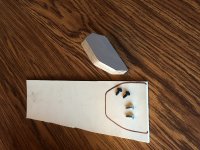
Next the end caps. I wanted one end to be solid and immovable so I took a scrap of 6” schedule 40 PVC pipe and cut it lengthwise so when it was heated in the oven it would lay flat. After five to six minutes in the oven at 350 degrees it was laid on a flat surface and a cookie sheet was placed on top of it with some weight. When it was cool I traced the shape of the molded PVC case on the thicker piece of flat PVC. This was cut out and attached using PVC primer and glue to weld it into place. Since the other end cap needs to be removable for servicing and balancing it was cut from ½ plywood. The plywood end cap was then drilled with a ½ inch bit to accommodate the battery cable and two smaller holes drilled on the top and the bottom for nylon pins to hold the end cap in place. The two nylon pins were purchased from an automotive store. These are the type of pins that are used to hold the automotive plastic upholstery in place.
Can PVC be painted? Yes, but it needs to be prepped using acetone. Before painting apply a little acetone by rag. This will temporarily soften the PVC and allow the paint to be embedded in the plastic.
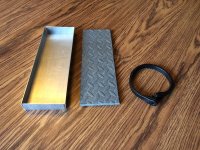
Now how to connect this thin PVC battery case to a bike frame in a way where it won’t be shattered apart in rough road conditions? This can be achieved by constructing a lightweight mount using sheet aluminum. This was made with the aid of a local aluminum siding contractor. The sheet aluminum can be purchased for around $5 and the sheet metal shop allowed me free access to their metal brake to bend the one-inch sides. The sheet metal was then attached to the frame by drilling two holes and screwing it to the water bottle mounts.
A thin layer of foam rubber is placed in the sheet metal mount before inserting the molded battery pack in order to absorb shock. Finally the battery pack is held in place using a single 15” rubber bungee cord that is bolted eyelet to eyelet after the S hooks have been removed. The bungee cord is wrapped around the bike frame, the mount and the battery pack.
Approx. total cost of the 10Ah pack:
$150.00 6 – 5000mAh 4S1P hard pack Hobby King batteries
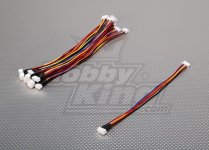
$5.00 wire and connectors from Hobby King
$2.00 wood mold made from 6”x 6”x18”
$1.50 4”pipe 24” long thin wall drain PVC
.50 6” pipe 5” long scrap schedule 40 PVC
$5.00 6 ¼” x 14 3/4” sheet aluminum
.50 2 – 5mm counter sunk screws
.80 2 – nylon auto pins
$2.00 15” bungee
$175.00 Total with Shipping
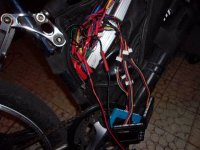
As you can see there is also a lightweight aluminum Schwinn rack mounted to the seat post that can carry another 20AH pack if required. This rack can be purchased at Walmart for $15.00 and the canvas battery case was acquired on eBay for around $10 with shipping.
http://www.walmart.com/ip/Schwinn-Deluxe-Alloy-Rear-Rack/17248454
http://www.ebay.com/itm/SALE-E-Bike-Battery-Case-Nylon-Bag-Wilderness-Energy-Electric-Bike-Kit-eBike-/301854955371?hash=item4647f5176b
Trek Full Suspension Fuel with a total of 30AH. It is not recommended that any more that 10AH be carried on the back rack when biking off road. The weight may fracture the bike frame at the seat post or break the bike rack.

Cannondale SL1 Trail 10AH
View attachment 2

This 10AH battery pack is made using six 5000mAh 4S1P hard case LIPO packs from Hobby King. By placing four batteries as a base and stacking two batteries on top a nice angular configuration can be made.
But what material would best be used for the enclosure? I thought about bending aluminum or possibly sewing something out of canvas or maybe Kydex or some other kind of plastic. But in the end I decided to try remolding PVC pipe. A mold was made by cutting a wood block to the desired size. After measuring the perimeter of the block I found the size to be close to the circumference of a 4” PVC drain pipe. Be aware that this is the thin walled stuff that is used for drainage not the schedule 40 high-pressure PVC.

I preheated the oven to 350 degrees Fahrenheit and placed a 14” length of 4” thin walled PVC pipe on a cookie sheet. (Note: this is best done when the wife is out shopping and it is a good idea to open any nearby windows as PVC can release toxic fumes when heated.) When the oven reached temperature I warmed the PVC pipe for only three to three and a half minutes. Then wearing leather gloves I transformed the PVC pipe by pushing it over the wood block mold. In order to make this process easier I rounded off the sharp edges on one end of the block. After allowing the PVC to cool it was removed from the wood mold by placing the bottom edge of the PVC against the edge of a table and tapping the center of the wood block with a hammer.

Next the end caps. I wanted one end to be solid and immovable so I took a scrap of 6” schedule 40 PVC pipe and cut it lengthwise so when it was heated in the oven it would lay flat. After five to six minutes in the oven at 350 degrees it was laid on a flat surface and a cookie sheet was placed on top of it with some weight. When it was cool I traced the shape of the molded PVC case on the thicker piece of flat PVC. This was cut out and attached using PVC primer and glue to weld it into place. Since the other end cap needs to be removable for servicing and balancing it was cut from ½ plywood. The plywood end cap was then drilled with a ½ inch bit to accommodate the battery cable and two smaller holes drilled on the top and the bottom for nylon pins to hold the end cap in place. The two nylon pins were purchased from an automotive store. These are the type of pins that are used to hold the automotive plastic upholstery in place.

Can PVC be painted? Yes, but it needs to be prepped using acetone. Before painting apply a little acetone by rag. This will temporarily soften the PVC and allow the paint to be embedded in the plastic.

Now how to connect this thin PVC battery case to a bike frame in a way where it won’t be shattered apart in rough road conditions? This can be achieved by constructing a lightweight mount using sheet aluminum. This was made with the aid of a local aluminum siding contractor. The sheet aluminum can be purchased for around $5 and the sheet metal shop allowed me free access to their metal brake to bend the one-inch sides. The sheet metal was then attached to the frame by drilling two holes and screwing it to the water bottle mounts.
A thin layer of foam rubber is placed in the sheet metal mount before inserting the molded battery pack in order to absorb shock. Finally the battery pack is held in place using a single 15” rubber bungee cord that is bolted eyelet to eyelet after the S hooks have been removed. The bungee cord is wrapped around the bike frame, the mount and the battery pack.

Approx. total cost of the 10Ah pack:
$150.00 6 – 5000mAh 4S1P hard pack Hobby King batteries
$5.00 wire and connectors from Hobby King
$2.00 wood mold made from 6”x 6”x18”
$1.50 4”pipe 24” long thin wall drain PVC
.50 6” pipe 5” long scrap schedule 40 PVC
$5.00 6 ¼” x 14 3/4” sheet aluminum
.50 2 – 5mm counter sunk screws
.80 2 – nylon auto pins
$2.00 15” bungee
$175.00 Total with Shipping
As you can see there is also a lightweight aluminum Schwinn rack mounted to the seat post that can carry another 20AH pack if required. This rack can be purchased at Walmart for $15.00 and the canvas battery case was acquired on eBay for around $10 with shipping.
http://www.walmart.com/ip/Schwinn-Deluxe-Alloy-Rear-Rack/17248454
http://www.ebay.com/itm/SALE-E-Bike-Battery-Case-Nylon-Bag-Wilderness-Energy-Electric-Bike-Kit-eBike-/301854955371?hash=item4647f5176b

Trek Full Suspension Fuel with a total of 30AH. It is not recommended that any more that 10AH be carried on the back rack when biking off road. The weight may fracture the bike frame at the seat post or break the bike rack.

Cannondale SL1 Trail 10AH
View attachment 2


