Yet Another Laptop Battery Pack Build!

Great, capacity looks good so far.
If it was charged to 11.6v that is about 60-70% full, this cell could probably deliver 1500+mAh at this small C-rate.
Since you have an amp meter now, you should make some internal resistance measurements. Measure voltage under no load, then measure voltage drop under different (0.2C, 0.5C, 1C, 2C) loads. You should make these measurements at aprox 50% DOD, or about 3.8v/cell.
Keep posting the test data, thanks...
 
SamTexas said:
This is the first time I've seen prismatic lithium cell in a laptop pack. Do you know what chemistry it is? Li-Cobalt, Li-Phosphate or Li-Manganese. Or may be something else?

BTW the entire line of apple laptops has lithium polymer cells in pouch format.
There are others. Most likely you will see it in laptops that are designed with weight and size in mind. tablets, etc.
 
Oh yeah, stanz. You just scored yourself some dirt cheap lico.

You should treat them the same way we would treat hobbyking lipo.
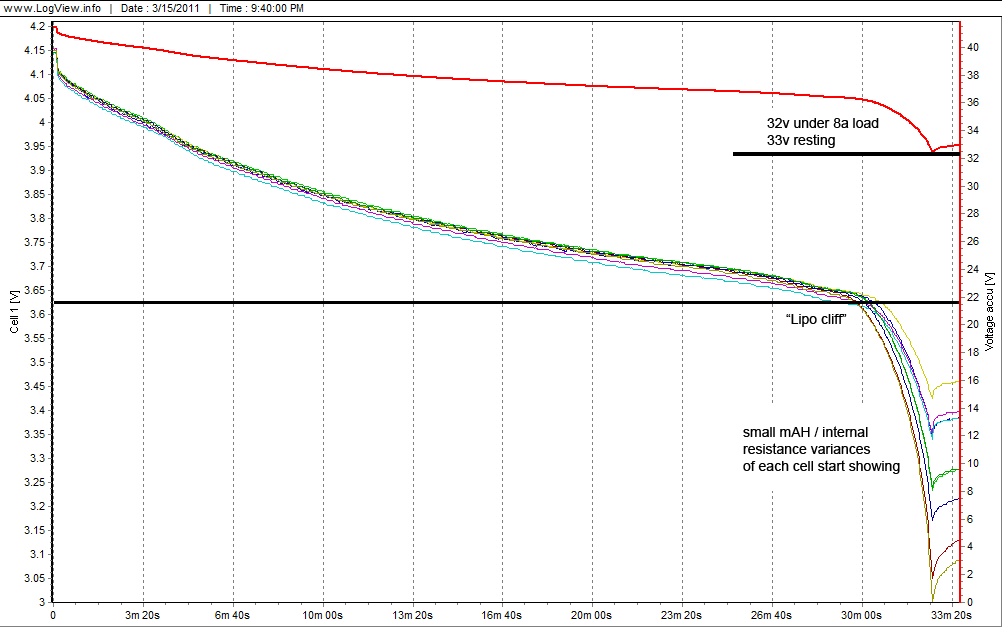
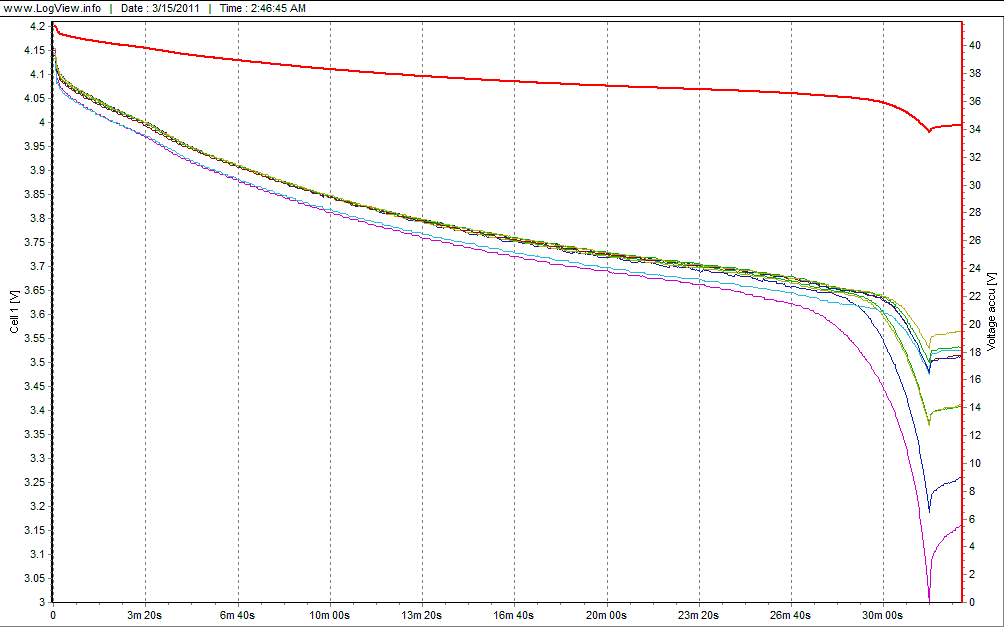
Discharge graph looks almost exactly like hobbyking lipo ( and many other low-end lipo brands ).
Same upper and lower voltages.
They seem to dive at 3.55v which is identical to how hobbyking lipo performs.
They are just as dangerous too so the same lipo precautions apply.

That's going to be a pain in the ass to put together though. Make sure you sort the duds from the studs before you assemble the pack for sure. Do you have a balancing charger or other equipment to do so? with something like an iCharger 1010b+ you could do 10 cells simultaneously, and get graphs like this:

24_dischargingmechanics.gif


lipodisbalance.gif


If you're going 36v you could also use this charger for daily charging and the occasional balance charge.

Those cells will do 1C but it looks like they sag A LOT from the factory. Consider that they are old too, you should consider them 0.5C and put together a 40ah pack.

just my four cents.
 
If it ever stops raining here AND I get my watt meter from Hobby King I plan on testing my eBike to see what kind of current draw I peak at and for how long. The cells are rated for 2C peak for 30 seconds but 1C constant. If I use half those numbers I should preserve the cells.

Oh CRAP, I just got my first Hobby King order in and realized I ordered the wrong parts! I wanted the charge balancers but ordered the BM-6 Cell Voltage monitors! Oh well, those will be useful too, now for another order or maybe a different system ...
 
The battery was charged to 12.15V or 4.05V per cell, nearly perfect for my thoughts.

I created a new load using two bulbs in parallel that measured out to .965 amps so I gotta watch the pack closely!

I'm looking at the following monitor/balancer since it got decent reviews on ES AND it's in my price range. I can't afford a $200 charger/balancer setup.

http://cgi.ebay.com/Dual-Meter-Voltage-Watt-Meter-Checker-2-6s-bal-x1-/120713416033?pt=Radio_Control_Parts_Accessories&hash=item1c1b148d61

EDIT: 2 hours 10 minutes into the test, 10.76V and all cells within .01V of each other, OUTSTANDING!

EDIT #2: 2 hours 45 minutes into the test and voltage was fine so I went out to mow the lawn DOH!

The IBM BMS shut the pack down sometime after my 2.75aH check. One of the cells dropped down to 3.17V so the BMS shut the pack down. NICE safety measure, much better than me hanging around. Unfortunately I don't know exactly how many amp hours the pack delivered except that it was more than 2.75aH.

If this BMS works this good I may just use it in the final pack design, it saved my cells! Oh, and it's "free" since each battery has it built in.

The battery is charging for the third cycle. I won't have time to test it again until tomorrow.

I'm going to see if I can measure the internal resistance of the cells. I will only be able to do it in pairs but it will give us an idea as to their health.
 
Do you have the amp meter connected permanently during discharge?
You should have it that way, so that the shunt resistance is added to the load, and not removed after reading, and this way you can read all the way and note the voltage AND the amp reading from time to time as the amp is slowly decreasing with voltage. This could give a pretty accurate figure, and you can later do a draft integration, just what the wattmeter does :D

Could you please do some internal resistance measurements after some charging? This tells us a lot about cell health...

I don't know too much about that balancer, I see it's only 6S, but you can definitely buy a charger for less than $200. It would be nice a 10s if you are going to make a 36v battery, but those tend to be more expensive. I'd get a 6S or 8S one, and split the pack in two and charge them in parallelel. This is what I am doing at the moment with my battery, but for a 1Kwh pack I will get a more powerful one, as mine is only 50w at the moment. HobbyKing has good prices on them, but you need to consider shipment price as well.
This looks good on specs, but not so on the reviews(6s, 200w, $40): http://www.hobbyking.com/hobbyking/store/uh_viewItem.asp?idProduct=12105
 
kZs0lt said:
Do you have the amp meter connected permanently during discharge?

No, sorry, not very easy to do, plus these are not meant to be 100% accurate, I'll get better readings when my watt meter arrives.

kZs0lt said:
Could you please do some internal resistance measurements after some charging? This tells us a lot about cell health...

Done: I used (Battery voltage - Cell voltage) / resistance = cell resistance

At .25 amp draw they all came to 30.28
At .70 amp draw it was 10.63, 10.64, 10.64
At .95 amp draw it was 3.73, 3.71, 3.72

All readings were done with the BMS in place I don't know if that matters, I assume it has some sort of impact.

Somebody tell me if that's good or not, I have no clue on Lico cells!

edit: Some quick research tells me that Lithium Cobalt cells have higher internal resistance than lipo cells.
 
I'm not sure how to interpret this data.
DC resistance is voltage/current. Cells internal resistance is voltage drop divided by current under load.
If for ex. no load voltage of the battery is 11.60v and it drops to 11.50v under a 0.25A load, then the IR of the battery is (11.6-11.5)/0.25 = 0.1/0.25 = 0.4 Ohms, or 400mOhm. Similarly if under 1A the voltage drops 0.4v, then IR = 400mOhm.

The industry usually uses instead of DC resistance the AC impedance which is measured at 1KHz in a similar way. The 2 measurements give different results, the AC impedance is a better characteristic of the battery, but DC resistance is a good indicator and easier to measure.

Have you noted cell voltages at end of discharge to see the imbalance? One was down to 3.17, what about the other two cells?
 
kZs0lt said:
I'm not sure how to interpret this data.

Neither was I, I followed a post on another forum site.

OK, I did the same test with each cell at 3.94V with a .46 amp load, they ALL registered 3.89 under load or .109

kZs0lt said:
Have you noted cell voltages at end of discharge to see the imbalance? One was down to 3.17, what about the other two cells?

Yes, I noted all three cells after the over discharge, the voltages were 3.17, 3.22, 3.39.

Obviously if you were going to discharge to this level you would need to bottom balance the cells, or simply not discharge them this far down. Before the big drop off at the end all cells were withing .01 volts of each other.
 
Well, what's it mean, Stan?

So far as I can tell the Zombie Battery Pack idea is OK, not perfect, but OK.

Two charge/discharge cycles after sitting at 0V for who knows how long and the cells can still deliver a decent punch. Each cell is delivering at least 1.375 aH compared to the new cells delivering 1.8aH. That's 76% of original capacity for $0.33 per cell or around 6 cents per watt hour.

The built-in BMS protected the cells well enough that I've decided to keep it. I left the battery to die and the BMS stopped it before it could happen. I've tried to overcharge the batteries by leaving a 16V source plugged into them for hours and it won't let that happen either.

They charge to 4.1V and stay there, the BMS won't let them dip below 3.1V so they're protected.

Until I get my watt meter I'm done testing for a while. I may just start charging the batteries I need and building a pack.
 
great to hear. If I see a similar deal I'd like to pick it up.
 
No major progress on the pack, too many personal/work issues to take care of. Here's what's happened since the last installment:

I sold off the 30 "extra" batteries, they landed in Romania today.

I finally got the rest of them unpacked and recycled all of the waste cardboard.

10 out of 30 batteries have been removed from the plastic cases, as carefully as I could. They're held in with sticky, sticky tape on one side.

I've decided to use all 30 in my pack, I know it's overkill but it will keep the C rate down and I won't need to drain the pack much on my short commute.

I originally planned to build a small 12V pack for lights but I purchased a 36V to 12V converter so I can run everything from the pack.

The pack will consist of 3 groups of 9 battery modules plus one 18p cluster to get to 37V nominal voltage. Each battery module is the current configuration as shipped by IBM with integrated BMS. They are 3s2p so my cell protection goes down to one pair instead of the usual pack design that protects a large string of parallel cells. Yes, the added BMS boards will add weight but since these are NOS cells I thought the added protection layer was important.

The total capacity is theoretically 32.4ah, since my peak drain has been 21 amps I'm going to be drawing .62C. I don't expect 32.4ah but I'm using it as a guideline for current draw in an effort to conserve the cells.
 
Got the surplus 30 packs yesterday.
I have charged up a pack to 4.1v / cell, but dunno exactly how much went in, because I found the RC charger with connection error, but cells were at 4.07v.
Unfortunately I have already shorted a pack and 4 cells fused, there is a small fuse inside the grey cap on the (-) side, be careful.
I have made a discharge test on the other pair and it delivered 2755mAh @1A from 4.1v downto 3.0v.
So far 1377mAh out of 1800mAh, I hope after several discharges if goes up to 1500-1600mAh from 4.2v
I have not measured internal resistance, but it seems to be acceptable.
What needs to be determined is the self discharge rate, which can be significant for cells sitting at 0.0v for extended periods of time(several years).
I thought I would capacity match every cell, and build a 12s15p pack, but I think I will just assemble it without matching, because it needs some cycles for rehabilitation anyway and the e-bike season is here. I was thinking of reusing the bms inside the packs, but they are probably low current.
What current would you recommend for reviving the cells? Very low, or moderate? I will use around 0.2C charging for a start...

Edit:
Second Discharge @1.0 amp from 4.1v downto 3.0: 2863 mAh/cell pair
Third Discharge @0.6 amp from 4.2v downto 3.0: 3206 mAh/cell pair
 
I'm also starting my own used laptop setup and was wondering if you could post pictures of how your hooking up into the BMS. I've been just tossing the built-in BMS thinking I would just use my charger balance setup but if your able to use the BMS no problem that would be great news. Keep us posted. :D
 
I have completed the battery few weeks ago.
I have built it from 28 laptop packs, paralleling 7 batteries, and putting 4 in series. Making a total of 12S7p.
First ran consumed 19.6Ah, around 850Wh, on 63km distance, controller limited to 15A. At that point one of the cell groups was almost empty. It was charged to 4.1v/cell, @ 4.2v I believe it would yield around 22Ah.
Pics follow:
View attachment 3View attachment 2View attachment 1
 
kZs0lt said:
I have completed the battery few weeks ago.
I have built it from 28 laptop packs, paralleling 7 batteries, and putting 4 in series. Making a total of 12S7p.
First ran consumed 19.6Ah, around 850Wh, on 63km distance, controller limited to 15A. At that point one of the cell groups was almost empty. It was charged to 4.1v/cell, @ 4.2v I believe it would yield around 22Ah.
Pics follow:
View attachment 3View attachment 2View attachment 1

22Ah is quite impressive. What would the capacity be if the cells were new? I can not get the picture to load. Keep getting this error:

The selected attachment does not exist anymore.
The file ./../files/7838_285c49f29ec436f7c2bfa5f65c8f6b29 does not exist.
 
Sorry, it is actually 14P12S as one laptop battery consists of 2P3S prismatic cells. Originally rated 10.8v, 3.6Ah, so cells were 1.8ah nominal when new.
Based on my testings, cells deliver around 1.5-1.6Ah when charged to 4.2v on low current consumption(controller is limited to 20A, so <1C, 0.3C on average). I will probably charge most of the time to 4.1v, getting about 1.3-1.4Ah out of a cell.
Cells sit on the shelf for several years, were discharged to 0.0v, so a aprox 85% of initial capacity is pretty decent.
Battery is pretty heavy for LiIon laptop cell standards, about 9kg, but 850 usable Wh for $100 is not too bad.

Don't know why the pictures keep disappearing, I have uploaded them to another site and I am linking to them.
BikeBatt1.jpg

BikeBatt2.jpg

BikeBatt3.jpg

BikeBatt4.jpg
 
Thanks for the answer. I can see the pictures now.

85% capacity left after sitting at 0 volt for years is very impressive. So all the talk about lithium ion low voltage cutoff (LVC) should now be taken with a grain a salt.

It appears that you're using the female ATX 20 pin connector (taken from a desktop PC?) for the battery. Where did you buy the male connector? Are you happy with the quality of the male connector? I've seen many male connectors for sale on Ebay but I fear that they are of low/flimsy quality. I have bought several male 4 pin molex connectors from Ebay and have thrown them away because of the unacceptable build quality.
 
SamTexas said:
85% capacity left after sitting at 0 volt for years is very impressive. So all the talk about lithium ion low voltage cutoff (LVC) should now be taken with a grain a salt.
These batteries came in original factory packages, so very probable they have never been used, just self discharged very very slowly.
It's a big difference compared to DISCHARGING them to 0.0v or even reverse them for some moments. And 85% capacity for 0 cycles is not a good thing, taking into consideration that it never sat 100% full, but however there is a calendar life also, and these are several years old, from around year 2003?, don't know for sure. I just had some luck with these, I wouldn't say that "all the talk about lithium ion low voltage cutoff (LVC) should be taken with a grain a salt."
We still need to see it's longevity, I may not pass the 100 cycle mark. But lets hope for better.

SamTexas said:
It appears that you're using the female ATX 20 pin connector (taken from a desktop PC?) for the battery. Where did you buy the male connector? Are you happy with the quality of the male connector? I've seen many male connectors for sale on Ebay but I fear that they are of low/flimsy quality. I have bought several male 4 pin molex connectors from Ebay and have thrown them away because of the unacceptable build quality.

For the main connectors (charge/discharge) I use a 6 pin automotive connector from AUDI to charge in parallel and discharge in series.
I have also made a balance connector with the ATX 20 pin connector. For now I am just using it for troubleshooting and maintenance, it helps me to address each parallel cell group separately without taking apart the battery pack. The cells are still in balance, 0.03v max difference is no problem since I charge to only 4.1v/cell. Later I will make a balance lead harness to balance the pack from time to time, or to charge to full 4.2v/cell. Most probably I will desolder a mail ATX 20 connector from a defective motherboard, that's what I have done in past.
 
texaspyro said:
All that LiCo hanging under my crotch would give my willey the willies.... :evil:
These are well engineered cells, probably made by Panasonic, they are manufactured in Japan, in aluminum cases, every cell has it's own fuse, so they should be Ok. Yes, they are old technology/chemistry, they have not been maintained/conditioned correctly, so they are to be handled with care and monitored closely for the first dozen of cycles.
 
kZs0lt said:
We still need to see it's longevity, I may not pass the 100 cycle mark. But lets hope for better.
Sounds good. Please also update at the 20 or so cycle mark. Who knows, the capacity might have improved.

I am also trying to see who made these cells. The only marking I see is "LEAPJ1A 000451" on one side and "2 10028" on the other.
 
How are you holding out with these batteries?

I am trying to build one myself. Wondering if they last.

Where do you buy your charger? How fast could you charge these cells?
 
I have about 6-8 cycles on them, one or two were deep discharges, to what I call 100% DOD.
I'm running them without a BMS, on charge they are about max 0.02-0.03v apart, but I do not charge them to full 4.20v/cell. At the low end they are still in balance of 2-3 mV difference to about 15Ah, but at the end, they get out of balance. Once I've run it down to the point, where one of the cells was already 3.38v, and others from 3.50 to 3.69v no load. I'm pretty sure it was toward the end, because that cell group lost from 3.5 to 3.38 in a few mAh's. The pack capacity was at 19.6Ah at that point, pretty much the expected pack capacity according to individual cell capacity measurement. (1.4Ah/cell)
For charging I am using my old RC(50w) charger, I charge in 6S configuration, so it's a sloooooow 20 hour full charge. Discharge limited to 20A now, so max 1C.
However I recommend a minimum 3hour full charge with these cells.
I'm not using it daily, and I also have another battery, and another ebike as well, so it could take some time to see many more cycles...
I was building this battery for the longer trips that I make once or twice in a month in the weekends in the surroundings. But maybe I will use it in town as well in the future. Actually I have made a balance connector, haven't used it yet, need to make the harness for it, and I will be able to safely charge to 4.2v/cell.
 
Back
Top