
Jay64
100 kW
Ok, I have recently found out that I am one of the few members that have these cells. So I thought I would do a thread on the basics I have for them and possibly try to answer any questions people might have for them. I don't have much test equipment other than some of my builds, some CAs, and some volt meters. But if there is a test that someone wants done, and you can describe how to do it, I will be happy to do it. I am also willing to buy some more test equipment that might help to test these out if it isn't too much money. I don't want to be spending hundreds of dollars just one one piece of equipment for one test. But if it is reasonable, I might buy it for future tests as well. So, here we go.
One of the most common question I get is, where did you get them. Unfortunately, I got them from one of the members here in the for sale section. He was selling a whole kit with motor, controller, batteries, throttle, charger, etc. At the time I was only interested in getting the motor and the controller, everything else was just gravy.....I didn't realize I was getting such a good deal on batts. I ended up getting 2 22s packs in the deal. They are 20ah pouches.
The batts I got have hard metal boxes with them, but I'm pretty sure these are re-purposed parts. But they do work fairly well for the intended purpose. There is a little extra space but it is pretty close to a perfect fit.


Here is how they connect the the rear of the pack. There are 3 strips that all the plastic plates bolt through to keep it together in the back. Unfortunately, the strips are only 24 holes, so I'm limited to a 23s pack with the top plate in place to keep the compression on the pouches. In the future I might look into having new, longer strips made if I decide to go past 23s.

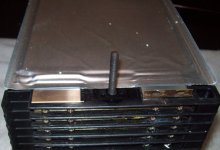
Here is one 22s stack from the front. On the top in the center you can see the end of a long bolt that has a nut on the top to keep the front of the stack compressed.

This is a view of the top of the pack to show how the front of the top tray is secured in place, and the neg termination.

Here is the negative cable. It is a brass bar with the bolt holes in it that is soldered to an 8awg wire.

This is another view of the connections with the top tray removed.

Here is a view of the underside of the top tray. This keeps pressure on the whole pack.

These are the pouches that I got.

These are the copper angles that are welded to the tabs.

They are sort of tack welded on, but it looks almost like it was some sort of press weld.

This is the top side of one of the trays that holds ea pouch. Kinda hard to see the details of the tray, but I can try to get a better shot with different lighting if someone wants really good detailed views.

One of the most common question I get is, where did you get them. Unfortunately, I got them from one of the members here in the for sale section. He was selling a whole kit with motor, controller, batteries, throttle, charger, etc. At the time I was only interested in getting the motor and the controller, everything else was just gravy.....I didn't realize I was getting such a good deal on batts. I ended up getting 2 22s packs in the deal. They are 20ah pouches.
The batts I got have hard metal boxes with them, but I'm pretty sure these are re-purposed parts. But they do work fairly well for the intended purpose. There is a little extra space but it is pretty close to a perfect fit.
Here is how they connect the the rear of the pack. There are 3 strips that all the plastic plates bolt through to keep it together in the back. Unfortunately, the strips are only 24 holes, so I'm limited to a 23s pack with the top plate in place to keep the compression on the pouches. In the future I might look into having new, longer strips made if I decide to go past 23s.
Here is one 22s stack from the front. On the top in the center you can see the end of a long bolt that has a nut on the top to keep the front of the stack compressed.
This is a view of the top of the pack to show how the front of the top tray is secured in place, and the neg termination.
Here is the negative cable. It is a brass bar with the bolt holes in it that is soldered to an 8awg wire.
This is another view of the connections with the top tray removed.
Here is a view of the underside of the top tray. This keeps pressure on the whole pack.
These are the pouches that I got.
These are the copper angles that are welded to the tabs.
They are sort of tack welded on, but it looks almost like it was some sort of press weld.
This is the top side of one of the trays that holds ea pouch. Kinda hard to see the details of the tray, but I can try to get a better shot with different lighting if someone wants really good detailed views.
 Resting voltage was 77.1V (3.5V/cell). This ride used 7.9kWh according to my CA.