1989 Kawasaki EX500 (Ninja) - Second build, slow and steady

harrisonpatm

10 kW
Joined
Aug 8, 2022
Messages
824
Couldn't pass up a deal on a roller posted to my local classifieds. It was an old Ninja, rough shape cosmetically, but structurally sound after I was able to see it in person. No motor, good front brake, underbone frame... basically screaming for an EV conversion. Had to get it, even though I already have a nice reliable commuter and have no need for another motorcycle. We'll see what happens...
20230603_134453.jpg
20230603_173555.jpg
20230603_134501.jpg
All the plastics are either missing or broken. Some of them don't need to be replaced. For example, I would love to mount the battery in the middle, and have it visible all the time, so that the motorcycle can be very obviously identified as being an electric conversion. So I wouldn't need the "belly" plastics. The front faring that houses the instrument cluster and headlight will probably need to be replaced, because even though slapping on a generic headlight to the front forks would probably work, I would then have to relocate and mount all the necessary instruments, and it probably wouldn't look as good. Frame is in good shape, the front disc break still has a lot of life left. The seat is okay, but it's probably generic enough to replace outright, if I want it to look nicer, or at least I can teach myself how to recover the plastic seat pan with new foam and vinyl.

By far the main goal for this conversion will be staying as cheap as possible, as I already have a great motorcycle, so there's no need to spend big money on a second. I'll be perusing the For Sale section for a controller and a motor, and I already browse BatteryHookup often enough that I can jump on the next good deal that fits my plans. But because it's no rush, I plan on stringing out the big purchases over months. So keeping an eye out for bargains and deals will be the variable that keeps this build slow and steady.

Second goal is to get top speed and range higher than my current build, which is 60mph top speed (realistically 55mph), and 40-50 mile range. I don't always need to go faster or farther, but it'd be nice to have more headroom above my top speed. I don't want to go 100mph, but it'd be nice to know I can get to 70-75 every once in awhile without damaging battery, controller, or motor (or myself).

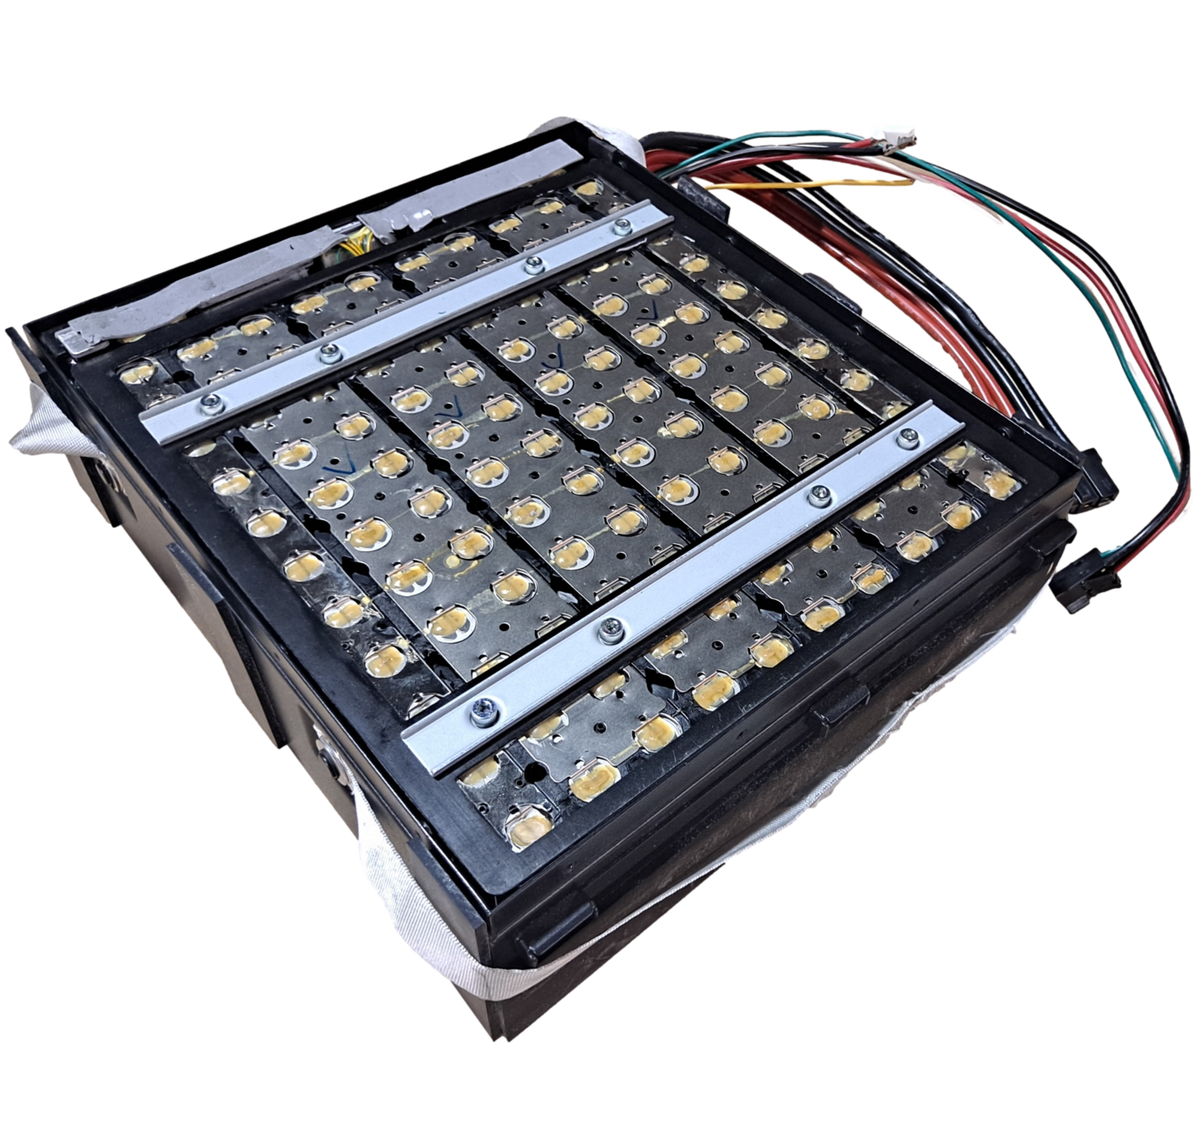
So I'm thinking that I'll probably be looking at Li-Ion this time, instead of LFP. I'll also be leaning towards the 96-120V range this time, instead of staying at 72v. I know I'll regret it later, because it makes the charge and controller components more expensive, but oh well, this is what I'm thinking now. I'm also quite partial to hub motor again, as I've been very happy with my 16-in QS273 8000w, and I like the lack of maintenance, quiet running, and electrical efficiency. Last I checked the 8000w is the highest hub motor rating in my 16-in wheel range, but maybe something more powerful has come out since then.

Anyway, I'll be getting the frame and ect cleaned up and repainted in the next week or two and I'll post more pics then. Cheers!
 
Still liking my plan of taking the restoration/conversion slowly, and in the meantime I've begun to cleanup and restore the gross old frame. Which is actually one of my favorite parts, I love scraping all the mud and muck off the old machinery, repainting, and putting it back together.
20230618_125534.jpg

20230618_135932.jpg20230618_174708.jpg20230619_095653.jpg
That rear shock is pretty good shape, but does anyone know how to disassemble the whole assembly? I'd really love to take that spring off and really get in the cracks. Couldn't find a specific method on YouTube so far, any hints?

Also thinking about color scheme. On one of my junkyard runs, I was able to score several lengths of high-voltage cables from EVs, so it'll be great material to use for battery cabling and whatnot. As well as the cables coming out of the big QSmotors are also orange. So why not orange as the color scheme for the whole bike?

How's this shade?
20230619_174647.jpg
I was thinking that it's probably unlikely that I will be able to find a full set of plastics that fit, so I want to consider naked bike options. Which I like anyway, because it'll be obviously an electric motorcycle with an exposed battery. So I was thinking about painting the frame orange, instead of black, since it'll be visable.

Here's a sample pic I found online of someone else's (IC) naked mod of the same model bike, in which the frame is painted a bright color to contrast the rest of the bike, and I thought it's something that I could manage.
537b494cbb76d_1.jpg
 
Restored the rear shock today, applied paint job, and its a good mix of colors of what the rest of the bike would look like. Last chance for anyone to tell me it looks ugly!
20230620_180334.jpg
 
Restored the rear shock today, applied paint job, and its a good mix of colors of what the rest of the bike would look like. Last chance for anyone to tell me it looks ugly!
View attachment 335482

Did you check the dampening with the spring removed? I would imagine the shock needs to be rebuilt/Serviced.
 
Feels good for now, and I measured/marked where it was before I took it apart, but it's currently irrelevant: i don't know yet whether I'm going mid drive or hub motor, so suspension is up in the air.

It did feel fine on the bike, but mostly I enjoy the process of taking apart old, gross, grease-caked and rusty pieces of equipment and making them pretty. Plus I wanted to get a good idea of the color scheme
 
Yeah it’s satisfying making old things new again 👍

Motor wise, I vote midrive for that frame ✌️
Hub motors are great also, I ride both. I just think the mid drive you would get better performance in handling with less upspring from the rear wheel. And to your point yes, I think suspension would need to be different from mid drive or hubmotor. Hub motors need a beefier rear shock to contain that heavy beast.

Interested to see how this turns out!
 
Nice work so far. That Ninja looks like a great platform (lot's of room). Taking it slow is a good idea; although it can be a struggle once you get closer to your first ride on it.
 
Nice work so far. That Ninja looks like a great platform (lot's of room). Taking it slow is a good idea; although it can be a struggle once you get closer to your first ride on it.
Should be easier to mount a battery than my last one. I unknowingly started work on a frame that used the engine as a stressed member, not realizing the difficulty I got myself into, and required a welder to help with the battery case. No issues in that respect with this frame.
 
Lots of progress the last few days. Frame got stripped and painted, front wheel cleaned up, rebuilt the front forks, made everything nice and clean and pretty. I'm fairly happy with the color scheme. Skipping the rear wheel for now, because if I get a hub motor I don't want to waste work on it.

Next up, modifying the fuel tank (empty and paint it) and redo the seat.
20230710_160622.jpg20230710_160633.jpg
 
I've been thinking about these a lot:

The price is stellar and I like battery hookup. Since I want to go with high voltage, I am strongly considering getting 3 and wiring them in series for 30s, nominal 11v, top voltage 126v. Nearly 6kwh, for $675, what a steal. They're rated new in box, which could very well be true.

The cases themselves can be reused, with some modification, they seem to be rather durable, good for a motorcycle build. Plus, 3 separate cases, it would be possible to mount them in 3 different spots in the frame, easier to fit that way.

The cells are rated for a max discharge of 15amps. At 11p (165 amps), 111v, looking at the area of 18kw max discharge. I won't use it all, but that's how I like my builds anyway: built in headroom, and should still be some nice speed.

James says, and I agree, that the nickel strips they come with are not going to carry 165amps. So, one would need to open them up and fix that. They way he does it is ripping off all the nickel and spotwelding 2 layers of his own. I was thinking, since the max discharge is being carried along the series connections, wouldn't it be possible to keep the nickel that's there, and simply spotweld one more layer on top of just the series connections? That way, you don't have to risk scratching or damaging the cells by removing the existing nickel, followed by another round or two of spotwelding again. Less stress on the cells. Doubling up nickel for carrying more current does work, there's obviously better ways (copper-nickel sandwich), but I was thinking that using this professionally made, new in box, well-built case of cells, and performing one simple modification of spot welding a single layer on top, has a lot of pros. Not to mention, an 18kw capable, 6kwh battery and case for less than $700?

Someone find me the downsides to this that I'm not considering!
 
As soon as the cell's temperature rises above 25C, it's discharge rating drops to 7.5A, which will probably be a bit underwhelming, with only ~80A from the pack.
 
Following along — great job so far, Harrisonpatm.

I see no problem with just tacking a second layer of nickel strip on top of the original. But TorgueRPM was keen to point out that having an 80A capable pack anytime the cell is above 77 degrees F may be your key limiting factor with the battery, as currently planned
 
Thanks for your replies. I had considered that 15A max discharge per cell was optimistic, and I wanted it for head room. But going down the rabbit hole after your link led me to some (not all, but some) sources suggesting that cycle life may only be 500-1000. Which is more of a kicker for me than max discharge. Oh well.
 
Thanks for your replies. I had considered that 15A max discharge per cell was optimistic, and I wanted it for head room. But going down the rabbit hole after your link led me to some (not all, but some) sources suggesting that cycle life may only be 500-1000. Which is more of a kicker for me than max discharge. Oh well.
500-1000 cycles is average, if not high, for most all round cells. I’ve only ever seen higher cycle life ratings in prismatic cells. My ebike is powered by 1000-cycle-rated cells. I figure that with all the shallow cycling with my average use, it’ll take my years and years to use up that cycle budget and the battery will succumb from calendar use before it cycles to death.

My ebike math is 75 miles on a full charge x 1000 cycles = 75,000 miles on those cells. You and I both know I’ll never ride this bike 75,000 miles. If I have to throw a few hundred bucks at a battery replacement every 20,000 miles, I’d be PUMPED. That math is great.

My ebike and this moto are apples and oranges, but it’s food for thought.
All true, just that I'm comparing it against my current emoto with LFP, rated for 2000-5000 cycles. And LFP chemistry is just getting better, some of the new cells coming out are being rated for 5000-1000 cycles. But if you give mine 2000 cycles @ 80% DoD, and I get 50 miles on a full charge, so 40 miles @ 80%, that's like 80,000 miles before I would need to replace it.

So yeah, it's just what trade off I want. Original plan was, and still kind of is, going with Li-Ion for its lighter weight, higher nominal voltage, and more energy density, I just need to consider if I'm okay with 500-1000 cycles. I may be. We'll see.
 
Here's a fun update. Following my theme of working on the cheap, I'm rebuilding the front disc brake calipers, which were gunked up and rusted, but salvageable. New gaskets/o-rings ordered for those on the way, those aren't expensive. And the handbrake/master cylinder worked and gave good pressure still, but unfortunately, the lever itself was broken off just after the axle. So I was considering purchasing a replacement, which would have been $20-$40 for just the OEM lever replaced, or $40-60 for a generic master from Amazon that would have been compatible.

Or, get some of my novice Blender skills a stretch and try to draw and print a replacement. It worked!
20230712_191626.jpg20230712_191632.jpg

Before anyone says it! Having a 3d printed plastic part in charge of braking a 70mph motorcycle? hm.... Anyway, it was a test to see if it would work, and I can use it as a substitute during the build and for bench tests. If I ever get this thing running at speed, I can look at a better replacement. At the very least, I need it to be thicker, and printed at 100% infill in CFPETG. Just a prototype for now. I am a big fan of using 3d printing in my builds, just letting everyone know that I will be thinking twice about employing it in the final draft.
 
Or, get some of my novice Blender skills a stretch and try to draw and print a replacement. It worked!
At the very least, I need it to be thicker, and printed at 100% infill in CFPETG.


More material behind it.jpg

Just fill the back side with more material. If you can find a piece/plate/strip of aluminium that is thick enough you can cut/saw/dremel the lever yourself from it.
 
View attachment 336465

Just fill the back side with more material. If you can find a piece/plate/strip of aluminium that is thick enough you can cut/saw/dremel the lever yourself from it.
Indeed. Just a first draft anyway. My skills likely aren't good enough to fab one out of metal, as there are a bunch of weird dimensions on the other side to engage both the brake light switch and the piston.
 
If you have the patience, you can just leave a block of material there, then hold that and your plastic lever together and hand-file the shape of the block as necessary until they match in enough detail to work. (my guess based on having done similar things, is several hours of work...)
 
Going to be working on the gas tank tomorrow: cutting cleaning and modifying it for EV. Last year i saw some build where they kept the bottom, cut a lid out of the top, and hinged it so that it was accessible for electronics. I think instead I'll do what I did last time: cut the bottom out, so it's essentially a shell/cover for whatever I end up putting underneath it. Plus, if I do it that way, I have the option of building my battery storage up into the cavity. More battery=better, in my book.

Does anybody have a trick to removing the gas cap without the key? I removed all the hex bolts easily, but it's still latched from underneath. Either I'll cut the bottom off and have access to the interior and figure out how to remove it, or I'll get my drill set out and bore through the key slot until it gives.
20230716_200027.jpg

There's what sounds like several handfuls of pebbles rattling around inside of it. Gee, can't wait to see how disgusting it is in there...
 
Eww. Gross.
20230717_094810.jpg
But not anymore.
20230717_103803.jpg
These kinds of jobs are some of my favorite bits of a restoration, definitely the most satisfying. The tank was in worse shape than it had appeared, lots of little rusted-through pinholes. For metal I would normally use something like JB Weld to cover up holes, but since this is just going to be a simple cover, I only needed to use a little bit of basic caulk from underneath. Went with matte black, and some of the tank's rusted spots still show through, but the matte helps hide them, and anyway this is still trying to be a budget build, so I wasn't about to spend too much time and money on it yet.
20230717_133314.jpg20230717_133323.jpg
 
Also managed to get the front calipers put back together, just needed one o-ring/seal @ $5. I'd say I'm still under $75 total with this restoration so far.

Before:
Screenshot_20230717-171202_Photos.jpg

And after
20230717_170736.jpg20230717_170744.jpg20230717_171228.jpg
 
On the offchance that someone else is converting a motorcycle in the same way, that also uses a fuel cap with the same shape, I managed to draw up a charge port to replace the gas cap. It uses the same holes, and incorporates a flush-mounted Anderson 50amp connector.
20230722_085929.jpg20230722_085941.jpg20230722_085945.jpg
The recess on the top is for a cover that I can draw and print in TPU, to keep it watertight when it's not being charged.
 
  • Like
Reactions: MDG
Back
Top