Crystalyte Controllers - Repair and Modification information

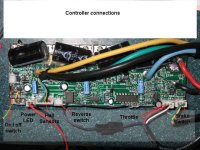
i have been replacing the stock 4710 fets with 4110s in 35/40 amp speed controls and it is then possible to double the current limit to 80A with these fets if you use it judiciously. it is important to remember that very high currents can overheat the motor and depolarize the magnets, causing permanent damage.

i would not recommend raising the 40A limit for 4xx crystalytes but gary goodrum seems to be having fun with his 5xx on speed controls i modified with 4110s and modified current sense shunts.

i have been paying $2.50 US for them in 100 pc qty so the price offered seems quite reasonable. i advise anyone who has the mechanical aptitude to do the swap put a set of these fets in your controller if you want to do wheelies and go 40 mph.
 
Hi All,

will move the puma controller info into my own thread as this is the sticky for xlyte controllers?
by the way, bob - fantastic work on the controller gary was using the results were scarily impressive !!! i think he should swap the kit to a beefier bike as soon as possible also :lol:


cheers

D
 
Actually, I just installed the second controller that Bob modified for me, in my bigger, 26" Townie bike, which is much beefier than the Mariner folding bike, and which has big fat tires. The controller in the smaller bike is going to get Richard's variable current limit mod, so I can tame the "current" limit of about 87A-88A, down to a more reasonable 60A, or so, which at 66V, will still yield of fairly spirited performance. I should, however, be able to come back from ride, and be able to let go of the seat a lot sooner. :D

-- Gary
 
i'm afraid i went a bit overboard on modifying the current limit on gary's controller. i measured the voltage drop across the shunt, and added solder until the drop was 1/3 lower, expecting that would result in changing the 40A limit to 60A. The way the current limiting is done on our controllers it turns out there is quite a bit of nonlinearity, and the change i made was too drastic.

i offered to adjust it back down, but gary said he could not go back now :)

on the 35/40/50a controllers the current measuring shunt is 4 parallel wires about a half inch long, made of fairly high resistance wire so that they are usually about a milliohm. i soldered two of the conductors together for their whole length to get the change in gary's controllers, so if you were to solder two of them together for less than the full length it might be closer to the 60A target i was shooting for. i told gary he could remove some of the solder to reduce the current limit if he wants to later.

the 4110 fets should be able to handle 80-90A easily, but i'm not so sure about the traces on the pcb :)
 
fechter said:
Solder them. Don't screw around with dodgy hall connectors.

I've been replacing them with 9 pin DSub connectors. More rugged and widely available. (You only need 5 of the 9 pins.)
 
Hi everybody,
As You probably know I made couple of cloned, working controllers. Now I'm thinking about drawing schematics. Recently one of my controllers blew. On some capacitors 16V higher voltage destroyed them, I think, fets are ok.
I need to understand more so I can identify the problematic part .
When I draw schematics( give me 2 weeks) I'll welcome any comments.
First question is; What is this diode? I suspect that my substitude for it was not the right one. (1n4148) Any ideas? Zenner? I don't have the orig. controller right now to measure anything . Thanks for your help!

Update to IRFB4110 for UK.: Last 15 left! (out of 120 for sale! here)
 

Attachments

  • diode uknown controller.jpg
    diode uknown controller.jpg
    75.2 KB · Views: 3,006
fechter said:
That's a 16v zener. Its the reference for the voltage regulator.
Thank You, that explains a failure on 36V and not on 24V then!
A 5v reg. was burned and also some caps.!
 
nemo said:
fechter said:
That's a 16v zener. Its the reference for the voltage regulator.
Thank You, that explains a failure on 36V and not on 24V then!
A 5v reg. was burned and also some caps.!

the zener and the power transistor next to it produce the 14.4v that runs all the logic chips and op amps and the 78L05 that powers the throttle.

i have seen a unit where the power transistor shorted, applying battery voltage to the 14.4v bus. it blew every chip, some it blew all the way off the board, and popped all the electrolytics.

when i work on one now the very first thing i do is connect it to 24v limited to 0.5A and make sure the 14.4v regulator is working.
 
16V zener? i think that is a little high. i measured the voltage across this zener on a couple of working controllers. and it was either 12V or 13V.

almost all of the Crystalyte brand controllers including the brushless 20A (start immediate and pedal first), brushless 40A and brushed 35A use the same identical low voltage supply. all of these have the zener with the MJE13005 transistor wired as a "amplified zener" regulator.

when repairng controllers i have been replacing the diode with 1N4742A or 1N4743A (12V or 13V 5% zeners.)

have i been using the wrong parts? or is this non-critical? the next higher zener would be 15V (1N4744A), add the 0.6v of the base emitter junction of the transistor would be a regulated voltage of 15.6V.

remeber also that this voltage is the one that is fed to the motors Hall sensors in the "start immediate" controllers.

rick
 
i have worked on dozens of these controllers and i have never seen the regulated voltage above 15V, so a 16v zener is too high. I use a 1N5350 13V zener, 27 cents at Mouser, p/n 863-1N5350BG

the ST13005A transistor has a Vbe of 1.2V at 200 ma. which is about where it runs, so the 13V zener is a better choice.
 
usually when i recieve a controller where i measure above 16V on the hall sensor connector (connected directly to the zener regulated supply.) i simulaneously recieve a motor with at least one blown hall sensor.

i just replace the zener in all such cases. i don't know exactly what hall sensors are stock in the motor but the ones i use to replace them are rated for 24V max and i have few troubles afterwards.

rick
 
yep, i've seen that also. i use the honeywell SS41 Hall sensors for replacement and they are good to 24v. i think some of the chinese motors and throttles i have seen use a counterfeit version of this part that can barely take 15v.
 
I measured 16v across the one in my controller when it was powered up. You lose about a volt in the transistor.

Perhaps they figured out that was too high at some point and changed the value of it.

The feed to the hall sensors is through a resistor, so the actual voltage at the sensors drops when they are connected. Still, if the supplied voltage is really close to the failure point of the sensors, that could explain a lot of failures.

If the zener goes open or the transistor shorts, it would be real ugly for the rest of the controller.
 
fechter said:
I measured 16v across the one in my controller when it was powered up. You lose about a volt in the transistor.

Perhaps they figured out that was too high at some point and changed the value of it.

The feed to the hall sensors is through a resistor, so the actual voltage at the sensors drops when they are connected. Still, if the supplied voltage is really close to the failure point of the sensors, that could explain a lot of failures.

If the zener goes open or the transistor shorts, it would be real ugly for the rest of the controller.

i think the voltage was higher in some older units, it is really not very critical, but a volt or two lower might be better. i have seen the pass transistor short and apply 72v to the 15v bus. it blew some of the chips right off the board and exploded the electrolytics. too exciting!

the critical circuit elements in the current limiter and pwm section are driven from a 5v reference on the pwm chip, and there is a separate 78L05 for the throttle power, so the voltage could probably be anywhere from 12 to 15v and it would be fine.
 
The Crystalyte Home Assemble Guide says the following:
Connect the Battery Pack to the Controller

22. Connect the battery pack to the controller. If your keyswitch is on when you make the connection, you will hear a “popâ€￾ and maybe see a spark. This is normal behavior. It will not hurt you or the system.

This is dumb. As someone mentioned on another site the Crystalyte controller needs an inductor added between it and the batteries.

I use a Radio Shack `Snap-Together Toroid Choke' (part #273-104, $8.39 for two) that I happened to have lying around. I wrapped it with 12 turns of #12 wire and added it inline with one of my battery cables. Much reduces the sparks, pops and eroded connectors and switches.

http://tinyurl.com/285dsd


Richard
 
I use 2 switches to start up the controller. One small switch 5A rated that connects the battery via small 5w 100R resistor to my controller. Second one rated 40A bypasses this resistor. I always switch on the small one first, wait half a second and then the big one.
No big sparks, switches will lasts, no problems. One could substitute this with some kind of electronics with a small and big relay and timer and a few other parts.
like in a big amplifiers.
 
rf said:
The Crystalyte Home Assemble Guide says the following:
Connect the Battery Pack to the Controller

22. Connect the battery pack to the controller. If your keyswitch is on when you make the connection, you will hear a “popâ€￾ and maybe see a spark. This is normal behavior. It will not hurt you or the system.

This is dumb. As someone mentioned on another site the Crystalyte controller needs an inductor added between it and the batteries.

I use a Radio Shack `Snap-Together Toroid Choke' (part #273-104, $8.39 for two) that I happened to have lying around. I wrapped it with 12 turns of #12 wire and added it inline with one of my battery cables. Much reduces the sparks, pops and eroded connectors and switches.

http://tinyurl.com/285dsd


Richard

I think I will give this a shot. I have killed a couple of the EagleTree MicroLogger beta units I have been testing, due to massive arcs when the unit is first plugged in. I've since put these on the other side of the power switch, but I worry how long the contacts will last.

-- Gary
 
The pre-charging resistor is the best, but I hadn't thought one of those snap on ferrite chokes would be that effective. Everything helps.
 
fechter said:
The pre-charging resistor is the best, but I hadn't thought one of those snap on ferrite chokes would be that effective. Everything helps.

Here's where the information about the inductor originated:
http://www.neodymics.com/Images/V24ProtoSwitch070818E.pdf

The intent was to keep the Dewalt packs and chargers intact. The Dewalt BMS would shut down as soon as connection to the controller was made due to the surge. His schematic shows a 300 uH inductor which he wound on a ferrite core that was harder to find. He used thinner wire.

I didn't want to use the thinner wire (and I was in a hurry), so I wrapped as much #12 around the form I had as I could and tried it. It kept the Dewalt BMS from shutting down. I suspect mine is less than 300 uH and that more inductance would be better.

The surge is apparently due to poor controller design. Why should there be any surge or stray capacitance at the power terminals of a controller in it's quiescent state? In this case it appears fairly easy to fix.

I just found the reference that describes the original inductor:
The Crystalyte controller has a capacitor which appears as a large initial load when the pack is connected or turned on. This can blow a fuse or cause the BMS to open. My solution was to add a small inductance in series with the controller. This inductor does not waste much power in actual use, since it never seems to warm up. Inductor was ten turns of #14 wire around a ferrite toroid Mcmaster-Carr #8495K57.

Cyclemotor Engineer
http://www.neodymics.com

(I've since discarded all vestiges of Dewalt BMS and charger. Junk!)

Richard
 
fechter said:
There's a capacitor on the board that controls the ramp up. Stock is 10uf. If you replace it with a smaller one, like 1 uf, it will ramp up much quicker.

It might work to just remove it completely.

Was reading through this thread again recently, and thinking about the `ramp up' thing while I was riding over the weekend.

Electric vehicles usually have a ramp up algorithm because max torque occurs at zero rpm. An electric bus without a ramp-up algorithm will spin it's tires at start if the driver presses just a little too hard.

Crystalyte's ramp-up seems wrong. It seems to delay the onset of any power, rather than provide a ramp.

Richard
 
Combined with the typical zero offset on the throttle, I think you get the delay effect. If the throttle voltage is 1v, but the controller doesn't start making any output until 1.4v, you get a delay while the throttle ramps up to 1.4v. This is oversimplified, but I think that's essentially what's going on.

If you install the trimmer on the throttle so you just barely move the throttle and the motor goes, you'll see the delay is much shorter.
 
fechter said:
Combined with the typical zero offset on the throttle, I think you get the delay effect. If the throttle voltage is 1v, but the controller doesn't start making any output until 1.4v, you get a delay while the throttle ramps up to 1.4v. This is oversimplified, but I think that's essentially what's going on.

If you install the trimmer on the throttle so you just barely move the throttle and the motor goes, you'll see the delay is much shorter.

So the intent was to turn on some power immediately but it's misadjusted?

Optimal would seem to be zero delay. Which is especially noticeable with light trail riding.

Richard
 
rf said:
So the intent was to turn on some power immediately but it's misadjusted?

Optimal would seem to be zero delay. Which is especially noticeable with light trail riding.

Richard

Any delay is really annoying to me. I don't really have any noticeable delay on mine. Try the trimmer.
 
fechter said:
rf said:
So the intent was to turn on some power immediately but it's misadjusted?

Optimal would seem to be zero delay. Which is especially noticeable with light trail riding.

Richard

Any delay is really annoying to me. I don't really have any noticeable delay on mine. Try the trimmer.

I'll order a pot today.

Any idea how effective removing or changing the delay cap in the controller might be?


Richard
 
Back
Top