
You are using an out of date browser. It may not display this or other websites correctly.
You should upgrade or use an alternative browser.
You should upgrade or use an alternative browser.
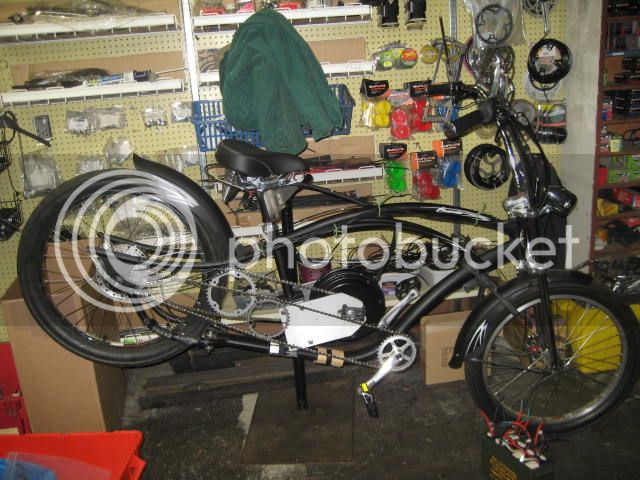
"E-Zilla" w/ Cro Motor mid-drive * UP-DATE Chopping Frame!!*
- Thread starter LI-ghtcycle
- Start date

LI-ghtcycle
10 MW


LI-ghtcycle
10 MW

LI-ghtcycle
10 MW
Getting closer to the final design:


LI-ghtcycle
10 MW
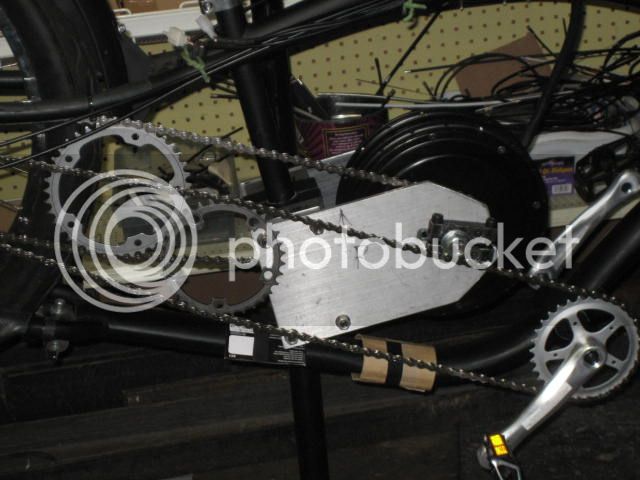
First set of final designed mounts!


LI-ghtcycle
10 MW
Warren said:LI-ghtcycle,
I am really liking this build. I am curious how you plan to keep the track cog from unscrewing the first time you hit the throttle...Loctite?
Heya Warren,
I am hoping to sneak in a locking ring, but yes, lock-tight works great too, I use the blue (medium strength), just like is used for the disc break rotor bolts so it's not so hard to remove when needed.
Generally because the force of the motor rotates it forward, and the freewheeling of the NuVinci Hub at the freewheel adapter (technically I could have used a cog instead of freewheel at the rear if I were not using a dual right side drive, both motor and pedals) this should be a non-issue (just like a freewheel is normally tightened by pedaling), but barring some freak accident (a stick or something else jamming the rear cog to the hub) I will be using one or the other to secure it.
Thanks for the complement, I am enjoying building it, however I have to pace myself, if I spend more than a few hours at a time, I pay for it for the rest of the day in fatigue.
I typically can't stop thinking about the next step and the best way to go forward though, so hopefully it will be on the road in the next week or two, starting with 48V for testing, hoping I can test drive it a bit as I wait to get my R-40(E) back on the road. :wink:
Very impressive mounts!
"Generally because the force of the motor rotates it forward, and the freewheeling of the NuVinci Hub at the freewheel adapter (technically I could have used a cog instead of freewheel at the rear if I were not using a dual right side drive, both motor and pedals) this should be a non-issue "
You totally lost me. As long as the motor is driving the rear wheel from the right side, through a right-hand threaded cog, that cog will want to unscrew. Hopefully Loctite, and a jam ring can increase thread interference to the point of overriding that. Too bad the motor doesn't have a left-hand thread outside the right-hand thread for an actual lock-ring like a fixie hub.
[edit]Oh! Did you mean that your separate pedal drive will reduce the startup torque on the motor chain?
LI-ghtcycle
10 MW
Warren said:"Generally because the force of the motor rotates it forward, and the freewheeling of the NuVinci Hub at the freewheel adapter (technically I could have used a cog instead of freewheel at the rear if I were not using a dual right side drive, both motor and pedals) this should be a non-issue "
You totally lost me. As long as the motor is driving the rear wheel from the right side, through a right-hand threaded cog, that cog will want to unscrew. Hopefully Loctite, and a jam ring can increase thread interference to the point of overriding that. Too bad the motor doesn't have a left-hand thread outside the right-hand thread for an actual lock-ring like a fixie hub.
[edit]Oh! Did you mean that your separate pedal drive will reduce the startup torque on the motor chain?
Ahh ya, I think you got me here, It's been a while since I put a RH drive set-up in this config (at least with a hub motor and RH threaded cog), I tend to transpose things, you are correct, and yes I will try to accomplish this with a lock ring, but with the spacing, I believe locktite will be the answer as I have spacers between the hub mount and cog currently.
LI-ghtcycle
10 MW
spinningmagnets said:Very impressive mounts!
Thanks!
I am really pleased with how they have turned out so far, the PE plastic is really strong and resilient even though it cuts like butter!
I am on track for never having to modify the metal parts again as any and all adjustments can be made shaping the plastic, and other than being a bear if you had to glue it, (requires special heating IIRC before a glue will bond) it's ideal!
Just enough give to not mar paint, but solid enough to not flex much if at all under compression, the twisting forces of the Hubzilla at 72V (18S 50c Lipo) remain to be seen!
Rassy
1 MW
Warren said:
I did have plan B and plan C, which I never used. Plan B was to see if the motor would run properly in reverse by just changing the correct phase and sensor wires. That would be for a motor that didn't have threads on the back cover and would still require the chain wrap. Plan C was to put it together like LI-ghtcycle is doing, and if necessary drill and thread the cog for one or more grub screws to prevent it from unscrewing.
Yeah, I saw that fixie hub solution when I set up my first mid-drive trike about 6 years ago. In my case, the motor I used had identical threads on both sides, so I just flipped the motor and put my cog or freewheel on the threads that were intended for a disk brake adapter. So it's only when I pedal that I could possible unscrew the cog, which has never happened since the motor torques it on very tightly. The bad part is that I had to "wrap" the chain around the cog "front to back" since the motor runs "backwards" relative to the forward motion of the trike.Too bad the motor doesn't have a left-hand thread outside the right-hand thread for an actual lock-ring like a fixie hub.
I did have plan B and plan C, which I never used. Plan B was to see if the motor would run properly in reverse by just changing the correct phase and sensor wires. That would be for a motor that didn't have threads on the back cover and would still require the chain wrap. Plan C was to put it together like LI-ghtcycle is doing, and if necessary drill and thread the cog for one or more grub screws to prevent it from unscrewing.
The thing that drives me crazy is that they could mill splines for single speed cogs onto the threaded steel portion, before it is cast into the aluminum side cover. The diameters are identical. You could run a single speed cog from 13-34 teeth, and hold it on with a bottom bracket lock ring, or a single speed freewheel for the pedals.
http://www.r3vlimited.com/board/attachment.php?attachmentid=71691
http://www.benscycle.com/images/variant/large/439-108.jpg
http://www.r3vlimited.com/board/attachment.php?attachmentid=71691
http://www.benscycle.com/images/variant/large/439-108.jpg
LI-ghtcycle
10 MW
I like the grub screw idea, but I think a lock ring and or loctite will be more than enough, but if not, since I am using a track cog I have a lot more flexibility.
Another idea is to drill a hole along a chord of the track cog's flange.
http://images.tutorvista.com/cms/images/39/chord-of-a-circle.PNG
Saw across the drilled hole, in a valley midway between two teeth. Tap one half of the hole for a pinch bolt, and drill the other half of the hole for bolt clearance. This would turn the track cog into a clamp collar like this
https://www.youngsindustrial.com/ProductImages/112361/lg_a23e26_single%20spli%20shaft%20collar.jpg
rather than this.
https://static.grainger.com/rp/s/is/image/Grainger/2X568_AS01?$mdmain$
LI-ghtcycle
10 MW
I wonder if it wouldn't be enough to just add a couple screws through the "face" of the cog vertically into the hub flange using the holes already drilled there if needed.

Rassy
1 MW
Screws through the face (after the cog is tightly screwed on) would probably work great, as long as nothing behind the face is damaged. Edit: Maybe the screws into the face could just be like grub screws with the threads added to the cog.
In my case, I was using a 16 tooth cog so there wasn't room to add screws like that. Plus of course I didn't even think of it.
In my case, I was using a 16 tooth cog so there wasn't room to add screws like that. Plus of course I didn't even think of it.
LI-ghtcycle
10 MW
Well, we have so far used a BB lock ring to secure the cog, and might be using lock tight if it proves unable to hold by it's self, and for now, I am focusing on the pedal chain, and battery.
Here are some pics!
I'm currently exploring the idea of using some form of "fuel tank" style battery cover, but I am still a bigger fan of something just above the motor, but with weight distribution, I think something in-between the top and middle tubes wouldn't be too bad, especially with LiPo.
Here are some pics!


I'm currently exploring the idea of using some form of "fuel tank" style battery cover, but I am still a bigger fan of something just above the motor, but with weight distribution, I think something in-between the top and middle tubes wouldn't be too bad, especially with LiPo.
LI-ghtcycle
10 MW
No new pics (forgot to take them, doh!) but she's on the road!
We have a long steep hill here in Oregon City, and I road up it in the bike lane passing cars today at 28 MPH!!!
I'm now running at 18S with 90c Turnigy Nano Tech Lipo, pulling only 25 Amps, averaging around 1400 Watts on the hill, otherwise closer to 250 - 500 Watts just cruising around with light pedaling, and couldn't be happier! 8)
We are going to see if we can start getting some 18560 battery packs through a local battery shop in town, but for now, I'm really happy with the Lipo for demonstration purposes.
The best part of this is that neither the motor nor the controller get even REMOTELY warm even after a 2 mile full throttle hill climb!
More to come soon!
LI-ghtcycle
10 MW
Pics!
Went for the first real trip down the hill, took the elevator down so I could stop by the barber shop and say hi! (Classic Cycles used to be next door) Then the Hobby shop to show them where all the supplies I bought from them were going, and show them what 72V (18S) of Lipo can do!


Going Down!

At the bottom.

The Depot Barber Shop Oregon City, OR.
Now some CA Stats! This was pretty good for a start, and I did do some pedaling, but most of the hill climbing was motor only, so I'm pretty satisfied! I will do some more testing with motor only in the future when I get the battery boxes finished and soon I will be upping the Amps, after I get a temp gauge hooked up, but for now, it's doing everything I need!
So far, with NO pedaling, it has conquered Singer Hill (steepest part of the climb at 7% grade) starting at 15 MPH from a dead stop, and accelerated to 17 MPH during the climb!
At the second steepest, I was passing car traffic in a 25 MPH zone going 28 MPH (with some pedaling, ok I got excited :lol: ) going up a 5% grade for about 1/2 mile!
After all the fun and games (this was after a couple other day's testing, so not on a fresh charge) here are some CA stats:


LI-ghtcycle
10 MW
Up-date! Battery Box construction and installed:


I can make more detailed pics of the boxes, but they are pretty simple, just screws and rivets with slots cut into the bottom where I attached them with t-clamps & a pipe clamp.


I can make more detailed pics of the boxes, but they are pretty simple, just screws and rivets with slots cut into the bottom where I attached them with t-clamps & a pipe clamp.
I am happy to hear you are closing in on a system that works for you. Since you posted that you are only seeing 1200W peaks, (and around 250W when just cruising), the Hubzilla might be overkill for this application. From everything I've read, its a great product, with many happy customers, but price aside...its heavy. You mentioned that it never even gets warm, which is what I would expect. The 50mm wide stator packs a lot of copper mass, so this motor is capable of a huge amount of watts. Some Hubzilla owners are successfully running more than 72V X 100A = 7200W
I have a rear DD hubmotor ebike with a sine-wave controller...so quiet and powerful, I use it to give test rides so I can show people how amazing ebikes are. Two of the things that the Hubzilla has going for it (that are not obvious to the new ebiker) is that...it has thinner laminations (0.35mm, compared to 0.50mm), which boosts the efficiency (less of your battery watts are converted to waste heat), and...it reduces cogging in the motor. The other feature in hubzilla is the aluminum stator-support, which acts as a heat-sponge. The common method is to use a flattish steel stamped plate.
Another development that can affect the choice of motor (for a similar system configuration) is Ferro-Fluid. This substance allows stator-heat to flow to the aluminum side-plates (dramatically improving heat-shedding), and this improves the motors ability to be fed amp-bursts without heat-damage. Nothing wrong with the Hubzilla (which is wonderful), but I'd like to list some options that are lighter, and still have these desirable features, for builders who are happy with 1200W.
Stator
width
28mm______MXUS 1000W front hub, from Kinaye Motorsports (narrower than a rear hub)
35mm______Edge 1500W rear hub, from L.A. Ebikes
45mm______MXUS 3000W turbo V3 rear hub, from Kinaye motorsports
LI-ghtcycle
10 MW
Thanks for the info SM!
Funny you should mention the MXUS 3000w as I just recieved one in the mail a few days ago! (bought it back in march on the special sale at Kinaye Motors!)
You're exactly right, the Hubzilla is waaay overkill for it's current application, BUT! I plan on pushing it to it's Limits in the future.
I will be installing the MXUS 3000w on my Recumbent soon as I get my controller in, and I will most likely use it for my main transportation, however, the "E-Zilla" as we have come to calling this bike, is a joy to ride, and even thought it's a bit awkward to pedal (my legs are just a bit short for the reach lol) I can still work up a sweat if I want and go 28 MPH up-hill pulling a trailer full of tools!
I hope to start doing mobile repair/service for E-Bikes in town on it, just need to get some signs for the sides of the trailer!
I have no doubt that even the MXUS 3000w will be a bit overkill for my use, but that is the point, I want something that has high efficiency, low to no maintenance, (no more than a typical bicycle anyway) and something that can haul a trailer doing errands that I would normally only do with a car, all the while hauling most anything I need and not noticing the extra load, and climbing steep hills with out any noticeable heat/stress! I am thinking that 60V will be more than enough for the MXUS, and that is a more manageable battery size/power that will get me away from having to run LiPo, and into something like Lunacycle's 60V pack here:

http://lunacycle.com/batteries/packs/60v/60v-triangle-20-24ah-panasonic-pf-or-ga/
Funny you should mention the MXUS 3000w as I just recieved one in the mail a few days ago! (bought it back in march on the special sale at Kinaye Motors!)
You're exactly right, the Hubzilla is waaay overkill for it's current application, BUT! I plan on pushing it to it's Limits in the future.
I will be installing the MXUS 3000w on my Recumbent soon as I get my controller in, and I will most likely use it for my main transportation, however, the "E-Zilla" as we have come to calling this bike, is a joy to ride, and even thought it's a bit awkward to pedal (my legs are just a bit short for the reach lol) I can still work up a sweat if I want and go 28 MPH up-hill pulling a trailer full of tools!
I hope to start doing mobile repair/service for E-Bikes in town on it, just need to get some signs for the sides of the trailer!
I have no doubt that even the MXUS 3000w will be a bit overkill for my use, but that is the point, I want something that has high efficiency, low to no maintenance, (no more than a typical bicycle anyway) and something that can haul a trailer doing errands that I would normally only do with a car, all the while hauling most anything I need and not noticing the extra load, and climbing steep hills with out any noticeable heat/stress! I am thinking that 60V will be more than enough for the MXUS, and that is a more manageable battery size/power that will get me away from having to run LiPo, and into something like Lunacycle's 60V pack here:
http://lunacycle.com/batteries/packs/60v/60v-triangle-20-24ah-panasonic-pf-or-ga/
LI-ghtcycle
10 MW
Heading to the sign shop here soon to get some adv to put on the side of the trailer, going to see if I can get a Mobile E-Bike repair/service gig going! (pics to follow later today  )
)
Similar threads
- Replies
- 34
- Views
- 5,189