• Howdy! we're looking for donations to finish custom knowledgebase software for this forum. Please see our Funding drive thread

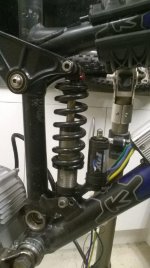
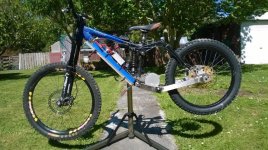
Kona Stinky, no pedals, big block on swingarm.

I have just ordered batteries for my build, and found an interesting variance between shipping of 5S 5000mAh batteries and 6S 5000mAh:

The 5S batteries (6 or 8 of them) could be shipped in one shipment, but the 6S had to be shipped separately, one battery at a time.
The batteries are Turnigy 20C LiPo's from Hobby King, and this shipping distinction is made by their automated online sales system, and relates to shipment of LiPo's to New Zealand. Quite possibly the same or similar restrictions may apply to any international shipping, or at least to some other countries.

I had read somewhere that batteries over 100Wh capacity are subject to more restrictions than batteries below 100Wh. I had intended to buy six 6S 5Ah batteries and run 18S 2P, but I decided to try the 5S batteries to compare shipping conditions / prices because the 5S 5Ah batteries are below 100Wh nominal.

This shipping issue means it is cheaper for me to buy and ship eight 5S packs than six 6S packs, so now I will be using 20S 2P for my mid drive motor, so I will be able to use lower gearing and lower current to achieve the same performance, and probably get better efficiency as well as greater range.

Just thought I would share this info in case it is of assistance to other forum members.

Dave
 
Drum said:
The 5S batteries (6 or 8 of them) could be shipped in one shipment, but the 6S had to be shipped separately, one battery at a time.
that's strange and plain stupid. what's the difference between 5x6s or 6x5s? the capacity is the same?! i found strange shipping restrictions lately with my latest quadcopter order which included 2 remotes (quite large). i could not fit everything in one box because of some limitations (too heavy, to large combined lenght (h x w x l), or whatever), but none of them really applied. so i had to pay twice for shipping for something that would have fitted in one box.
regarding batteries: i received my order of 18(!) 6s5000mah batteries w/o problem. but this was sent from european warehouse to europe. so other restrictions may apply to shipping from int. warehouse, and may be new as well, as i ordered 10x 6s5000mah about 2 years ago w/o problems.
 
At last, a bit more progress!
I have welded and braced the front brackets of the swingarm, and started to work out the details of the motor mounting plate.

I have drawn up the brackets that will connect the swingarm to the suspension linkage, and started to work out possible mountings for the controller.. possibly on a bracket bolted to the drink bottle holder threads on top of the lower frame tube.
WP_20140907_027LowRes.jpg
WP_20140907_028LowRes.jpg

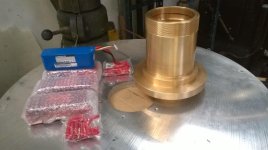
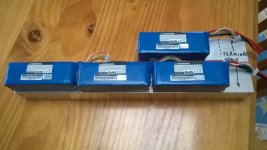
And the batteries have arrived.. the first half anyway. Four Turnigy 5S 5Ah Lipos, and some connectors. I will be ordering another 4 of them soon.

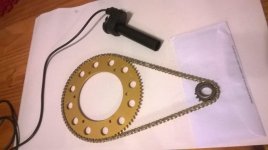
I have also ordered a 16 tooth 219 sprocket to adapt to the motor, 2 219 go kart chains and chain tool, and an 80 tooth sprocket, which should arrive soon.

Too busy in my real life to find time to work on this project as much as I would like, but we will get there eventually..
 
A few goodies have arrived, and more progress:
WP_20140907_029LowRes2.jpg
The big aluminium disc (740mm diameter, 20mm thick) is the back housing of the 24 inch research grade Cassegrain telescope I am building. The bronze component is the corrector lens housing: 36kg of LG2 bronze hollow bar ($1024) machined down to 16kg of finished housing.. that means there is $569 worth of bronze in the swarf tray of my lathe!

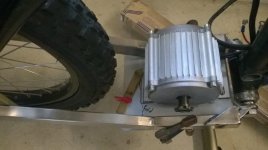
The motor mounting plate is fully welded into the swingarm, and I have drilled and filed square the holes for the motor bolts, so I can use coachbolts to secure the motor, with the nicely rounded head below the mounting plate, so they don't catch on anything as I slide over it.

I got some brackets waterjet cut out of 8mm stainless plate, as the original swingarm is 8mm thick where the upper suspension link connects to it, to complete the swingarm at the rear. They were way stronger and heavier than needed so I milled them down over most of their area before welding them on.
WP_20140925_001.jpg
WP_20140925_005.jpg
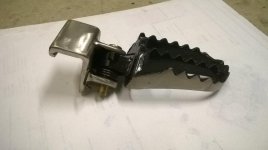
As the position of the footpegs is one of the "undecided" items (and the most controversial so far!!) I have mounted them on "hooked" brackets I can position anywhere along the swingarm and secure with tack welds, so I can try several positions before making the final decision.
WP_20140925_002.jpg
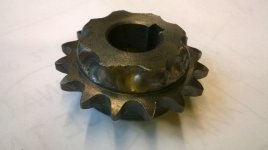
I have received my 2 lengths of 219 chain, 219 chain tool and new 80 tooth 219 rear sprocket. Unfortunately, the (American) Kart supplies company sent a 16 tooth #35 front sprocket instead of the 16 tooth #219 sprocket ordered. More international freight fees and delays coming up!! I e-mailed them 3 days ago about the mistake, and they haven't even replied yet.
If life was meant to be easy, the designer was incompetent!
WP_20140925_006.jpg
 
Comet Kart supplies originally sent the wrong front sprocket, but they came through and put it right.. sent the right one for free as soon as possible, so now it has arrived I have to adapt it to the motor shaft.
Also The Magura throttle arrived from John Holmes Hobbies (supporting those who share their knowledge on ES..).
WP_20141017_001.jpg

Not a lot of progress the last 2 weeks: My younger son bought a new Avanti Torrent mountainbike, and I bought a 3 yr old Giant Trance X1 in really good condition and sold my equally nice 2011 Giant Anthem. So of course we had to go out in the wonderful Spring weather and give the new bikes some exercise.
Both the Torrent and the Trance are great trail bikes: The Torrent is amazingly stiff and confidence inspiring, capable of riding through pretty much whatever you point it at without flexing or getting out of shape, while still pedalling uphill pretty well; The Trance is a bit lighter feeling, more agile and playful, but still quite stable through the rough patches and also good uphill.
We swapped bikes, and despite the winter rains having cut the tracks out and exposing a lot more rocks than last time we rode it (North Face on Makara Peak, Wellington NZ) I don't think either of us have ever gone as fast on that track.. a great day, even though I got a corner wrong, slid off and tested out my helmet by head-butting a tree...

Hopefully a bit more progress soon, if the weather co-operates by raining on the weekends!
 
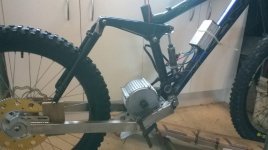
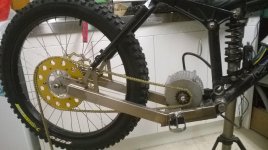
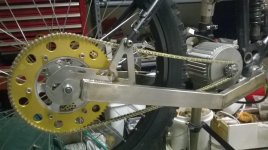
I have fitted the front sprocket to the motor and spliced the chain to length, so starting to look more like a bike..
WP_20141105_001.jpg
WP_20141105_002.jpg
WP_20141105_006.jpg
WP_20141106_002.jpg

The chain passes very close to the rear suspension link.. doesn't touch, but I am sure it would while riding.. I will have to move the sprocket in towards the hub a few mm and / or devise a way of protecting the suspension link from the chain.
Hoping to have throttle, controller and batteries jury rigged and the back wheel spinning this weekend under power.

After that, mount the controller and batteries, seat, left hand thumb throttle for variable regen control, buy more batteries and a Cycle Analyst (Honey... you know that you asked what I wanted for Christmas..).. still plenty to do before it is finished, but it is taking shape quite well considering how few hours I get free to work on it.

As always, being inspired by some exciting looking builds going on in the ES world..
 
Real progress the last 2 evenings and today...

The bike has brakes (borrowed off a freeride bike my son has outgrown), and I made a bracket to mount the rear brake to my swingarm back end. A bit more work to do in that department but I now have the basic shape of the bracket sorted and the brake is usable as is.
Also mounted the Magura throttle on the handlebars.

I have temporarily added an old seatpost and saddle.. not the final system but it will give me somewhere to sit on the test ride, which at this rate won't be too far away!

More WAD (woodwork aided design) has the controller temporarily mounted and the battery support system prototyped.
WP_20141108_001.jpg

WP_20141108_003.jpg

When I was planning to use two battery packs in parallel, each of three 6S 5Ah batteries, this was where I decided to mount them.. as low and far forward as I could get them. The plan was to make the battery packs by sliding the batteries inside a square aluminium tube, and clip the two tubes on either side of the frame downtube. If the battery packs were a suitable colour, from the side the battery packs would be almost invisible.

If an aluminium or fibreglassed plywood plate was mounted under the downtube, the battery packs could rest on that and be clipped in place, so be easily removable for charging or security. A battery fire would be contained inside a metal tube (venting needed) and the batteries would be well protected from bumps etc.

The plate would be slightly narrower than the swingarm, and it would act as a mudguard to prevent water and mud from the front wheel getting to the battery packs, controller, motor, shock or rider. Although it would probably reduce airflow over the controller and motor slightly, keeping them clean is a bonus.

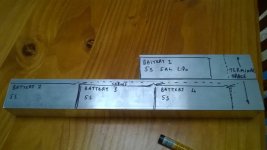
Now I have four batteries per pack, I will have to piggyback the fourth battery above one of the lower ones, probably the rearmost one. This will make the aluminium battery pack more complicated, but still do-able.

The bike is not quite as finished as it may look.. some welding needs finishing on the swingarm, a lot of bolts need replacing with others of higher grade or different length etc, but it is great to see it so close, and to be able to confirm dimensions and final arrangements for the battery packs etc.

I have to re-machine the rear sprocket holder to move the sprocket inwards about 3mm so the chain clears the suspension link, but that's only a few minutes work.

I might choose to mount the controller vertically behind the seat tube instead of on top of the downtube, but apart from that I am happy with the setup as shown.

I have stood on the footpegs and bounced the bike around, and scooted it down the drive unpowered.. and yes, that's about where I am going to have the footpegs for the first trial.. it gives a nice riding position. Once the bike is going, I will report on how much of a problem the footpeg position is.. and shift them forward if I have to.

Thanks to my wife and daughters who mowed the lawns and gave me a day off so I could work on the bike today.. it is amazing how much you can achieve in a few hours if not interrupted!
 

Attachments

  • WP_20141108_001 (800x449).jpg
    WP_20141108_001 (800x449).jpg
    105.7 KB · Views: 3,543
Can anyone tell me why my photos are not displaying in my posts anymore? The only thing I can see different is that the photos less than 60 kiB display and the photos larger than 60kiB do not.. is that it? If so, I will have to figure out how to shrink them even more.
 
I think it might be the image width constraint.....have a look at your original files and check the resolution

edit......

Anything over 800px wide will display in the above behaviour. What you can do without much effort is to get the physical address of the image i.e......http://endless-sphere.com/forums/download/file.php?id=151363 and use that inside of [ img] tags. So ill do this now to that url....
file.php
 
Hi Rodgah, I guessed the problem with the pictures was to do with their pixel count, as it started when I bought a new cellphone with a higher resolution camera. I "shrunk" the photos by e-mailing them to myself and ticking the "make smaller for e-mail" option, but obviously that is not enough.
Now I have to learn a new skill.. manipulating pixel counts in photos.... or I could just bring out the old cellphone and use it as a camera specifically for the e-bike project!

Now I know what the problem is, and the limiting value, I know what I am aiming for. Thanks for the information.
 
Great build Drum, looking forward to seeing how well it rides :D I see you're in Otaki, small world, I'm in Waikanae visiting family until Saturday!
 
Hi Askor,
if you had the time, and wanted to come up & see the bike one evening, you'd be welcome. pm me..
Where is home?
Dave
 
Ok, Being a mechanical engineer, things so far have been within my comfort zone, but I am now getting into new fields.. the battery packs.
I have enough electrical knowledge to fully understand the basics: Amps, Amp.hours, Volts, resistance, series, parallel etc, but I am new to LiPo and EV batteries.
I am going to build two battery packs, each being four 5S, 5Ah LiPo batteries in series, giving 20S 5Ah, so when they are paralleled up I will have 20S 2P 10Ah.

I have bought the first 4 batteries.. Turnigy 5S 20C 5Ah from Hobby King.
I have found an aluminium alloy rectangular tube extrusion that the batteries fit into almost perfectly: 50mm x 65mm outside, 3mm wall thickness, so the interior dimensions are 44mm x 59mm. The batteries are nominally 43mm wide so they slip into the tube snugly, so will hopefully be able to conduct heat to the aluminium well.
The extrusion is a bit heavier than I would like, but the batteries will be well protected from knocks, and any battery fire will be contained.

Here's my planned arrangement:
WP_20141117_004 (Small) (Custom).jpg
WP_20141117_003 (Small) (Custom).jpg
WP_20141117_006 (Small) (Custom).jpg

I plan to extend the cables (including balance charging cables) on the batteries marked 2 and 3 so they reach the terminal area of the battery pack.

So far I am happy, beyond here I am hoping to get advice from other members:
1) Do I use connectors to series up the batteries or hard-wire them? They are fitted with 4mm bullet connectors standard, and it would be convenient to be able to separate the batteries in the future, but maybe hard wiring them would give lower resistance and greater reliability??
I doubt I will ever pull over 100A from the batteries overall, which would imply 50A from each pack, but I would prefer not to overload connectors or cables, and may possibly want to get full performance for a short time with only one battery pack on the bike.

2) Obviously each battery pack should have a fuse or circuit breaker built in in case the output cables are ever shorted. What sort of fuse / breaker is recommended, and how physically big are they? I would like to fit it within the terminal space I have available in the pack. What value of fuse / breaker?

3) I guess there would be a final circuit breaker downstream of where the packs are paralleled up, and I am wondering if I could use this as the main off / on switch for the bike.. any reason this is a bad idea? In this case I expect the final breaker would be selected so it would trip before the fuses / breakers in the packs blew.. My thoughts are to use fuses (motor rated 150 A??) in the battery packs and a motor rated breaker say 150A as the final protection / switch??

Advice / comments appreciated as I am just guessing here!
Thanks,
Dave
 
Another question on the battery packs:

1) I hope never to have a battery fire, but if I do, I do not want an explosion caused by pressure building up inside a very strong battery box! Therefore I am guessing that I need to provide some form of venting,that would suppress flames as much as possible but allow pressure to escape. Also preventing ingress of water / mud in normal use.
Any ideas?

I spent some time with my friend who builds Battery Management Systems> He would like to learn more about LiPo batteries, and I would like a BMS, but after looking at the size of his modules etc, we regretfully decided that it was not practical to build in permanent BMS systems.
We will make a single-battery-pack (20S) setup in the smallest box we can, and work out a way to plug it in to one battery pack, so it can be on board the bike or left behind, as I choose. I will have to find a place to mount it while riding.
Not as good as a full setup but it will still provide a lot of information, and it could be swapped between the battery packs so could spot a bad cell during use, and balance up the charging every second time each is charged, so well worth having.
 
to allow venting should some thing happen, I use 20mm blanking grommets .. in a loose fitting hole, placement of the grommits will have to be thought about as they are not 100% water tight so will need to be at the lowest point of the box .but they will blow out if needed.

Edit:
found this vid on youtube that demostrates the need to have venting .

[youtube]1jwS2puM800 [/youtube]
 
hmmm. don't want to see this happen on my bike. that's 48x 5000mah cells. could be A LOT of smoke. even though it was not THAT much smoke as i was expecting. so keeping them in the 3mm thick aluminium box with a nice pre-defined venting hole would at least prevent the environment form burning?!
 
Hi Dave, perhaps I can help with some of your questions

1) Do I use connectors to series up the batteries or hard-wire them? They are fitted with 4mm bullet connectors standard, and it would be convenient to be able to separate the batteries in the future, but maybe hard wiring them would give lower resistance and greater reliability??
I doubt I will ever pull over 100A from the batteries overall, which would imply 50A from each pack, but I would prefer not to overload connectors or cables, and may possibly want to get full performance for a short time with only one battery pack on the bike.
The first thing to think about here is your charging setup.. if youre going with a RC balance charger, the best you can do is 12S charging so you need a setup where you can connect the batteries in 20S2P for riding, and say 10S4P for charging. If this is the case then youre better off making a wiring harness that plugs into the 4mm connectors.

2) Obviously each battery pack should have a fuse or circuit breaker built in in case the output cables are ever shorted. What sort of fuse / breaker is recommended, and how physically big are they? I would like to fit it within the terminal space I have available in the pack. What value of fuse / breaker?
I can see the logic behind this but its not really practical given the space constraints. You've got excellent mechanical protection with the aluminium battery box which is all you need really.

3) I guess there would be a final circuit breaker downstream of where the packs are paralleled up, and I am wondering if I could use this as the main off / on switch for the bike.. any reason this is a bad idea? In this case I expect the final breaker would be selected so it would trip before the fuses / breakers in the packs blew.. My thoughts are to use fuses (motor rated 150 A??) in the battery packs and a motor rated breaker say 150A as the final protection / switch??
Solid idea but again the space constraints make this an issue as a 150A breaker is quite large (and expensive). Maybe just go with a fuse and use a battery isolator switch as the main on/off. this is what I am using for my e-bike http://www.aliexpress.com/snapshot/6340590893.html

Hope this helps,
Alex
 
Hi Stielz,
Thanks for the comments and ideas. I am doing quite a bit of research on the fuse / circuit breaker situation.
I think I am heading towards fuses in the battery pack and circuit breaker as the main switch as well. I have discovered "Noark" brand high voltage DC circuit breakers which have the same size as domestic standard CBs, although they don't do a high enough rating so a double pole unit in parallel would be needed... more research to be done!
My local electrical supplier's sales engineer is interested in my quest, and is looking through suppliers of equipment for photovoltaic installations, as they are similar voltage DC circuits. So we will see what disconnects / breakers / fuses he can find.

Eco, thanks for your comments.. your build and videos are helping keep my enthusiasm going, and pushing me to find the odd hour here and there to keep it moving forward. Hope you find a strong back hub and get riding again soon.

Dave
 
Keep going Dave, any project requires that you sacrifice 3 times the expected effort and 5 tomes the man hours and ...er, best not talk about the costs... :D

I built a vintage mx bike (not a resto, it was designed and built from scratch), with a pal and swore 'never again' on many occasions over a couple of years.
Eventually, eventually, you will get to the stage where you get your evenings and weekends back and can just ride. There is no better feeling than "... I made that, and it meets my needs perfectly".


Then of course you can start to design an even better one :shock:
 
Hi Stielz,

Real life is swamping me with demands on my time, and on the odd occasion I can squeeze some project time in, the telescope is priority.. other people are waiting for it and I have to get it finished soon.

A bit of progress on the bike.. I now have everything except a decent battery charger, and I have had the battery cases welded and a support tray folded so when I get a chance to work on it things should happen quickly.

Meantime you are catching me up.. you might be riding before me at this rate. Good to see progress on your build.
Dave
 
Yes, I have a Chinese pitbike moto style seat that I will adapt.

I will probably use the bicycle seat at first, and mount the moto seat later. I will mount it fairly low so it is out of the way for trials type riding, because I get into some tight, technical country with stream crossings, steep banks etc. Definitely do not want a high seat for that type of riding.
Adjustable height might be cool, but probably not worth the extra work.

Dave
 
Back
Top