Opening a hub motor - FAQ

Hello,

I have the same hub motor (from ebikekit.com) and I'have some trouble after remounting it.

I did open the motor, clean it a bit and after remounting the to covers, the motor is bent. I insist on the fact that it is not a spoke/rim issue, the whole motor oscillates when I turn the wheel.

I can't figure out what I have done wrong.

Is it possible that I've bent the metal of the motor when I've opened it ?

I hope I'll find a solution because now I have to use my old diesel car...
 
Without pics or diagrams or a better description, I'm unsure of your exact problem, but if it's just the covers, one of two common things could cause problems:

--covers are not always made perfectly, so if they are installed in other than the original rotation orientation, (using different boltholes to the sockets on the rotor than before), they may be offset so the wheel doesn't have the same offset around that it did before.

--covers are not always symmetrical, so if installed on the wrong sides, the wheel may not work like it should.


Unless extreme force was used it's unlikely the metal of anythign would actually bend to a noticeable degree; the same applies to bearing damage.
 
How to open A Q100C CST motor, after having removed the 6 screws if it is blocked by oxidation.

Here I speak about the BLDC motor to have access to the windings, the cassette cap side is already removed, and the inside block is out of the main alu cage .

Thierry
 
Hi all,

I add my own question here because I bought a while ago a 2nd hand BLDC hub motor on the french equivalent of craigslist. My first tests showed that the motor will run on some occasions (I haven't figured out which ones yet, the errors were not repeatable if I recall correctly).

Now that I have time on my hands (with the covid19 pandemy !), I decided it was time for me to open the hub motor. Problem is there is no visible screws on either sides.

Side 1:
hubmotor1.jpg


Side 2
hubmotor2.jpg


I tried removing the flask by hitting the axle with a wooden mallet, nothing moved (I opened successfully several RH205 and a Golden Motor in the past, thanks to the info on these forums). I noticed two notches that I thought could be used to unscrew the flask (supposing the flask is threaded).

I built a tool exactly for that, copied from the tool to change the discs on the grinders, but managed to bend its arms when I applied pressure while trying to unscrew the flask.

Tool View 1
hubmotor3.jpg


Tool View 2
hubmotor4.jpg


I'm out of ideas as to how I can possibly open non destructively that hub motor. Since I know a lot of such chinese motors were sold and no kind of maintenance was expected, I simply think that the manufacturer might have permanently sealed it.

If anyone smarter than me (and I know there are a lot such people here) can give me some advice, I'd be grateful :)
 
You need a better (bigger and stronger) tool. Here are some examples;

https://endless-sphere.com/forums/viewtopic.php?t=62056

Use the flat plate steel in the second pic and instead of doing that bad welding, use bolts and nuts to make the "nubs" that fit in the indent holes. If the side-cover(Flask is something else in english) will still not come free, gently heat around the outer edge with propane torch. It helps to have someone stand on the wheel.
"Lefty loosey" of course and good luck.
 
Thanks for your answer, momotech.

Alas, I can't build a strong tool since most stores are closed at the moment due to the crisis. I saw an adjustable wrench on Amazon:
https://www.amazon.fr/gp/product/B07Q43HBC2/ref=ox_sc_act_title_1?smid=A2NCAO2WVRYTOH&psc=1
that I will probably buy. Means I'll have to wait some more I'm afraid. (also thanks for the wrong use of "flask", I figured I saw that word used like that on endless-sphere but no !)
 
Need some advice here
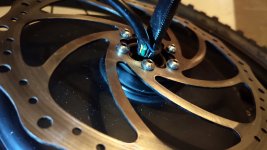
I have a chinese made ebike (RisunMotor-Aliexpress), obviously the brake disk managed to cut into the the motor cable
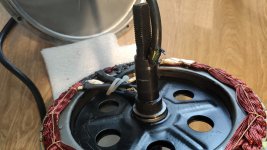
The small blue wire is completely severed, 2 bigger wires are partially cut, as in pictures
I managed to open the motor hub, had some experience from when I first got the bike (motor was defective out of the box, changed only core axle then)

So I figured I need to first feed the cable in, plenty of length, and solder cut wire and tape other 2.
I removed some silicone at inlet, cable seems free but not easy to move/push in.

IMG_20200410_203936.jpg
IMG_20200413_141109.jpg

The controller was toast, ordered a new one, motor was rotating freely so unlikely damaged

Any input on how to safely proceed forward is appreciated guys :thumb:
 
If you cut the zip tie, you can usually pull just enough slack out the axle end to repair them... But some times the repair is too bulky to want to go back in very far. If you pull it in the other way, you have to pull a lot more thru, and same thing with not sliding back out, and then maybe the other end is too short to reach the wire to the controller.

They make special wire pulling lube btw... You use it getting data cables thru conduits etc... Something like that can help, esp if you decide to bite the bullet and pull a whole new undamaged cable thru so it's got unbroken insulation and no splices, since you have it all the way open...
 
Thanks Voltron :thumb:
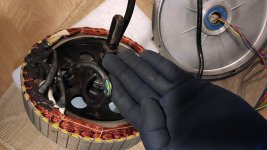
Managed to pull the cable from inside inlet, the big help was a tacky thin work glove, somewhat rubbery palm side.
Will weld/fix in weekend and hope motor is still working.

IMG_20200415_215759.jpg
 
was about to use a silicone lubricator btw .... had a can lying around for ages
 
Do you have a continuity meter for testing to make sure they're not either broken somewhere besides the obvious cut, or shorting before final reassembly?
 
Voltron said:
Do you have a continuity meter for testing to make sure they're not either broken somewhere besides the obvious cut, or shorting before final reassembly?
Was thinking of using my (dusty) avometer after the fix to check shorting (should be no circuit between different wires at plug end, right?)
Checking for other breaks didn't quite hit me... excellent idea especially when everything is exposed..... thanks :)
 
all the phase wires will appear to be shorted to each other, because they are connected at the wye-point inside the motor. that's normal. you'd have to disconnect that point to verify no other shorts, but it's a pita to do so if you don't have problems don't worry about that. ;)

no other wires should be shorted to each other, though, and no hall or power/ground wire should be shorted to any phase wire.


if you want to test for breaks in the wire for phases, just measure from every phase to every other phase, they should all read shorted. if they don't, something is broken.

to test for breaks in hall signal or power/ground, you ahve to measure from connector pins to inside the hubmotor itself.
 
:lol: couldn't hold it reading your post and realizing/remembering the principle behind the whole electric motor.... totally right ... cheers :thumb:

amberwolf said:
all the phase wires will appear to be shorted to each other, because they are connected at the wye-point inside the motor. that's normal. you'd have to disconnect that point to verify no other shorts, but it's a pita to do so if you don't have problems don't worry about that. ;)

no other wires should be shorted to each other, though, and no hall or power/ground wire should be shorted to any phase wire.


if you want to test for breaks in the wire for phases, just measure from every phase to every other phase, they should all read shorted. if they don't, something is broken.

to test for breaks in hall signal or power/ground, you ahve to measure from connector pins to inside the hubmotor itself.
 
Back
Top