To all the Raptor 165 owners, I finally dismantled my Raptor 165 to upgrade to a Q76R.
I've moved over to the Q76R thread
https://endless-sphere.com/forums/viewtopic.php?f=31&t=74286
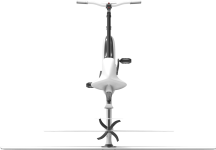
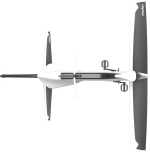
Some comparison photos of the Q76 and the Raptor 165.
I still can't believe how much thinner the frame is. The Q76R frame is also lower at the top.
The frame you see in the picture, The Raptor 165 is about 18 lbs (8.16kG) The Q76R is about 10 lbs (4.5kg) including aluminum side covers and shock mount . This is only what is seen in the picture, with no seat or swingarm.
Swingarm weight for the Q76R is 5.1 (2.3kg) lbs and the Raptor 165 is 6.6 lbs (3kg)
Motorcycle seat is about 1 lbs lighter in weight.
The Q76R top of the frame is lower when lining up the bottom brackets and bottom of head tube. The Q76R frame is also lower at the bottom than the raptor 165.
I can't believe I rode around in this wide frame. But it was actually very comfortable with the motorcycle seat and also since I didn't pedal.

You can see the Q76R is lower at the top. May benefit shorter riders.

The Q76R is lower at the bottom. I guess this will lower the center of gravity. I assume it is better to have it lower the the bottom.

I've moved over to the Q76R thread
https://endless-sphere.com/forums/viewtopic.php?f=31&t=74286
Some comparison photos of the Q76 and the Raptor 165.
I still can't believe how much thinner the frame is. The Q76R frame is also lower at the top.
The frame you see in the picture, The Raptor 165 is about 18 lbs (8.16kG) The Q76R is about 10 lbs (4.5kg) including aluminum side covers and shock mount . This is only what is seen in the picture, with no seat or swingarm.
Swingarm weight for the Q76R is 5.1 (2.3kg) lbs and the Raptor 165 is 6.6 lbs (3kg)
Motorcycle seat is about 1 lbs lighter in weight.
The Q76R top of the frame is lower when lining up the bottom brackets and bottom of head tube. The Q76R frame is also lower at the bottom than the raptor 165.
I can't believe I rode around in this wide frame. But it was actually very comfortable with the motorcycle seat and also since I didn't pedal.

You can see the Q76R is lower at the top. May benefit shorter riders.

The Q76R is lower at the bottom. I guess this will lower the center of gravity. I assume it is better to have it lower the the bottom.

")