Think I messed up my battery or motor, help needed

d8veh said:
You can now test to see if the BMS is switched on. Put your black probe on B- and your red probe on B14, which should give 54.2v. Now move your black probe to the point on the pcb where the thick black wire comes out of the BMS and goes to the output connector. It should be marked P-. If you get 0v or something less than 54v, the BMS is switched off. If so, try unplugging the mulipin connector and then re-plugging it to see if it switches back on. If you get the 54v, there's nothing wrong with the cells or BMS, so you have to follow the power wires to find the problem.

When I do this, should the battery be switched on but not connected to the charger, as if I were about to use it on the bike?

EDIT: I measured again, this time not connected to the charger, but the battery pack switched on:

from B- to B14: 54.2V
from P1- (where black discharge wire exits the BMS to connect to the motor), to B14: 48.5V
from black to red anderson powerpoles, of the battery's discharge wires: 48.6V
from black to red anderson powerpoles, of the battery's discharge wires (but with battery pack switch turned off): 40.0V

I disconnected and reconnected the sense plug and got all the same readings again, so that didn't appear to help. So it looks like my BMS is switched off. Would I need to get a new one? Or should I start looking for a component on the BMS that is blown?
 
dnmun said:
you already found a dead channel, what more do you need?

I need to find out the next steps in getting the battery to work (if that is possible at this point). I don't know what a dead channel is, or if that is something that can be fixed.

I've already stated multiple times that I don't know anything about electronics, and I posted very specific questions in my previous post. If you want to keep talking down to me, you don't have to post in this thread.
 
As I see it, you have two options. Either contact Calibike for an rma to get the battery replaced or repaired, or bypass the bms output and connect directly to the battery pack for discharge, using the bms only for charging and balancing the pack. Assuming your 48V controller has an LVC of 42V, it should shut off at an average cell voltage of 3.23V. Well within low voltage tolerances assuming the cells discharge somewhat evenly. Another option would be to remove the bms altogether and buy a 14s rc charger to charge the pack with or replace the bms yourself. Since you 're not familiar with any of this, your best option imo would be to get Calibike to fix the problem.
 
wesnewell said:
As I see it, you have two options. Either contact Calibike for an rma to get the battery replaced or repaired, or bypass the bms output and connect directly to the battery pack for discharge, using the bms only for charging and balancing the pack. Assuming your 48V controller has an LVC of 42V, it should shut off at an average cell voltage of 3.23V. Well within low voltage tolerances assuming the cells discharge somewhat evenly. Another option would be to remove the bms altogether and buy a 14s rc charger to charge the pack with or replace the bms yourself. Since you 're not familiar with any of this, your best option imo would be to get Calibike to fix the problem.

Thanks. I'll contact calibike.
 
I contacted Rafe, the guy who runs calibike.com and explained the situation with my battery and included a link to this thread. Literally, within 30 seconds of me hitting send, I received a phone call from him. I really appreciate that very fast response from him.

Basically he is going to send me a new BMS and new heatshrink sleeving, and also a link to a fuse that he recommends I install between the battery pack and my motor/controller. He said that he sent an email to owners of his battery with info about the fuse, but I never got it. I don't know if I ever provided my email address while ordering the battery so I wouldn't fault him for that. But it might be a good idea for him to post info about the fuse on his website.

Anyway, this is good news to me. I will probably come back here again seeking advice on replacing the BMS. Rafe said that I will have to solder 3 wires, which I don't think should be a problem. If anyone reading is in the Bay Area and would like to help me out in person when the time comes, i'll be happy to buy you lunch and/or a 6-pack of your favorite beverage! (PM me).

EDIT: Here is the fuse he suggested to install: http://www.ebay.com/itm/251742947572?_trksid=p2060778.m1438.l2649&ssPageName=STRK:MEBIDX:IT. What's the purpose of this, to protect the battery or to protect the controller? And how would I install it, e.g., in series on the red wire going from the battery to the controller? Overall, do you think it's a good idea to install it? I'm using the Bafang BBS02.
 
That's good. The three wires you have to solder are the two thick black wires B- and P-, and the thinner black charging negative C-. For the thick ones you need to leave your soldering iron on them long enough to heat them up and fuse the solder properly.
 
In the meantime, I received my 2nd battery from calibike today. I was hoping to be able to finally ride the bike but that's not going to happen today, because this one didn't come with Anderson connectors and I don't have spares on hand.

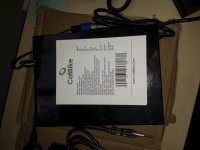
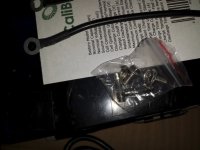
This one has different dimensions (5 3/4" x 7 3/4" x 4 7/8"), it is taller but not as long as the blue shrink-wrapped version. At 10.8lbs, it weighs roughly the same as the blue battery. Specs on the label appear to be the same as before. This battery appears to be a lot more robust than the blue version. The way you screw the discharge wires onto the battery seems like it will make it more secure, and easier to swap out different discharge wires when you want to, rather than having to solder. I was worried about eventually accidentally ripping the wires out of the PCB on the blue version.

The on/off switch is now integrated into the hard black plastic casing of the battery instead of thin wires with a bulky white switch that was dangling off the blue version.

The new casing also now has a charging port built-in instead of having really thin wires sticking out with a hefty 3-prong charging connector dangling at the end. When this goes in the trunk bag on the bike, nothing will protrude from the battery other than the discharge wires. These are all improvements as far as I can tell.

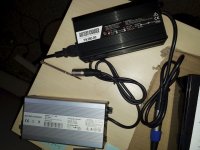
The charger looks different now. All black instead of silver, but seems to be the same specs (4A). Both chargers have a 250V fuse, and both included 2 spare fuses.

I need new longer wires and to crimp whatever this type of connector is called onto them to screw onto the battery on one end, and to crimp Power Poles to the other end. Apparently Home Depot and Ace Hardware don't sell Andersons, so I have to buy them online, which means another week that I won't be able to commute to school with the bike.


Pics:

Top:
file.php


Top with discharge wires and output terminals:
file.php


New charger (black) next to old (silver):
file.php


Screws and fuses:
file.php


Charging port and switch:
file.php
 

Attachments

  • IMG_20150203_163144.jpg
    IMG_20150203_163144.jpg
    92 KB · Views: 409
  • IMG_20150203_163246.jpg
    IMG_20150203_163246.jpg
    127.2 KB · Views: 409
  • IMG_20150203_163309.jpg
    IMG_20150203_163309.jpg
    100.8 KB · Views: 409
Back
Top