Your Creation's Before & After Pics

Hi all! I've been lurking for a few days and thought I would post up a couple shots of my first project code named Ghetto Electric v1. I'll get my asbestos suit on to protect me from the flaming I'm going to get about this one. lol

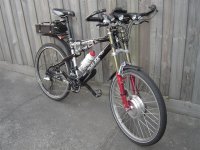
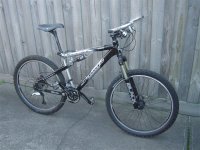
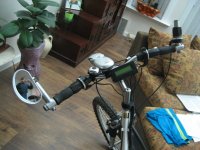
These are 'after' pictures but it isn't too hard to imagine the 'before' version. Sorry for the poor photo quality, it was getting a bit dark when I took these.


My original plan was some kind of hub motor but I got my hands on a new Kollmorgen for very little $$$. I decided to do a little playing around with some parts I already had around the garage and came up with a simple friction drive.

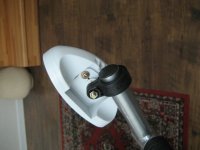
I started with a EV Warrior clutch roller bearing and machined a larger knurled roller for it (since the Kollmorgen doesn't have as high of rpms as the original ev warrior motors). I then made a simple aluminum frame to hold the motor to the rear rack and a bearing support so the Kollmorgen's bearings don't get too much load.

I need to make a couple of little supports from the rack to the top rack frame mounts to ensure the whole assembly never moves to one side. The roller actually centers itself but I would hate to hit a bump at speed and have the motor slide into the tire.

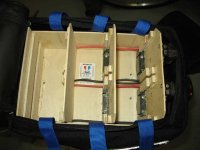
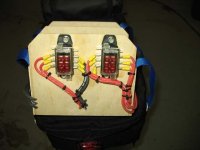
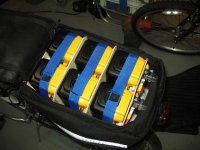
I must say I was very very surprised with the results. The friction drive works very well (I never ride in the rain, btw). I've used the bike daily for quite a while now (over 400 miles since converted). I'm currently using two 7ah sla batteries and get around 12 miles per charge with moderate pedaling and one decent size hill on my daily route. I really don't see too much of a downside to the friction drive. It doesn't need to be plastered on the tire to give a good amount of assist so I don't see it being that inefficient and I haven't noticed any tire wear since I've used it (yes the tire in the photo is a bit worn but it's getting old and it's not from the roller).

Top speed is 16mph and I'm shooting for 20. The next project will be a 36v external controller to raise the motor rpms. Then I can reduce the size of the roller a bit to make hill climbing even better.

Is there anyone else here using friction drive?
 
Hey now that's excellent !! well done !

amazingly simply i must say, this would transfer to another bike very easily, makes for a quick-on quick-off setup !

I'd like to try a friction setup with 2 rollers and a belt, with a big large contact patch on the tire instead of a single roller ( for jack-rabbit takeoffs ).

Great job !
 
Thanks for the kind words ypedal!

I'm not sure you would ever really need two rollers and a belt. If you adjust the roller a bit tighter you can accelerate rather briskly with one roller.

I keep mine on the loose side just to avoid burning up the wimpy stock controller and I'm still amazed by how much torque it has.
 
EVTodd said:
Hi all! I've been lurking for a few days and thought I would post up a couple shots of my first project code named Ghetto Electric v1. I'll get my asbestos suit on to protect me from the flaming I'm going to get about this one. lol

Hey, it's an EV (in other words, "not a gasser" -- so no asbestos necessary here :) ) and it sounds like it's working great, in a compact, modular design incorporating spare parts too.

This may not pertain to your expectations, but if that system was mine, I'd be wondering how well the friction drive elements would scale to higher wattages -- say, 2,500 watts. :) And also if the drive would slip on steep hills, in wet conditions, when riding over bumps, or similar such potentially friction-reducing situations. Perhaps a sheath over the roller, made of rubber, or other soft, sticky compound could help?
 
Xyster,

I've tried this setup on some pretty steep hills and it worked very well, of course, with only 24 volts you can't stomp on it and fly up a huge grade but if I feather the throttle it pulls very well without the roller slipping.

Friction drive pretty much sucks in the wet. I've tried it and it works ok if you tighten the roller but I really don't like riding in the rain anyway so that's not a big issue with me.

2500 watts!?! I would like to try it! :) I imagine I would have some tire wear with that kind of power! lol

It would probably still work if you had some self control and pedaled first.

Actually, my big concern (other than the motor or mount slamming into the tire) is how much torque the roller bearings can take. Maybe I'll add an extra bearing for each 12v battery I add. :)
 
Nice job! I bet it's quiet too.

To increase the voltage you'll need an external controller. The bearings should be fine.

If the internal controller ever blows, you'll have a good excuse to go for an external controller.

How does the roller attach to the motor shaft?
 
fechter,

It is indeed very quiet.

The roller isn't really attached to the shaft at all. There is a hardened steel pin that goes through a clutch bearing in the roller (which is the bearing I fear might not be able to handle a ton of torque). The roller simply floats on the pin. It's great because it freewheels when you're not using the motor (or if you pedal faster than the motor) and feels like a normal bike.

The hardened shaft has steel adapters on each side of it that are a bit of a press fit with split pins that go through the shaft. One adapter is attached to the motor shaft with a set screw and the other rides in the support bearing.

I do know about the need for an external controller above 24 volts. I'm actually looking for one right now. Anyone know of a cheap 36 volt controller other than crystalyte? I have to stay within the 'ghetto' theme so I'm trying to keep the $$$ low. :p
 
EVTodd,
Good work! Simplicity at its best.
Have a look at solarbbq, he has a good selection of assorted e-bike parts,
Rob
 
I recently saw a cheap brushless controller on the forum here, but I can't remember what thread that was in.

They have a relatively cheap one at:
http://www.goldenmotor.com/

If you got the really cheapest POS one you could find and upgraded the FETs, it might actually work well. Even in stock form, if it has enough current to slip the roller, you wouldn't gain much by upgrading it. Around 30 amps is the most that motor will take anyway.
 
Unfortunately the other end of sales@goldenmotor.com is currently fickle in responding to e-mail. They seem to be focused on selling their wares in bulk on the mainland, so sales through the website are treated as a hobby for whenever they feel like answering. I keep a presence on their web forums and I haven't heard too many complaints about controllers failing, but they seem to be having some significant quality control problems with the hubmotors themselves (and issues with damage in-transit). We're all hoping they clean up their act.
 
If you got the really cheapest POS one you could find and upgraded the FETs, it might actually work well.

I have been thinking about messing around with one of the 'el cheepos on eBay. I'm not afraid to tinker a bit even if I screw something up now and then. My big fear is that the cheap controllers might be potted in which case I would be screwed.

I think the highest spec one I found on there was 48v at 18 amps or something like that. I assume you could run that controller at 36 volts too.

As you said roller slippage is the exact reason I thought it might work too. But... I'm probably pulling pretty good amps up large hills. I usually only run a 20 amp fuse and it's never blown. Although, I did try a 15 amp fuse yesterday and it popped rather quickly.

The controllers on eBay are listed for 60 degree motors. Is the Kollmorgen 60 or 120?
 
EVTodd said:
The controllers on eBay are listed for 60 degree motors. Is the Kollmorgen 60 or 120?

There's still some debate about the significance of that. I'm sure there's a way to make it work correctly. Worst case scenerio is you need to reverse the orientation of one hall sensor, which is pretty easy on a Kollmorgen. I don't think that will be necessary.
 
I figured I better introduce mself, as I have been lurking here for so many months, (I lost count) stealing ideas and information for my bike. I think I got the idea to build one when I saw the Schwinn electric on Engadget. I thought "I can make one cheaper than that!" Boy was I wrong! But, mine outperforms the Schwinn and I learned a lot along the way, which is why I like new hobbies now and again.

I bought the bike at a pawn shop after checking out all of them in town all summer. I got lucky, as I found one with a 7 speed Nexus hub, which is nice as you can change gears while stopped. I also got it very cheap and it was like new. I modified it for electric assist, by changing out the rear sprocket to the smallest one available for the Nexus. I also found a ridgid, suspension corrected steel fork that was identical in trail - 38mm to the original aluminum suspension type . :)

The specs are: Crystalyte 408, 72 volt 40 amp controller, full twist throttle, CycleAnalyst ( all from the good folks at ebikes.ca ) 6 Dewalts in series parallel. That's about it. I can get 20 miles out of it pretty easy, and I use it as a commuter vehicle, 7 miles each way. I can get to work, within 5 minutes of the time it takes to fire up my gas guzzling SUV and drive it in. I have had it up to 30 miles an hour, but, I normally have it speed limited to 20, to save power. Don't know what the top speed would be.

Thanks to everyone here- for all the good info and ideas. I think this is a pretty good community and it appears to be growing a good rate.
 

Attachments

  • Trek eBike4.jpg
    Trek eBike4.jpg
    40.2 KB · Views: 10,354
  • Trek eBike3.jpg
    Trek eBike3.jpg
    32.5 KB · Views: 10,352
  • Trek eBike2.jpg
    Trek eBike2.jpg
    47.9 KB · Views: 10,363
Welcome EMF, and very nice work. Looks like I'm no longer the only member using wood for their lithium battery box. :D
 
Nice EMF, your setup is extremely clean and tidy, especially the battery box. One question, though: What is the battery arrangement exactly? You said "6 Dewalts in series parallel", and I'm rather confused. Since it looks like you didn't have to modify the Dewalt packs any, are they all in parallel, running at 33v?
 
xyster said:
Welcome EMF, and very nice work. Looks like I'm no longer the only member using wood for their lithium battery box. :D
Thanks Xyster. I actually thought about you a lot as I built this thing, as even though I did not use any duct tape - I used plenty of "Gorilla Glue" and cable ties. In fact, there are only 4 screws in that box and that's for the fuse holders. That glue is good stuff! I also took your idea to mark the nuts on the hub motor axle with a painted line, to make sure they are not coming loose! Plus used removable locktite and double nuts. :)

lazarus2405 said:
Nice EMF, your setup is extremely clean and tidy, especially the battery box. One question, though: What is the battery arrangement exactly? You said "6 Dewalts in series parallel", and I'm rather confused. Since it looks like you didn't have to modify the Dewalt packs any, are they all in parallel, running at 33v?

Hi! Thank you. The Dewalts are first wired in series pairs, with #12 noodle wire, with a 10 amp fuse on each individual 36 volt pack for 72 volts. Then I paralleled each 72 volt set. Total of 3 pairs, tied the ends together with #10 wire for the output. I think this is called 20s6p. Of course, it's only 66 volts, but this seems plenty to haul me around and nothing gets hot.

The DC9360's are not modified. I'm glad too, as 2 of the batteries I got off ebay out of 8, had to be returned for warranty after a few rides. When I stuck them in the charger they showed the bad battery code.

The nice thing is, I sent them in on UPS ground and they came back in two days! The service center is only an hour away, so I lucked out there. They even paid the UPS frieght one way. I have put over 100 miles on the packs since with no problems.
 
So the Dewalt BMS is OK with two packs in series then? If so, that's great. I seem to recall other people's blowing when put two-in-series, but I could be wrong on that. Glad some of my ideas proved useful to you. That high-strand-count noodle wire is great stuff I thought....
 
xyster said:
So the Dewalt BMS is OK with two packs in series then? If so, that's great. I seem to recall other people's blowing when put two-in-series, but I could be wrong on that. Glad some of my ideas proved useful to you. That high-strand-count noodle wire is great stuff I thought....
Yeah they're ok. My logic was, that the "load" would be shared between all 6 packs equally, since I bypassed the BMS for discharging, by using the outer stakes. But, to be safe, I placed the 10 amp fuses, to try and not blow the 15 inside. According to the CA I think the peak amps I have pulled is right at 38-40.

Now, If I just ran 2 batteries I think I would have problems.
 

Attachments

  • wiring.jpg
    wiring.jpg
    14.1 KB · Views: 11,550
EMF said:
xyster said:
So the Dewalt BMS is OK with two packs in series then? If so, that's great. I seem to recall other people's blowing when put two-in-series, but I could be wrong on that. Glad some of my ideas proved useful to you. That high-strand-count noodle wire is great stuff I thought....
Yeah they're ok. My logic was, that the "load" would be shared between all 6 packs equally, since I bypassed the BMS for discharging, by using the outer stakes.

OK, so you did bypass the BMS for discharge then. I think other people's Dewalt BMS's have fried when two or more packs were wired in series because of the external voltage on the BMS FETs, not because of the internal amperage limit determined by the in-pack fuse.
 
Yes I think so too. My understanding is if you use the outside stake connections, you only have to worry about the internal 15 amp fuse. I don't think the BMS will even work at all anyway, for discharge at least, unless you try to fool the pack with resistors. I think someone, cylcemotorengineer, or possibly one of the RC guys?, figured that out- by using a drill or something and determining how it communicated with the pack. At least this is what I remember reading in here somewhere.
 
EMF said:
The nice thing is, I sent them in on UPS ground and they came back in two days! The service center is only an hour away, so I lucked out there. They even paid the UPS frieght one way. I have put over 100 miles on the packs since with no problems.

See if you can score some free ones from the service center :wink:
 
fechter said:
EMF said:
The nice thing is, I sent them in on UPS ground and they came back in two days! The service center is only an hour away, so I lucked out there. They even paid the UPS frieght one way. I have put over 100 miles on the packs since with no problems.

See if you can score some free ones from the service center :wink:

Yeah, good idea. I happen to know they have or had - at least two!

Frankly, I was so concerned about getting them replaced under warranty, I did not want to mention how they were being utilized. :oops: Luckily, they never asked what "tool" I had them in. :)

Since I'm not using the BMS I was afraid they would say this is what caused the problem. I really think they were defective though, as I had the CA set for 60 volts. At rest, the packs when all together, even came up a bit from there, whilst still in the bike. When I tested the individual packs with a voltmeter, from the terminals, I felt like one cell had "died" or lost contact somehow. Because in each of the 36 volt defective packs, they had lost ~3 volts. Plus, I can go a lot farther now (it seems) without the voltage sagging off of 66 volts at rest.

After a while, if I don't have any more trouble, I may just try that.
 
It's a double up to my thread, but here are my before and after shots - bit of a change from the original!
 

Attachments

  • After.JPG
    After.JPG
    134.9 KB · Views: 7,301
  • Before.JPG
    Before.JPG
    124.1 KB · Views: 6,816
OK here is the before.
13598640.jpg


and of course the after.
it needs the wires cleaned up a bit.
2019713121_3a6788666f_o.jpg
 
After my first long trip, figured out I needed a mirror.

Almost ran off the road looking behind me..

You don't want to crash with that much weight and $ 600 of batteries on top...

Bought an add-on mirror from the automotive section, took off the mount and rigged a mount from some bike tail light.
 

Attachments

  • IMG_2468.JPG
    IMG_2468.JPG
    48 KB · Views: 11,110
  • IMG_2469.JPG
    IMG_2469.JPG
    80.1 KB · Views: 11,108
Back
Top