Custom KMX recumbent trike with QS205

So that huge piece of tubing in the rear is for a trailer or towing trucks maybe?
 
calfeetwenty said:
So that huge piece of tubing in the rear is for a trailer or towing trucks maybe?

For towing a trailer, the tubing goes right over top the rear tire, has a 1/2" bolt going thru it and a 1/2" heim joint that will thread into the trailer hitch. the trailer is a modified bicycle trailer - removed the normal trailer tires, welded on 10mm bolts to use as axles. The tires I'm using are from an old ebike they are 18 x 2.5 cast aluminum wheels (they have drum brakes but I'm not connecting them)

One of the future plans is to make a camping trailer, with solar and to have solar canopy on the trike, along with side walls on the trike and a bit of a velomobile type body. Part of the wiring on the trike includes the trailer connector in which the computer knows when and what trailer is connected, it can then do a self test and control what ever lights have been designated on a given trailer.
 
Going to be doing machining of the rear motor mounts tomorrow, hopefully I'll have enough time to finish them in one go.
Wiring and assembly will start next week.

I also received the suspension kit from adam... wow the machining and design on them is just awesome, I'll post photos as I assemble the trike.

Painted the frame flat black just using Armor Coat paint.
Down the road I wouldn't mind using getting either epoxy painted or truck bend liner so it can last long term...

top frame painted.jpg
View attachment 1


The front tires have been assembled (but I damaged one of the tubes during assembly; with new one on the way) one tire assembled weights about 8lbs, while this might diminish the suspension quality over all, one of the reasons I wanted these tires is for long distance travel (tire wear and flats from potholes). I also wanted more space between the handles and tires. so we'll see how it performs in the long run with such heavy tires.

front rims_tires_tubes.jpg
View attachment 3
 
tonystark20 said:
I also received the suspension kit from adam... wow the machining and design on them is just awesome, I'll post photos as I assemble the trike.

Thanks for the kind words :)

tonystark20 said:
The front tires have been assembled (but I damaged one of the tubes during assembly; with new one on the way) one tire assembled weights about 8lbs, while this might diminish the suspension quality over all, one of the reasons I wanted these tires is for long distance travel (tire wear and flats from potholes).

Ya, 8 lbs is gonna be a bit too heavy in my opinion.

I had knobby tires before also and I had to switch as they were too noisy and energy inefficient.

You should give a try to the mop tires I am using right now, they are puncture resistant while being fairly light as they fit on the regular KMX rims.
 
Good call on the moped tires, had an old scooter style e-bike that used them and didn't think to use them for this. For now I'm going to use what I have as I don't have time or budget to go back and order new spokes for the original 20" KMX rims that I have (some snapped last year)

The suspension makes the trike look so great as a whole.
front tire_suspension.jpg


Made a 3D printed bracket to hold the J1772 connector in place (printed in orange ABS to signify high voltage; anything high voltage is being label and using orange wiring)
J1772 mount.jpg


The wiring assembly has started, I wont be pinning anything in place until the sheet metal has been put together and I know where everything will be travelling.
partial assembly 1.jpg
View attachment 3
 
adam333 said:
why is there two cycle analyst?

One is v3 for the main motor and battery pack (I'll be using some of the limit functions and eventually want to add a thun sensor so i can pedal and enjoy scenery when travelling long distance.

The other is running marine software to track the usage from my 11.1v 3s 30ah battery

all the lights and arduino are run off this battery, the 72v 54ah (20s 16p) battery only powers the motor.
 
adam333 said:
Interesting, I didn't know Cycle analyst could work at 11V
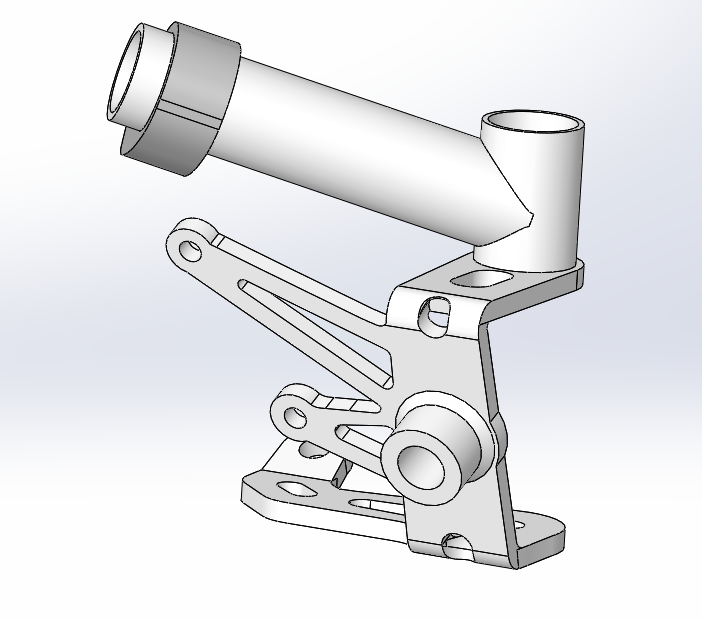
The manual for the cycle analyst says the voltage range is 10v to 150v. which is likely the rating for the internal voltage regulator, unfortunately that does mean the display will likely stop working when the cells in the 3s battery are at 3.33 v I might end up open the cycle analyst and bypass their regulator with a buck boost so that if i decide to run down the 11.1v (I'd have to be using lots of lighting or long travelling for that to happen) but still be able to accurately track ah used on the battery pack.

The better solution would have been to use a 4s pack but didn't realize the cycle analyst cut out voltage until I starting assembling things, and all the lights and their associated resistors are set up for the 3s battery. so I'll make due. (there are actually quite a few things I'd change with the electronics but that will be an upgrade and change down the road)

There has been more assembly on the frame:
View attachment 4


The wires have been selected wires and trimmed them for the trailer connector (they will have a sheathing on them)
partial assembly trailer connector.jpg


Tail lights have been put in place, the wires that travel inside the tubing along each side come out right next to the tail light to try and keep everything together and neat. the right side has all the wires, and I started the left side today.
partial assembly tail light.jpg


The top bar has all the wires run, the pod lights are fastened into place. the strobes will be soldered into place and bolted up.
partial assembly top bar.jpg


Motor was mounted the other day (just took the photo today) I added the derailleur today, originally I reused the old mount point from the original dropouts of the kmx and re-welded it down lower but it was too low and if mounted there the chain would hit everything on the ground, so I drilled a blind hole in the aluminum and tapped it just deep enough to mount the derailleur, its a actually position quite well. the mounts have an extremely tight fit into the tubing but will be drilled and tapped for bolts but I'm waiting to assemble so sheet metal boxes that will house electronics on both sides and use those same bolts to stay in place. needless to say I don't think the motor will be going anywhere and if it did I'd be very surprised.
motor mount with derailleur.jpg
 
what total weight do you expect for te trike?

It is important to keep in mind that those pieces bellow are relatively weak.

Spindle%20K%20right%20new%20piece%201.png
 
I knew when originally planning the build that it would be heavy - maybe 50-80kg was the target I had in mind. I would have liked to make it less weight but alas I had to work with what I had. I definitely think I'll spend some time designing new spindles to be CNC'd. You wouldn't happen to have a model of them or a scan of them already would you adam? (the old spindle type that is)
Think about it now I might be able to design a new spindle that would also replace the first plate of the suspension, (the suspension arms would bolt onto the side of the spindle instead. (thoughts?)


as far as the actually weight I'm not sure but plan to take it to a scale once it's done.

the weights I know right now (or estimate)

13.5kg for 72v attery (just the cells)
3kg for the NESE modules
1.5kg for the 11.1v 30ah battery
~15kg for the motor and tire assembly
7.3kg for both front tires
1.5kg for the offroad lights
19kg for the orginal trike frame
10kg in added metal frame
1.6kg for both headlights

Total so far: ~75.4kg; doesn't include other lights and accessories at the very least I'll have to get it weighed at a certified scale to ensure I can prove that It's under the 120kg ebike law limit in my province (state) but it does seem clear to me that the current point of failure for the trike will be those spindles.
 
adam333 said:
Personally I would just make the spindle thicker, or maybe cut in a Hardox steel plate. It would be cheaper and easier.

Good point, will have to keep that in mind.

I finished the welding of the trailer last week, mounted the heim joint for the hitch (works nicely so far), the frame has been painted and a box was 3D printed to hold the electronics to run all the trailer lighting. Next up is to assemble and wire the trailer.
Trailer welded and painted.jpg

Top light bar has been mounted and wired, all functions work correctly. On the rear is a traffic bar, top has spot lights, bottom has flood lights, and the front has dual amber strobes.
View attachment 2


The J1772 charging connector was mounted - used a 3D printed bracket (made orange to signify high voltage per automotive standards) the connector then bolts to the mount, it also hold the connector at and angle which should make plugging in easier.
J1772 mount finished.jpg


The marker lights on both sides have been soldered. I still have to test the multi color leds before I permanently attach them.
marker lights wired.jpg


The headlights are installed and aimed correctly, I now have a few other wires for functions within the headlights that have to be soldered.
View attachment 4


The things still to be done include, the key switch, horn, cycle analyst wiring, throttles, brakes, motor controller, control panels, sheet metal, batteries, and trailer assembly. Overall should be done soon.
 
I finally came up with a name, currently 3D printing it to be added on the front of the light bar above the drivers head.THE BEAST.jpg


also 3D printed a mount to hold the shunt in place, along with a bunch of small pieces to hold some zip-tie for the few spots where wiring is visible along the frame.
View attachment 1


The front headlights and control panels are installed, because these wires are exposed to the elements I put liquid electrical tape over the heat shrink as I didn't have any glue based heat shrink on hand.
View attachment 2View attachment 3


The trailer has been assembled, lights are in place temporally, so that I can start running all the wires to correct length.
Also up-close shot of the heim joint hitch along with 3D printed spacers
partial assembly trailer.jpgView attachment 5

The sheet metal has also been fabricated so I'll be finishing off the trike very soon.
 
was able to put forth some more progress, including putting the bottom piece of sheet metal in place, have the foam gluing on the one side (only have so many clamps available). the foam helps protect the battery from vibration and accidental shorts against the metal frame.
View attachment 3


a bracket was made to attach a car horn on the front boom, riveted to the frame below the extended boom portion.
View attachment 1


The name was 3D printed and painted and added to the top of the light bar, had initially planed to put it on the front of the light bar but their isn't enough room as the front strobes were longer than I thought. Oh, well I think it still turned out quite well.
finished name.jpg


Started to mount the battery charger. The bolts I'm using are too long so I spent time cutting then down to length. Using nylock nuts so that they can't come apart from driving down the road, was amount to tighten everything down but remembered that the charger was advertised as 110-220v but the seller has had issues with people burning chargers as they forget to change the switch for what voltage they are using - so they sent me the 110v version. thankfully inside there is a link I can cut on the PCB that allows me to switch it to be used on 220v (which I need when using the J1772 connector) I also have a sheet metal cover that I'll be adding over top the charger which will protect it from the weather but still allow air flow from the fans within the charger.
mounting charger.jpg


Overall not too far from being done, still need to make two sheet metal boxes for each side of the rear of the trike to put electronics (10x10x5 inch) along with a cover for the bottom battery box then finish off the wiring within the boxes and trailers, then lots of arduino programming, and motor settings and cycle analyst setup.
 
more progress, (which I'll keep posting progress until I complete this beast.) Hoping to finish in the next few weeks.

I have the foam all glued in place for the bottom battery pack. I assembled the 12v battery pack using the vruzend battery system, not a bat system but rather tedious to assemble, and far to easy to potentially short something. defiantly took time and care. The 3s 60amp bms that I have on it is a dud so it will be removed and I'll use my smart balance charger to keep it balanced and eventually add the BMS back. I have a feeling that I'm going to enjoy assembling the NESE modules way more because of their simplicity. I'm also glad I have a smart Bluetooth bms for that main battery as it will make it easier to ensure that everything is working normally.
finished bottom foam.jpg


They key panel which I used on an old trike has been added to this trike, the key will switch 12v power for the lights and for the main contactor, the green button used to be an indicator as I no longer need the indicator and didn't want to make a new panel,I drilled a hole to add the button. This button will control the pre-charge contactor. i'm using a 1k 10watt resistor for pre-charge.
key panel.jpg


Trailer lights have been assembled and wired, still have to assemble the marker lights on the trailer and run the wiring to the PWM module that is on the trailer, and assemble the 7 pin trailer plug.
trailer lights wiring.jpg
 
This thing is starting to look more and more like an electric car build. Definitely one of the most street-legal fast setups out there.
How many KWh of battery do you have for the main pack? With that vehicle, I'd personally go for at least 2 KWh of battery.
 
thorlancaster328 said:
This thing is starting to look more and more like an electric car build. Definitely one of the most street-legal fast setups out there.
How many KWh of battery do you have for the main pack? With that vehicle, I'd personally go for at least 2 KWh of battery.

Ya, I'm probably blurring the lines between vehicles.

The motor will definaty have a decent top sped, but I mainly wanted the torque to go up any hill in my area.
QS205 hub motor 32*343, about 930rpm at 72V (went with a higher torque winding) laced to a 17inch motorcycle rim

the battery is NESE 3d printed modules 20s 8p (X2) with Sanyo 18650GA 3400mah cells for a total of 20s16p ~54ah for a whopping 3.996kwh hours using the grin motor simulator, I've estimated a range between 300-500km under various conditions, but wont really know until I start driving and can look at my wh/km.

as for street legal, I'm going to use the cycle analyst to limit speed to road legal limits, most of the time the only reason I'll go faster is to keep up with traffic (40km/h) or to make a left turn on a 3 lane road when no one will let you change lanes. as longas you are reasonable and not a complete hoon, I find the police wont bother you, But to be safe I plan to take the trike to the scales as my first stop to ensure that I'm within the weight limits of an e-bike in my area. (max 120kg)
 
It's definitely a strange one.

I'm wondering what the finished product is going to look like. It's kind of hard for me to see what direction the builder is going with it. So far a lot of the added weight looks non-functional, but that's only because I don't know what the builder's finished product is going to look like or even what it's going to do.

Is this trike going to have a body shell on it?

I like the trailer hitch. Any idea what its load capacity will be? Performance specs?

If the new steering spindles hold up to this usage case, then it will be safe to say that they are no longer a weak point.
 
adam333 said:
One thing is sure... This trike won't go unnoticed!

Just hope it gets noticed for good things, and that people can appreciate some of the hard work that goes into it.

The Toecutter said:
I'm wondering what the finished product is going to look like. It's kind of hard for me to see what direction the builder is going with it. So far a lot of the added weight looks non-functional, but that's only because I don't know what the builder's finished product is going to look like or even what it's going to do.

Ya, fair amount of the weight is likely unneeded. But i like the look and function of some of it. plus with amount of lights should cut down on the number of drivers that say they can't see me. The over all goal of this build is to act as a showcase piece for my company (3D modelling, Electronics, 3D printing, Fabrication) The trike will also be dual purpose as it will allow me the ability to go from A to B (and likely Z)

The Toecutter said:
Is this trike going to have a body shell on it?

I would like to do a solar roof and side panels to protect from rain but that will be a future endeavor (need money...) Plus I'll likely have a weight issue adding such changes that I'll likely have to redesign the trike with an aluminum frame and find an easier way to cut the wiring down (I'm thinking custom electronic modules)

The Toecutter said:
I like the trailer hitch. Any idea what its load capacity will be? Performance specs?

The trailer hitch is uncharted territory for me. I chose a heim joint so that the hitch could move in all ways that it would need to to function (and does seem to move very nicely around the shop) The supplier I purchased it from lists this information:
Item: POSB8 Bearing
Type: Male Rod Ends
Thread Size: 1/2" UNF
Ball diameter: 1/2"
Dynamic Load Rating: 15 KN
Static Load Rating: 19 KN

In the current design, the likely first failure would be the white ABS 3D printed spacers (2 outer shells, 40% infill) there is a decent amount of flex in the rear section that should help with unloading stress. The trailer isn't really that large (especially when compared to the trike) but will hold the groceries that I'd end up carrying. along with my backpack if I were travelling.

The Toecutter said:
If the new steering spindles hold up to this usage case, then it will be safe to say that they are no longer a weak point.

I haven't done anything to the front spindles (yet) other than adding a steering dampener (was having shimmy in the tires even before modifications but they would happen at any speed and always had to keep both hands on the steering. even tried adjusting toe with no luck. but looking back now it may have been related to loose spokes; after 501km in 4 months last summer I stopped riding as 6 spokes snapped on one wheel)

I will likely add some steel plate to the existing spindles to strengthen them, but will also end up designing some aluminum replacements for CNC as if I end up doing some long term goals, then I'll end up make an aluminum frame to replace the steel one.

As for the direction That I'm going, I hope to be done within the coming week. At the very least should have it driving and will have to spend time programming all the controls and lighting, but will need to get my computer out of storage as I forgot to make a copy of the code I started writing (took a long time, not worth trying to recreate) everything is in storage as I'm done college and looking for a new apartment as I'm moving out of student residence.
 
In the past 2 days, I've finished the wiring on the trailer (minus the marker lights; which I'll worry about later)

I also assembled the main battery. 74v 54ah... This thing is big and heavy and fits snug like a bug snug in a rug. I wire up the BMS and the shunt. The BMS bluetooth sucks but was expecting that and will likely replace that at a later date. However the PC connection works great and was having no issues, as is the battery still has a storage charge from when purchased. The max difference in voltage is 8mv (I may have sparked the battery a few times) but over all seems good. I tried to wire up the charger I had but when I plugged it in all it would do is pulse on and off while trying to trigger the output relay. So I disconnected the charger output from the battery and let it sit and tried again, hear the capacitors charge up but then it did the same thing (minus the relay as the battery wasn't connected) disconnected ac again, wait about 10 minutes tired again with it no longer doing anything. I'm going to probe the PCB and see if power is actually getting in have a feeling the power cord is bad, no electrical smell coming from the unit, no soot, no heat, caps all look fine,so I think it might be a power cord or input issue (input fuse was fine too)


assembled battery pack.jpgassembled module.jpg
 
At what speed did you simulate 300-500 km range?

With your current setup, the drag is probably horrendous. CdA is probably more than 0.5 m^2. Those tires probably aren't very efficient with regard to Crr as well.

That is a huge battery pack though. There was a time where lead acid battery powered car conversions often didn't even have 4 kWh usable on board.
 
The Toecutter said:
At what speed did you simulate 300-500 km range?

40km/h - at full speed (70km/h it says 183km) granted it shows wh/km being 8 - I've never gotten better than 10 before the modifications when using a golden motor pie 5.

And I imagine the results will be different as I don't have the exact specs for the battery resistance or motor controller resistance added to the simulation. That and those tires will definitely add some rolling resistance. Will be interesting to see what my actual wh/km ends up being.


motor simulator.jpg
 
That is one BIG battery :) How was assembling NESE compared to vruzend? Any feedback would be appreciated.
Build looks intense. A lot of work theres
Cheer
 
Back
Top