• Hello ES! We could use some help to get us past the finish line on building the new knowledgebase for the forum.
    Can you donate? Please see our fundraising page. Thank you!

2015 Specialized Awol Elite BBSHD build

TexanInTennessee

New-ish here
Joined
Jun 21, 2026
Messages
36
Location
Tennessee, USA
Hello, this is for my build.

Compared to so many things I see on this forum, this is a vanilla build. But it's my build and I will share my joy and geekiness with you here.


Base bike, a 2015 Specialized AWOL Elite:

1783003533742.png

Got this ten years ago to go ride the KT trail.

I just could not adapt to the drop bars despite trying. Swapped them for a swept bar, stem riser, and matching Tiagra upright components.

I stopped cycling for a few years, been hiking. Live in Appalachia now right next to the AT.

The bug returned, I took inventory, had this nice steel frame bike.

Knew a mid-drive was necessary for where I live, started getting components and am still awaiting the last of them before I dig in.

Here is the build list to date, more to follow:

Upright Conversion
Handlebar:Origin-8 Transit Ergo Hbar
Cockpit Stem:Bucklos 35mm
Stem Riser:Delta 2.5"
Shifters:Tiagra direct swap (drop to upright)


Drivetrain & Power
Motor:Bafang BBSHD M615 52V 1000W CAN-Bus
Battery:52V 25Ah Samsung 50E cells (1300Wh, 40A BMS)
Display:EKD-01
Chainring:Gustavo 42T for BBSHD (1x conversion)
Chain:KMC E10 Turbo 136 links
Brake Levers:Bafang mechanical with cutoffs
Shift Sensor:Varstrom sensor

Customization
Front Rack Removal
Chain guide:Muqzi Aluminum Alloy - Red
Pedals:Bucklos Nylon Fiber - Red
Tires:WTB Resolute 700x50 (from 42, could fit some 55s)
Tubes:Continental
Grips:ESI Extra Chunky Silicone - Blue
Bar Ends:ZFZ Bar End Plugs - Red
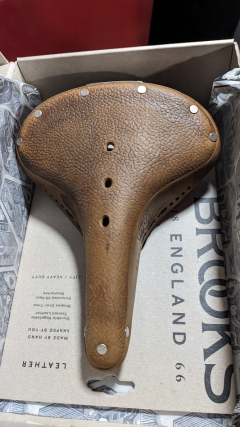
Saddle:Brooks B67 Softened Short (deciding)


Maybe over the 4th of July I will get started. I've already gone about installing a few components and am 3D printing some hardware to help secure the new cabling. My first use of PA6-CF filament it works... ... some of the time ...

Ultimately to be used for rail to trail.
 

Attachments

  • 1783003402019.png
    1783003402019.png
    332.8 KB · Views: 0
Last edited:
I'm taking my time on this build to address common issues. With no timetable it's a summer hobby to build it.

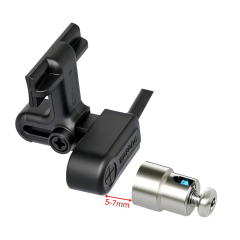
I wasn't happy with the Bafang speed sensor bracket:1783259475842.png

I started looking for other 3D models having a chainstay mount. Printed several, either they weren't robust enough or a poor fit for my bike.

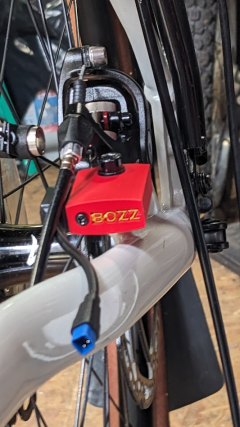
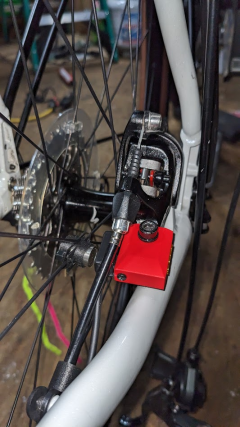
I noticed the brake caliper mount on my chainstay has a substantial bolt and mounting location that I can use. It positions the speed sensor directly in front of the wheel speed magnet. After printing several and adjusting fit I'm nearly there.
1783259628139.png

Mounted on the bike:
1783259667770.png

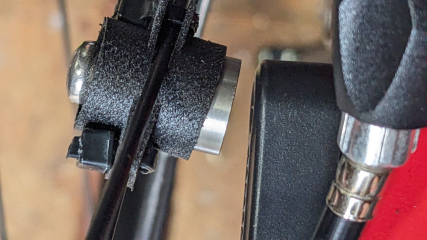
Tight clearance to the magnet on the wheel:
1783259719649.png

The final version will use a 5mm x 7mm x 5mm ID sleeve bearing so that the bolt continues to have full clamping force onto the caliper but the printed piece sets on a 15x15mm square and is locked in from the top with the bolt head and a flat washer.

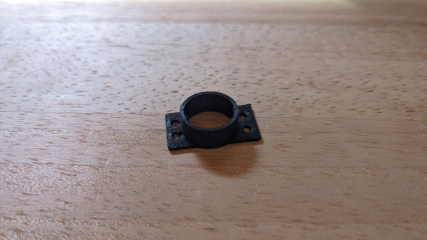
Found a useful part on makerworld that lets you surround the magnet and hold it in position on the spokes. Printed two in carbon fiber and sandwiched the magnet between them with zipties.
1783259912867.png

I will post a picture of the final piece and fit up and try to publish the print files (although they may only ever work for my bicycle).
 
Last edited:
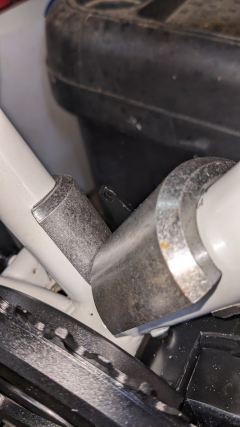
Going to try a novel solution for a torque arm bracket. I don't love the hose-clamped bendable steel brackets very much.

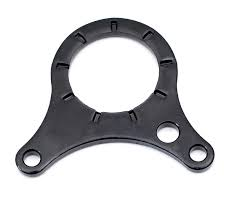
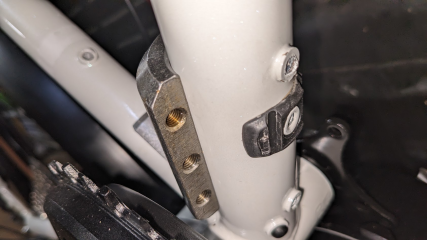
Let's see if I can actually pull this off. I've purchased a second Bafang "Middrive Triangle Torque Plate". This thing: 1783260533989.png

If you put two of these together, the grooves in them lock together. I "think" I can index the second one so that it has one armature bolted to the motor with the second (will get longer bolts) and it's other armature hole ends up positioned directly parallel to the seat tube.

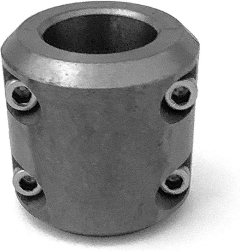
I picked up some UTV weldable roll bar clamps in the correct diameters for my downtube and seattube.

Like these:

1783260668040.png

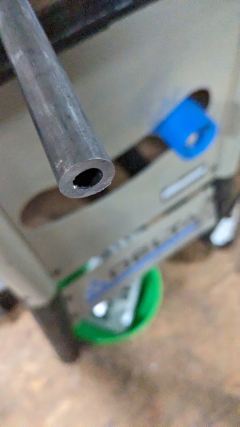
And I picked up some 9/16" DOM. I think I can create a double clamp that holds onto both the seattube and downtube near the bottom bracket. The DOM tube would connect the two weldable clamps, providing an immovable structure.

Then I can affix the clocked/indexed secondary ring directly to the assembly.

I'm a capable MIG welder but might tap the hillbilly magicians I know with better skills and equipment to get a good finish weld on it for a better looking end result.

Please poke holes?
 
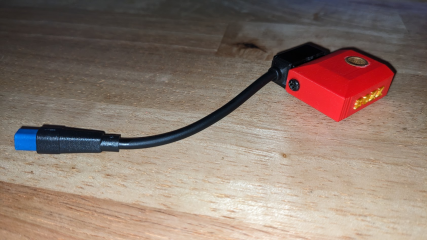
I finished/finalized the design of an alternate wheel speed sensor bracket for the Bafang kit. This one mechanically locks onto the square brake caliper bracket. It features a sleeve bearing to enable full clamping force onto the caliper while holding down the sensor bracket. I will print a second one and keep it in my toolkit for any long rides.
1783699436225.png
1783699474731.png
 
Began working on a part that will secure the position of the BBSHD in the bottom bracket (I hope).

Got ahold of two UTV roll bar clamps. One has the perfect ID for the downtube. The one for the seattube was too tight. I took it to my neighbor who has a 60 year old South Bend Lathe. He turned it down to the proper size for me. Now they "fit" the two tubes.
1783699621486.png
I plan to connect the 2 pieces with some 9/16" DOM, am waiting for a tube notcher I bought to arrive before I can start.
1783699675206.png
I will likely double up the tubing, one on top of the other if space permits.

Hopefully you can see from the first pic the armature sticking up from the bafang triangle mount ring, I've got a second ring overlapping the first and I think I can build out from the UTV mount on the seat tube so that I bolt the motor directly to it, preventing spin.

I will have to shave the bosses on the downtube with a grinder and touch them up for the larger roll bar clamp to fit. Not thrilled to do that but I can live with it.
1783699816391.png

Waiting for parts 'til hell freezes over.
 
Other random bits:

1) decided to not use a gear shift sensor at all, picked up a motor cutoff switch instead from JohnnyNerdout (hurry up and ship it Johnny) ;)

2) Thinking about not installing a throttle. I mean, it's a 1000 watts so never will be a legal class 1 bike. But I'm not going to drive it like a jerk, and maybe if no throttle is present I won't get hassled in parks or trails. Just wanted the bigger, more robust motor for crying out loud.
 
For all of my planning, I am abandoning the dual-clamp system I've been mocking up for securing the mid drive.

I'm just going to order a BBSF-01 from Lunacycle and see how well it fits the bike. It appears I can at least use the bosses on the downtube. Will be lighter weight as well.

I guess I should have chosen that out of the gate. Not the first time I ordered parts I didn't use...

When I first looked at the BBSF-01 I thought it would require using hose clamps which I'm trying to avoid. It turns out I can bolt directly to the downtube water bosses underneath and I already have some good 12.9 bolts for that.
 
Appreciate the feedback.

I often overcomplicate things to my own expense. By the end of this build I will have spent more than on a comparable, engineered ebike, I'm pretty sure and it won't have the tight integration/functionality an engineered ebike would have.

I knew that going in but my hobbies have always been DIY and I can't help myself. It's giving me something to do this summer.

I'm surprised there aren't more options for customizing Bafang mid-drives. The price point, ubiquitousness, and longevity of the company means these should be like 350 Chevies or the LS and have a much fatter aftermarket than it does.

My choices for brake levers are either cheap quality (but functional) Bafang levers or to rig up a magnet and ziptie/glue/etc to a nice brake lever and make it less nice with the ziptie. It's irritating. Next time I might choose the CYC kit.
 
Appreciate the feedback.

I often overcomplicate things to my own expense. By the end of this build I will have spent more than on a comparable, engineered ebike, I'm pretty sure and it won't have the tight integration/functionality an engineered ebike would have.

I knew that going in but my hobbies have always been DIY and I can't help myself. It's giving me something to do this summer.

I'm surprised there aren't more options for customizing Bafang mid-drives. The price point, ubiquitousness, and longevity of the company means these should be like 350 Chevies or the LS and have a much fatter aftermarket than it does.

My choices for brake levers are either cheap quality (but functional) Bafang levers or to rig up a magnet and ziptie/glue/etc to a nice brake lever and make it less nice with the ziptie. It's irritating. Next time I might choose the CYC kit.
There's a third choice when it comes to cable pull brakes (rim or disc) , in-line brake sensors . They can be installed anywhere along the brake cable to keep things neat and you can use the brake levers of your choice . The levers that come with kits are terrible .

How It Works and Installation

Unlike traditional e-bike brake levers that have built-in electronic switches, inline sensors let you keep your original bike levers.
  1. Integration: The sensor body is placed in-line with the brake housing. The inner brake cable passes directly through the sensor, which detects the cable's movement when the lever is pulled.
  2. Connection: It connects to the Bafang controller via a standard waterproof 3-pin Higo/Julet yellow connector.
 

Attachments

  • In-line brake sensors.jpg
    In-line brake sensors.jpg
    91.7 KB · Views: 3
Last edited:
All parts are finally on hand.

The BBSF-01 bracket arrived from Luna yesterday. I had to file away some material to get it to fit the BBSHD bracket. I'm thinking about trimming 3" off the end and mounting it directly to two bosses on the downtube, not using a hose clamp. Will try to get a picture of it up here.

Anyone else not used a hose clamp? I'd rather use the giant UTV clamp I bought and weld the support arm to it than use a hose clamp.

Also, the BBSHD has a little bit of movement in the bottom bracket, maybe 1mm. Not side to side, but a little up and down. Against the threads in the BB. It's not tightened down at all and I assume that is normal, but I don't love it.

Pretty much ready to attack this build this weekend but a long hike tomorrow will get in the way of it.
 
So you’ve already got a set of in-line mechanical sensors
No, I have the full Bafang replacement brake levers and I plan to use them.

I've had another Bafang bike before this one, it came with the levers. They're fine.

My only complaint with them is the cheap barrel adjusters but I could swap them out.
 
Yes exactly.

I want to use this bike on ~30ish mile legs between towns on rail to trails. I'm trying to pick components so that I have a good chance of completing each leg, I'm trying to choose simple/robust over having more complete functionality.

For example, I've decided to use a cutout button instead of gears sensors because it should work 100% of the time. Also why I want to use the Bafang integrated levers instead of coupling sensors to existing mechanisms, which might come apart in a fall, crash, etc.
Also why I tried to over-engineer the middrive mount assembly even though the BBSF-01 will be used instead.

Also why I made my own wheel speed sensor mount, I wanted something much more robust.

I know a lot of people use those methods and I'm not throwing shade at it, just not my preference.
 
Spent today getting the BBSF-01 shaped, bent, and primered.
1784410248895.png

I could just slam this thing together today at this point but what fun is that?

Going hiking up on the mountain top tomorrow, my other escape, but in the morning I will wet sand it and get blue paint on it.

Gonna let that cure for a couple days, wet sand, then clear coat it.

I traditionally do not have the patience for good paint job results but I'm getting older, maybe this time?
 
Yes exactly.

I want to use this bike on ~30ish mile legs between towns on rail to trails. I'm trying to pick components so that I have a good chance of completing each leg, I'm trying to choose simple/robust over having more complete functionality.

For example, I've decided to use a cutout button instead of gears sensors because it should work 100% of the time. Also why I want to use the Bafang integrated levers instead of coupling sensors to existing mechanisms, which might come apart in a fall, crash, etc.
Also why I tried to over-engineer the middrive mount assembly even though the BBSF-01 will be used instead.

Also why I made my own wheel speed sensor mount, I wanted something much more robust.

I know a lot of people use those methods and I'm not throwing shade at it, just not my preference.
In my opinion , a Lekkie Onenut would have been the simplest solution to hold the motor in place . Bafang motors push themselves into the down tube when in use so all that’s needed is something that will stay tight . It even looks good , no hose clamps needed .

Designed to specifically address the issues encountered when fitting Bafang BBS kits to a 73mm bottom bracket, where the Bafang cover cannot be installed, the Lekkie Onenut is a single fastener that can be easily tightened with a standard Shimano bottom bracket tool (wrench type, as most sockets are too shallow) or the Lekkie Sixteen-44 Socket. Once tightened, the Onenut boasts a locking feature – two grub screws secure the nut to the bottom bracket thread, preventing any unintended loosening or rotation. For DIY installations, this becomes a must-add-on, providing not only convenience but also a cost-effective alternative to purchasing a specific tool for the Bafang nut, while simultaneously enhancing the overall aesthetic.
 

Attachments

  • IMG_2191.jpeg
    IMG_2191.jpeg
    134 KB · Views: 0
Is it overkill to use the BBSF-01 and the Lekkie Onenut?

Random segway, we had a friend in high school with that nickname, some kind of biking accident. :)
The bracket you’ve got seems to be made primarily for carbon frames .


This arm was custom designed and made in the USA to hold your Bafang mid drive in place by being bolted in between the motor and bike frame and then hose clamped or Zip-Tied to the Seat Tube on your bike. Hose clamps and Zip Ties are not provided.

I strongly recommend this part if you are converting a carbon fiber frame bike and don’t want to tighten down the inner lock ring too much.


The Lekkie Onenut (yep , I know someone with the same nickname) will do the job by itself .
 
The Lekkie Onenut (yep , I know someone with the same nickname) will do the job by itself .
I considered getting it awhile back and may still. Maybe the same high school, lol?

I strongly recommend this part if you are converting a carbon fiber frame bike and don’t want to tighten down the inner lock ring too much.
This is a steel frame bike. I can crank it down tight.

I got a proper socket for the Bafang lock ring. I think for initial assembly I will use it. If I notice movement in the BB afterwards the Lekkie will likely be my first go-to fix.

The way the BBSF-01 aligns on this bike I have confidence it, along with torqueing the lock ring, should keep the motor from moving.

I am planning to install the default Bafang triangle mount ring in front (before) the BBSF-01 and tighten down both to the bosses on the motor. The BBSF-01 has no teeth to bite in the BB.

No instruction I could find for the BBSF-01 to recommend otherwise, if I don't use both nothing bites the BB.
 
Spent a little time this morning and the BBSHD is officially mounted and torqued down.

1784642257539.png

Past couple of days I've been priming, painting, and clear-coating the motor mount. I think it turned out nice. Super-fan of Duplicolor spray paints. Blue metallic fleck paint with shimmery clear coat over it.


I accidentally dropped the motor on the floor this morning. It slipped out of my fingers, boogered up the threads. I had to take a small metal file and fix the thread at the edge/start so that the lock ring would start. Once I got it smoothed out it went down nicely.

I also had to use a 6mm tap and die on both the mount bolts on the side of the motor as well as the holes they go into. Too much powdercoat and red loctite on the threads. I was afraid I'd stripped something from initial fit-up but it just needed a good cleaning. I learned a lot of others encounter that.

Next activity is:

1) a connected test of the system on the bike
2) run wires
3) get tires on it, put it on its wheels, install the cockpit
4) cranks and pedals
4) install the battery
5) secure/tidy wire bundle

But I have to start my workday now. Work from home so I'll probably tinker at it during the day.

Thinking about printing the ubiquitous BBSHD cover to help secure the wires at the bottom bracket but undecided. This thing you've likely seen before:
1784642610967.png


Almost there.


Post-build stuff includes:
- a new saddle (if I can bring myself to spend any more $ on this one). Thinking about a B67 softened.
- been trying to get the right tubes to fill out to about 2-2.1" tire width
- frame bag for tools
- collect spare parts, links, tubes, etc. for 2-3 day outings
- wife's ebike -> she wants a Velotric Discoverer mid drive
 
Last edited:
I'm calling Phase 1 complete.

1784813092046.png

Got error 21 on the first test ride. Adjusted the position of the wheel speed sensor, another mm closer to the magnet and all is good now.

I don't have a gear sensor installed. I'd read that the BBSHD would hard shift without a gear sensor or motor cutout. I do have a motor cutout (and also the brake cutouts) but I am able to shift gears smoothly under power, even without a gear sensor. I'm going to use the cutout anyway to reduce wear but I found that interesting. As such, I might install the gear sensor and see how well it does. I didn't realize when eliminating it that the BB display wouldn't know what gear I'm in, but maybe that won't matter if I play with the power outputs in advanced settings (not sure yet if the BB knows what gear I'm in, if that effects power output).

1784813728995.png

When I began planning I wanted to see a build specific to my bike in case there were any gotchas so I decided to document it for the next person here on Endless Sphere. No tinkerers project is ever complete, there are still things to do and I will document those here as well.

Some of the things on the list:
-clean up wire bundle at headset
-hide wires under BB (3d print cover or ?)
-chainstay protection
-reinstall front cargo rack
-tire sealant
-fatter tubes
-Brooks B67 saddle
-frame bag

And then:
-first outings
-first overnight
 
Back
Top