e-Sprocket
1 mW
- Joined
- May 14, 2019
- Messages
- 11
Ive been playing around with e-bikes for the last few years and have ridden many good ones and not so good ones. For this build I wanted to build a high end e-bike with the best components. Decided that I would start with an amazing bike and a Mini Cyclone as my power plant. The reason I chose this motor is because of it low weight, the big one is just to heavy for my application. Below is the process I went trough to electrify this bike.
Things to buy:
1. 2019 YT-TUES form YT-Industries. This is a full carbon downhill race bike and is considered one of the best DH bikes made.
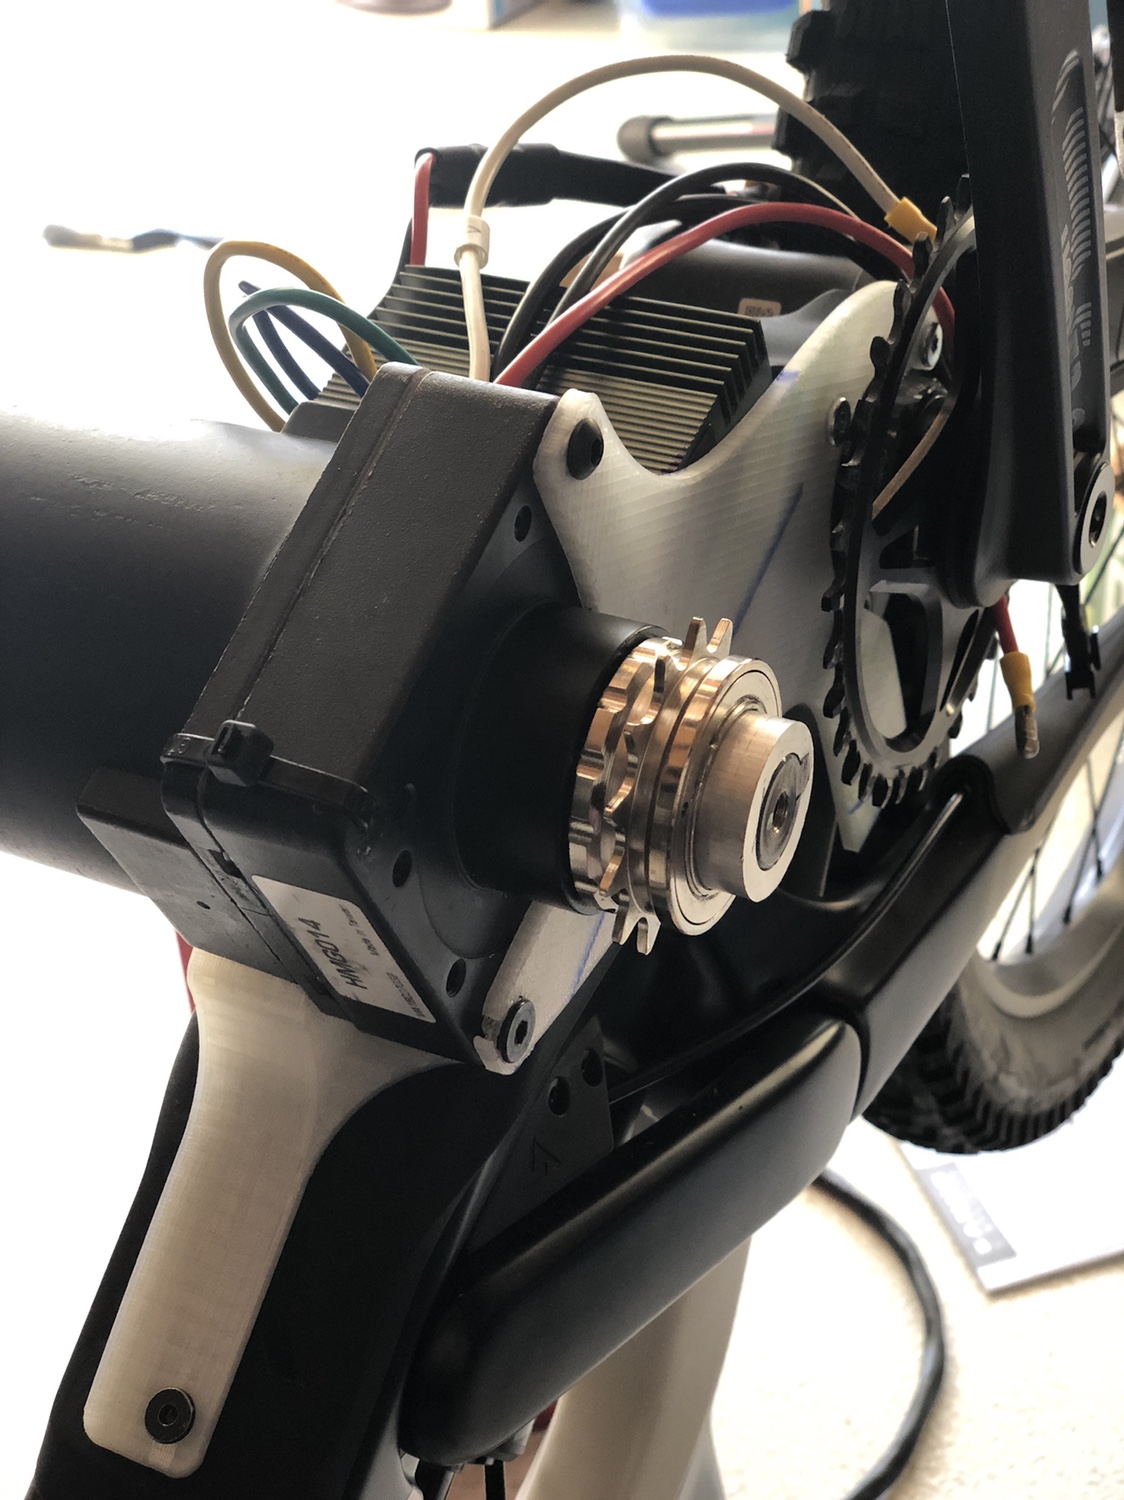
2. Mini Cyclone motor from Luna. Ive used this motor before and was quite happy with the power output.
3. Purchased a ASI controller directly from Accelerated Systems. These controllers are very well built and you can purchase the developers package to program them yourself. Much better than the Kelly controllers I’ve tried in the past.
4. ORO mini twist throttle for the power control. I don’t like pedal assist and rather have a throttle to apply the power.
Time to build:
1. Stare at the bike for some time to figure out how to mount the motor and controller with minimal weight and bulky mounts.
2. Take a bunch of measurements of the frame and bottom bracket. I had a friend help me 3D scan the geometry using a Faro arm. This gave me a 3D image of the down tube and basic dimensions of the bike to start with.
3. Created a sketch of the bottom bracket using Fusion 360. (Fusion 360 is a CAD program for mechanical engineering, amazing tool, you can build anything with it.)
4. Measured and replicated the Mini Cyclone in my Fusion 360 software so that I can have a 3D model of the motor to work with.
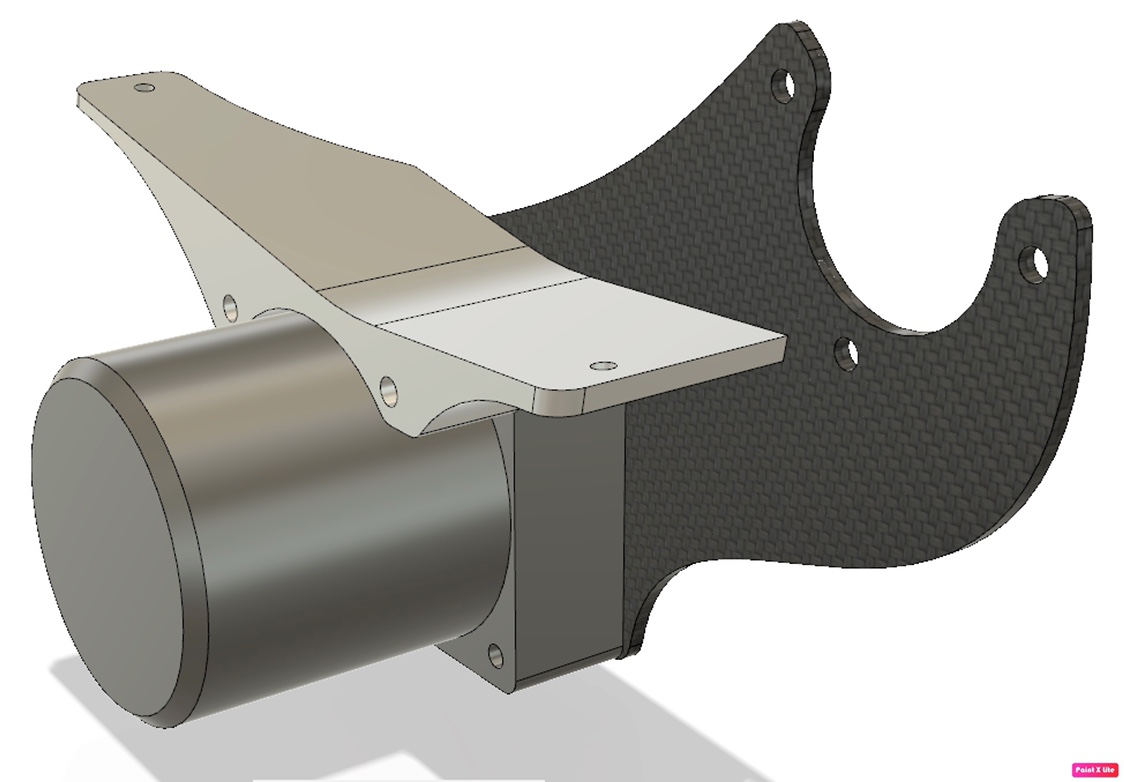
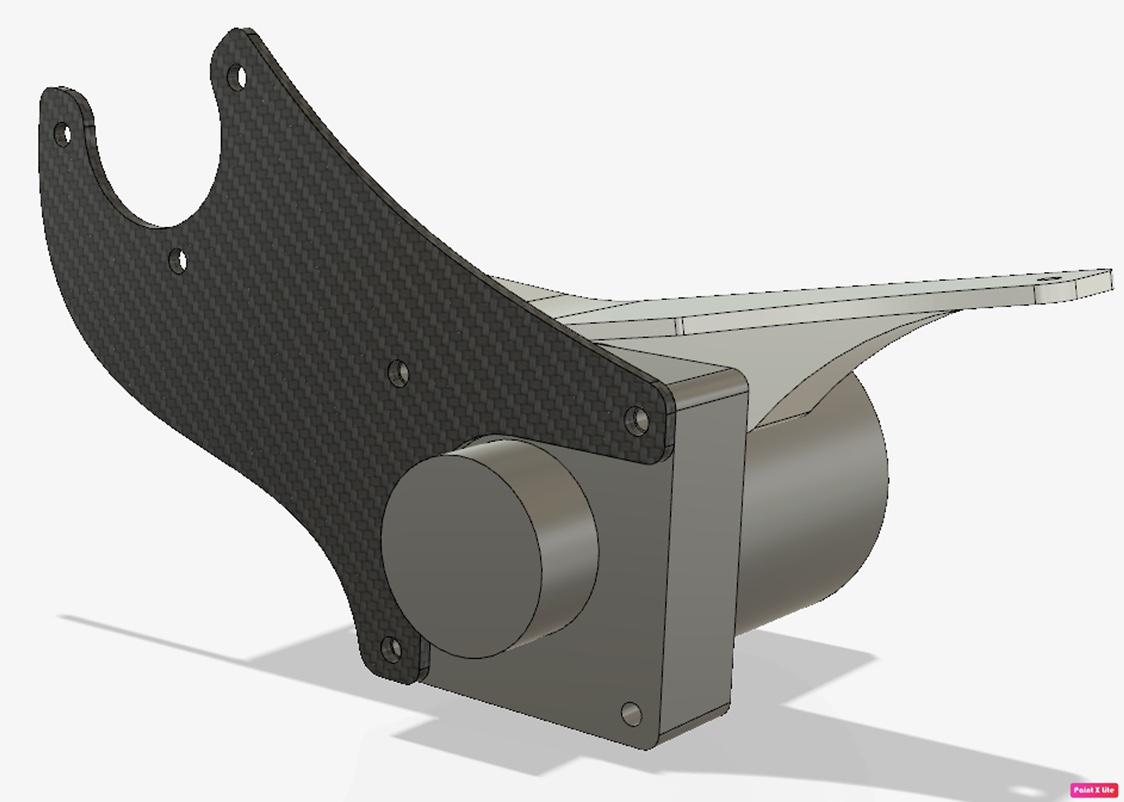
5. Sketched out the ISCG mount to use as the main mount point for the drive plate. Lucky that the technical drawings for the ISCG mount were really available online.
6. Created all the 3D CAD drawings for the motor mounts, drive plate, and down tube mount.
7. 3D printed all the parts using my home made FT5 printer.
8. Test fit everything onto the bike to check clearance and fitment.
9. Make some minor adjustments to my 3D files and reprint all the parts.
10. Final test fit of all the parts
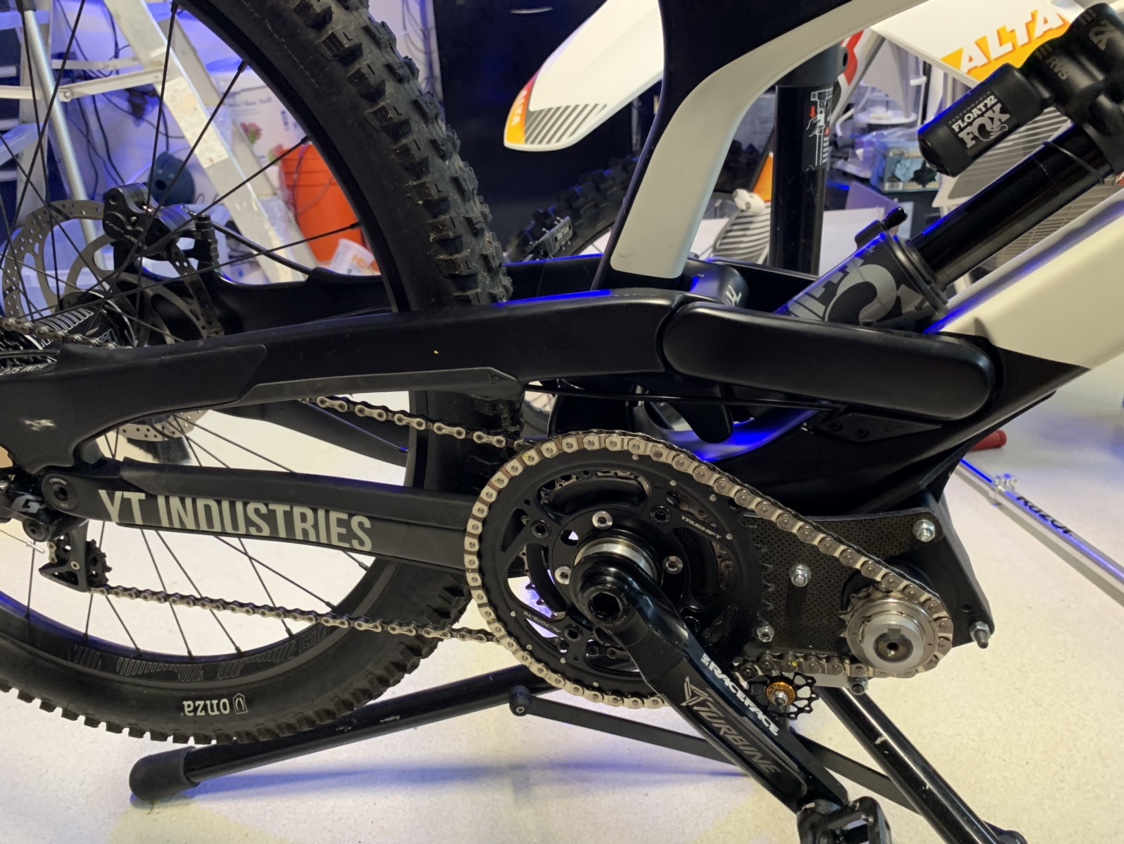
11. Make a custom adapter to thread into my mid drive freewheel for the main chainrings. This was made to adapt the RaceFace direct mount style crankset to the threaded freewheel chainring adapter. (Thank you Jonny V For the machine work.)
12. CNC cut the main drive plate from a kevlar/carbon composite 5mm thick sheet. (Also a Jonny V job)
13. 3D print the down tube mount for axial load and motor stabilization. (This part doesn’t hold that much force so its made from 3D printed PLA).
14. Program the ASI controller and fine tune some parameters.
15. Final install of all the parts
16. Test drive. I hit 40 MPH! Not bad for a mini cyclone motor.
Weight
Total weight of all the parts, controllers motors etc. approximately 8Lbs.
Total weight of the bike 43.8 LBS, that’s pretty cool and it still feels very snappy and nimble over jumps.
Next steps
1. Having some minor issues with the chain tensioner. Redesigning one in my 3D software with a chain guide built in.
2. Front chain cover to keep out the sticks and weeds that get sucked up into the motor.
Things to buy:
1. 2019 YT-TUES form YT-Industries. This is a full carbon downhill race bike and is considered one of the best DH bikes made.
2. Mini Cyclone motor from Luna. Ive used this motor before and was quite happy with the power output.
3. Purchased a ASI controller directly from Accelerated Systems. These controllers are very well built and you can purchase the developers package to program them yourself. Much better than the Kelly controllers I’ve tried in the past.
4. ORO mini twist throttle for the power control. I don’t like pedal assist and rather have a throttle to apply the power.
Time to build:
1. Stare at the bike for some time to figure out how to mount the motor and controller with minimal weight and bulky mounts.
2. Take a bunch of measurements of the frame and bottom bracket. I had a friend help me 3D scan the geometry using a Faro arm. This gave me a 3D image of the down tube and basic dimensions of the bike to start with.
3. Created a sketch of the bottom bracket using Fusion 360. (Fusion 360 is a CAD program for mechanical engineering, amazing tool, you can build anything with it.)
4. Measured and replicated the Mini Cyclone in my Fusion 360 software so that I can have a 3D model of the motor to work with.
5. Sketched out the ISCG mount to use as the main mount point for the drive plate. Lucky that the technical drawings for the ISCG mount were really available online.
6. Created all the 3D CAD drawings for the motor mounts, drive plate, and down tube mount.
7. 3D printed all the parts using my home made FT5 printer.
8. Test fit everything onto the bike to check clearance and fitment.
9. Make some minor adjustments to my 3D files and reprint all the parts.
10. Final test fit of all the parts
11. Make a custom adapter to thread into my mid drive freewheel for the main chainrings. This was made to adapt the RaceFace direct mount style crankset to the threaded freewheel chainring adapter. (Thank you Jonny V For the machine work.)
12. CNC cut the main drive plate from a kevlar/carbon composite 5mm thick sheet. (Also a Jonny V job)
13. 3D print the down tube mount for axial load and motor stabilization. (This part doesn’t hold that much force so its made from 3D printed PLA).
14. Program the ASI controller and fine tune some parameters.
15. Final install of all the parts
16. Test drive. I hit 40 MPH! Not bad for a mini cyclone motor.
Weight
Total weight of all the parts, controllers motors etc. approximately 8Lbs.
Total weight of the bike 43.8 LBS, that’s pretty cool and it still feels very snappy and nimble over jumps.
Next steps
1. Having some minor issues with the chain tensioner. Redesigning one in my 3D software with a chain guide built in.
2. Front chain cover to keep out the sticks and weeds that get sucked up into the motor.

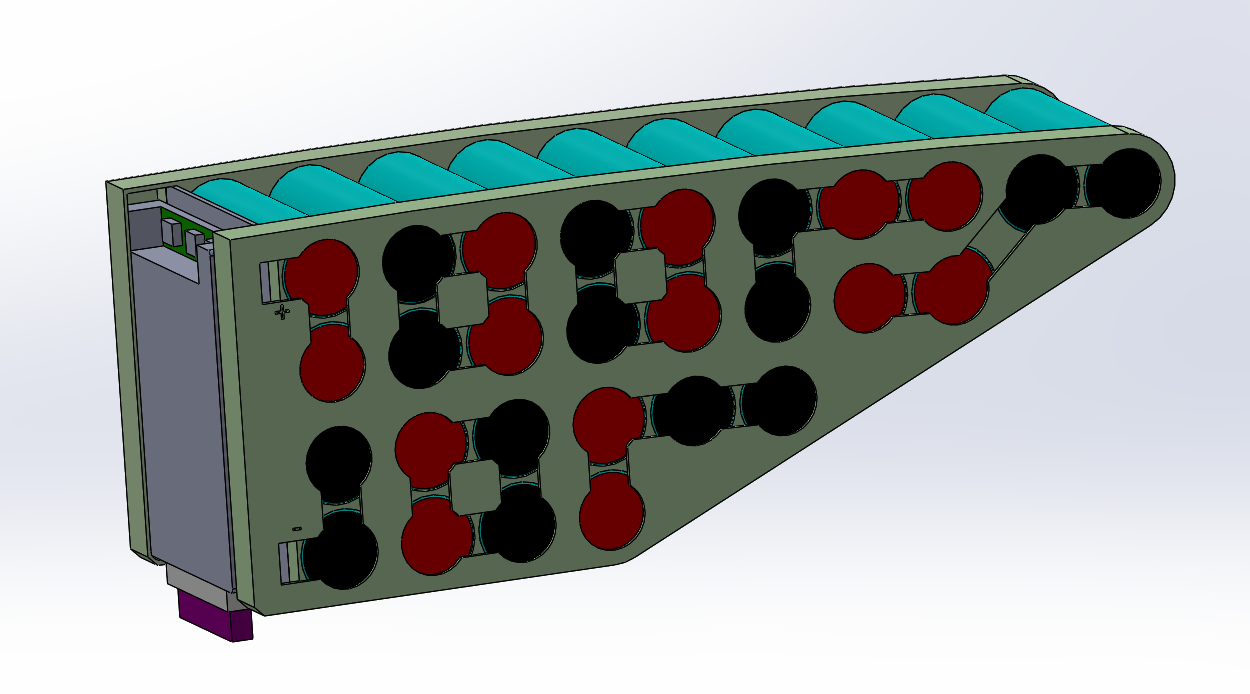
 . I’m a big fan of backpack batteries as well. I’ve been using it for the past 3yrs, so stealthy!