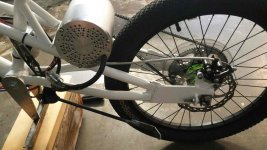
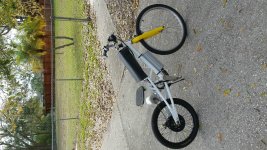
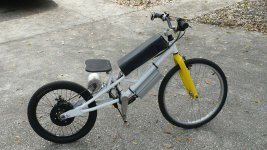
3000w Mongoose girder

Barncat said:
Was able to zip around a bit yesterday afternoon for the maiden voyage of this project. Had to weld battery mount brackets and chain tensioners a few days ago so decided to do the paint job at same time.
<snip>
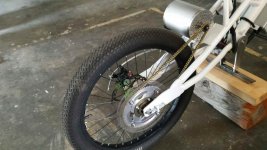
Suffered a big unforseen setback when the goddamn chain derailed on the inside of the rear sprocket today, which is why the wheel is off. Major PITA. Must build some chain guides for both sides of the 80T...

This is all stuff you may already know from your motorcycle experience, but I'll put it out there anyway:

Well, the frame looks plenty stiff, and the motor is very close to the wheel, so it's unliekly to be frame twisting causing the derailing (a common problem).

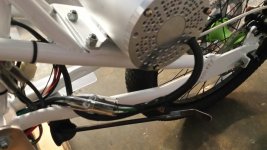
You mention a just-added chain tensioner but I can't see it in the pics, or a way I can see to adjust the chain tension or chainline. If you see chain "bounce" along the slack side of the chain while running, especially as torque changes, you probably need a tensioner (on the pull side) or a way to adjust tension by moving the motor forward / up.

If the chain (for that skinny size) is so tense that you can't even deflect it at all with your finger, it's too tight and will wear the chain, freewheel, sprockets, motor bearings, etc., much faster than it should.

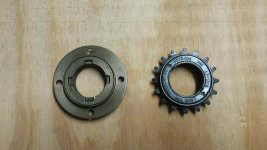
If the freewheel has any wobble in it, it will also contribute to chain throwing--worse the larger diameter the sprocket is.

I can't tell if the chainline is perfectly straight or not; if it isn't, then that will contribute to chain throwing. If the derailments always happen on the same side of the sprocket, it's probably not a straight chainline, and the motor sprocket would need to be moved laterally in the direction opposite to the derailment by a tiny bit at a time until the rpoblem stops.

Also, #25 chain is not really known for it's torque-handling capabilities (or it's wear rate), since none of hte ones I've had actually had "rollers", only bushings); if you really want higher torque you might need a larger type of chain (though this means larger diameter sprockets for the same reduction, which probably means making your own large sprocket or paying quite a bit for a custom-made one :( ) or parallel two #25 chains and sprockets on the motor shaft and wheel freewheel.
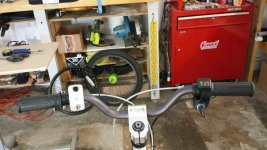

The throttle however is lurchy off zero throttle from a standing start even with a careful gradual twist. I hate that. I assume neither the throttle nor the controller is adjustable in my case. Opinions appreciated...
This issue we're covering over here:
https://endless-sphere.com/forums/viewtopic.php?f=30&t=110234
so I'll respond there to that part.
 
Yes I'm very familiar with everything you just wrote with the exception that I've never used 25H chain before. It looks more like jewelry than power transmission equipment.

The stuff is plenty strong in tension for 4 or 5hp it seems. The issue is the sprocket teeth are so small that it'll throw instantly off the rear with any misalignment or possibly shock loading, though I took great pains to line up the sprockets. I also erred a bit on the too tight side the other day. Lesson quickly learned. The tensioners are threaded motorcycle style axle adjusters which I'm also redesigning.

More importantly, Razor etc make plastic chain plate guides to keep the chain on the 80T rear sprocket. They don't sell them separately unfortunately so I cut out some polycarbonate. Testing soon.

Of course the main reasons to use 25H are availability, single stage reduction, light weight, and low cost.
 
Got back on the road for further testing. I cut out 4 polycarbonate rings, 2 @ 1/8" thick to space the larger 3/16" thick guide rings at the proper width. It works. Chain won't get thrown again. I'm waiting for some new 25H chain which is hopefully better made.

I'd also recommend the freewheel style with the four notches and the matching puller, as you WILL need to remove your freewheel at some point... A tip is put the puller, teeth up, in a vise and then place your whole wheel on the puller so you can exert adequate down force to keep puller engaged. Turn CCW.

Now I can get back to making some minor refinements to the finished build.

As mentioned in another thread in the motor section that disappeared, I added a 3 speed DT switch which is working great to smooth out the over-volted standing start launches. That's bottom switch left handlebar, with top switch a kill.

Battery design fantastic, so far. My only concern with it is some possibilty of shoulder shorts. Still testing.
 

Attachments

  • 20210205_103858_compress40.jpg
    20210205_103858_compress40.jpg
    263.1 KB · Views: 974
  • 20210205_112536_compress92.jpg
    20210205_112536_compress92.jpg
    324.7 KB · Views: 963
Build is pretty much done and have maybe 50 miles on it thus far. A fun "toy" that'll get to very near 45mph. I suspect the cops may take a dim view of it but have not encountered any, yet. There are a lot of conventional ebikes here in FL but they can fake it with pedals. Mine are removed obviously. Would have just been in the way on a bmx frame.

Chain issue was solved and new chain installed. I also redesigned the axle adjusters for more precise chain tensioning and to make it impossible to have back wheel come out of the dropouts. I have noticed that it would be preferable to have a freewheel of a more instant engage type than the conventional ratchet/pawl that introduces some drive train lash at every throttle-on event... bike really rolls well though. You get a lot more range with a freewheel than you would with regen.

One note that may be of interest is that many of these controllers and motors come with eyelet wire ends. Short 10-24 screws with nuts are an easy way to join them- put a length of clear vinyl tubing on first and then slide in place to insulate the connection and also prevent the nut from coming loose.
 

Attachments

  • 20210212_100655_compress69.jpg
    20210212_100655_compress69.jpg
    304.8 KB · Views: 936
  • 20210212_101024_compress13.jpg
    20210212_101024_compress13.jpg
    206 KB · Views: 936
Something I recommend on any multi-splice/connection cable (like phase wires, etc) is to stagger the connection points, so they dont' overlap.

This does a couple of things--makes the cable connection point thinner, more like the thickness of the rest of the cable (or even the same thickness, depending on connection method), and it also means that no splice point can ever accidentaly short against another one, even without any insulation on them (failed, forgotten, etc), as long as an outer jacket of some kind keeps the cable section "straight" there. :)
 
Yes that's a valid approach to connections, one that I use for thinner ga multi-wire soldered splices that'll get heat shrinked together. The vinyl tube just happened to be right for this application and you can see through it too!
 
Be careful with that chain. A chain whipping around is very dangerous, and needing chain guides to keep it from doing so is.. well, inherently dangerous..
Coincidentally, I think full chainguards are required on single-speed Speedway race bikes for exactly this reason.

This is an often overlooked complication to big single reductions. Chains are to be de-rated past 4:1 (concerning if your chain is already marginal), and under 3:1 is ideal as it guarantees 120deg of chain wrap on the smaller sprocket.
 
Fatty- I appreciate your cautionary observation. As stated earlier in this thread, I've already determined that #25 rear sprocket teeth are way too small to be trusted. What's REALLY dangerous is having a chain come off and lock up your back wheel at 40mph. This is why Razor makes chain guide plates for their sprockets.

Dauntless- #25 sprockets are commonly available at electricscooterparts or ebay as is that matching threaded freewheel.
 
The problem I've had with the nuts and bolts approach was them getting loose from thermal expansion and contraction of the terminals. Then the resistance heat would gradually grow, then the ever looser connection finally overheated during a romping session until the bolt ends melted thru their insulation and touched.
I've actually had better long term results will regular old wire nuts, with some waterproof tape.. I've had builds I slapped together with those I still haven't bothered changing 🤣
But for long term, gold plated bullet connectors, or solid crimps are good. A really good tight crimp with adhesive heatshrink seals out even air out of the connection, for long term peace of mind.

Lucky it happend during straightaway climbing, but the sudden juddering of the motor prob wouldn't have been great if I was really leaning into a turn...I ride near cliffs a lot 🙄

Just a btw, obviously you're on it re. danger stuff, people here just point out stuff like that for those that might read things later and try it, that aren't seeing the dangers👍
 
Well anything is possible... thus far the screw connections are as-installed, and were made tight as possible. One could always use nylock nuts. I like not having to modify the cable ends and the ability to disconnect as needed. And you can clearly see every connection. My battery and phase wires do not get hot at the 55A controller limit. And this is a street bike which will never see rain if I can help it :).

So caveat emptor. Use my technique at your own risk.
 
Mine were tight too.. At first. Lol
Then I got complacent because it hadn't been a problem so stopped checking them as much.
I've also seen boat installations with nylocks, where a corroded connection got so hot it melted the nylon right out.
Just my experience...
 
That can certainly happen...it is a common cause of scooter motors (using plastic lug-bars for this purpose) haivng wiring failures and sometimes getting so loose they arc and damage the controller from RF noise.


But...FWIW, quite a few powerchairs I've gotten wiring harnesses from use bolted together connections just like this, often in the series connection between the two lead-acid 12v batteries, or between those and the controller, etc, by bolting a fuse inline to the cable between the batteries or between the battery and the controller. Typically this just has heatshrink over it, sometimes double layer, sometimes just using marine-grade HS.

I've also seen this in a couple of EV harnesses, including one from a Zero motorcycle.

The nut is sometimes a nylock and sometimes a standard, usually using a star washer underneath, sometimes a spring washer.

I've been using the bolted-on inline fuse cable taken straight out of a well-used powerchair harness in my SB Cruiser's battery setup since I started using the 14s2p EIG packs in it, which I think is 2-3 years or more now. That sees short peaks of 80-100A now, and during some testing of the SFOC5 controller was over 200A peaks, with continous 20-30A+ for minutes at a a time. No problems yet (and I check for voltage drop across connections and breakers and the like every so often). :)


None of these applications are weather-exposed, but if I had one that might be I'd coat everything with NoAlOx or similar dielectric grease (or vaseline in a pinch) to keep corrosion/oxidation from occuring.
 
I'll TIG the wires together, then triple heatshrink and pot the whole thing :)

Seriously though, I'm having fun with the new toy. I'm still deciding how to bleed some charge off a few cell groups in the battery when bulk charging, and as luck would have it and you all know dmm's only read to 10A... I briefly connected a 50W power resistor which will work but I couldn't verify the current draw. Don't have a clamp meter but may have to secure one.

Already thinking ahead to a 35lb build with aluminum frame and 80100 outrunner. I guess Grin is the only choice for a small controller.
 
Barncat said:
I've already determined that #25 rear sprocket teeth are way too small to be trusted.

:thumb:
But shouldn't force per tooth be the same on drive and driven sprockets? I thought the concern is generally with insufficient chain wrap on the smaller sprocket leading to derailing.
 
"Small" is 35% the size of a 9x6x3" box. The sensorless stuff is very unobtrusive but inadequate voltage AFAIK.

I consider the chain issue closed at this point. Mine derailed from the rear and was instantly wrapped between hub and freewheel by the 4hp or so generated by the front sprocket. Much swearing ensued...
 
Barncat said:
I consider the chain issue closed at this point. Mine derailed from the rear and was instantly wrapped between hub and freewheel by the 4hp or so generated by the front sprocket. Much swearing ensued...

I gotcha. I'm just curious about chain drives and trying to learn more, so was surprised to hear it derailed from the rear.
Are you thinking to eventually switch to 219? Short pitch, high strength...
 
fatty said:
I'm just curious about chain drives and trying to learn more, so was surprised to hear it derailed from the rear.
Some observations from my early drivetrain attempts a decade ago (before I gave up and went hubmotor ;) ).

Large diameter sprockets on freewheels have wobble (freewheel lateral play amplified by the size of the sprocket) as well as some runout from noncentering of mounting bolts and fw bearings/machining/hub threading/etc, whereas small diameter sprockets mounted solidly to a shaft, etc. dont' have much (if any significant), so it's pretty common for the larger (freewheeling) sprocket to end up with the derailment in setups like this.

When there is no freewheel, it can still be the larger sprocket that does it, if it is not perfectly straight.

It can also be the rear one that does it, regardless of size/etc if there is any slack in the chain, because the top of the chain is pulled taut, and the bottom then has the slack in it, and more chance of a lateral chain movement (from a bump while riding, etc) causing derailment.

I think I ran into just about every possible problem with all that stuff in my early CrazyBike2 and Dayglo Avenger bike experiments. :( I can't count how many sprockets and chains I destroyed, not to mention wheels, cranks, shafts, etc....
 
amberwolf said:
Some observations from my early drivetrain attempts a decade ago (before I gave up and went hubmotor ;) ).

Interesting -- I had only considered chain wrap.

I expect a solid disc-mount rear sprocket mounted directly to the rear hub would be desirable.
 
Ditto what amberwolf said above as it's 100% correct.

The relatively tiny size of 25H chain and sprocket teeth amplify the likelihood of sudden disaster, particularly given the multiple HP involved here as opposed to human power alone. I have lots of experience with chain drives- this is a special case.

Do NOT run a rear #25 sprocket without chain plate guides.

The 13T front and 80T rear is perfectly fine, so equipped, aligned, and adjusted so as to not be too tight. You get 7T of wrap on the front sprocket.

In a jackshaft setup where sprocket centers are 8" or less and sprockets more similarly sized I'd not be very concerned.

What is bugging me is the lash from the commonly available sprocket adapter freewheel, though it's great that they're available I hasten to add. They are a 20 click unit, which means 18 degrees of take-up prior to engagement. This is not good for many reasons but mostly creates an annoying lack of precision for any performance oriented riding with a lot of on-off-on throttle.

I'm trying to find an Origin8 hornet 16T bmx freewheel, which has only 3.3 degrees of slack. As it happens the 4 bolt pattern on a #25 sprocket lines up perfectly with teeth spacing on any 16T. Sprocket could be bolted up with some minor mods though you'd not have the nice flange on the conventional adapter freewheel. Unfortunately you can't TIG them together due to oil contaminants and you'd lose the hardness in the performance freewheel. Will report back when experiment complete...
 

Attachments

  • 20210215_080743_compress88.jpg
    20210215_080743_compress88.jpg
    273.7 KB · Views: 790
Barncat said:
What is bugging me is the lash from the commonly available sprocket adapter freewheel, though it's great that they're available I hasten to add. They are a 20 click unit, which means 18 degrees of take-up prior to engagement. This is not good for many reasons but mostly creates an annoying lack of precision for any performance oriented riding with a lot of on-off-on throttle.
If you can find one that will take the torque required that will also fit wihtin the necessary ID and OD, you could use a sprag clutch bearing and make yourself your own freewheel. :)

Someone here on ES had designed one like that, but I don't recall if they ever had it made. Cyclone (in Taiwan) was going to have one made like that, but I don't know if they ever did--if so, it's probably available on their website. I know they had something like the White Industries dual-row-bearing model made (to reduce self-disassembly problems), but I don't know what it's ratcheting was like.

Also, you mgiht consider using a freehub instead of a thread-on freewheel, if you can find a FH that is strong enough to handle your torque requirements. The freehub (if well machined) is likely to have less runout and less lateral play, and you can then use a single splined sprocket as an adapter for your larger sprocket, if no one happens to make an actual sprocket adapter for that spline pattern. Some of the FHs have pretty fine increments (lots of ramps); I think there's a DT swiss with more than 50 ramps, and they *all* engage "teeth" when in use, rather than the typical FW that only has a few pawls engaging ramps at any moment.


EDIT: Some potentially useful info, inclduing pics of some of thsoe FHs and FWs inside:
https://bicycles.stackexchange.com/questions/44990/what-freewheel-mechanism-designs-are-used-in-bicycles

It includes pics of a Chris King FH that uses 72 "ramps" / "teeth", all engaged at once, and a helical engagement so the harder you pull on the input sprocket the harder the faces are pushed together. A poke around the web shows it's only about $500. :lol:


More info
https://dirtmountainbike.com/features/work-freehub-body.html#ZBVXxucruFf7O0f0.97
https://www.mtbr.com/threads/onyx-racing-hubs-sprag-clutch-vs-other-types-of-engagement.970959/
 
Hadn't really considered trying to custom build a sprag freewheel but my lathe is at the northern headquarters so capabilities limited here. Fitment, clearance and alignment would be very difficult. Welding to a bearing would ruin it. And yeah, all those freehubs are ridiculous $$$.... AND you have to build a whole wheel!

As mentioned earlier in the thread, IMO a freewheel is far preferable to regen for an ebike unless perhaps all your riding was straight up and down mts. On flat or rolling terrain much of the time you're coasting. Motor cogging is very annoying and creates huge drag. Manually pushing the bike if necessary becomes problematic. Grin has a pseudo electric freewheeling hub motor but it's complex and pricey. I use the KISS approach at all times.
 
Just some final notes on the build.

I've put about 150 miles on it and climbing fast. It's a blast on the quieter streets and twisty bike trails in the area. Does close to 45mph with a bit of tailwind and handles like a scalpel. You don't so much steer as think where you want it to go. Weighs in the vicinity of 50lbs total. Range is 25ish miles even pushed to max at numerous intervals. More a mini motorcycle than bike.

I swapped on a stock Razor rear sprocket/freewheel /chainguard. It's a touch lighter than the polycarbonate plates I made, and the freewheel is a 9 degree engagement unit which noticeably reduces lash from the previous 18 degree model. Coasts fabulously.

My experimental battery pack is obviously still under wraps. As mentioned it's 18650 20s5p no-weld no-solder and there's nothing else like it. Trying to decide whether and how to reveal it, pending some more miles of testing. I want to put it out there but feel I'd deserve some compensation. A real catch 22. This could make the DIY battery world less complicated.

Have moved on the the Mongoose Blackcomb build.
 

Attachments

  • 20210225_111027_compress48.jpg
    20210225_111027_compress48.jpg
    513 KB · Views: 678
  • 20210225_111243_compress57.jpg
    20210225_111243_compress57.jpg
    467.8 KB · Views: 678
Back
Top