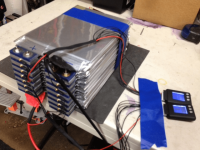
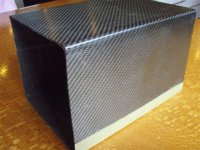
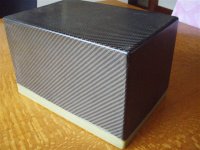
A few people have asked here and by PM for the parts list so here it is along with a few more photos and some random thoughts about the build. -> Zappy, I love your box. I've never worked with CF but that makes me want to try.
Part numbers are for McMaster-Carr. http://www.mcmaster.com
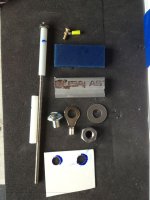
Bars
8975K27 1 Each Multipurpose Aluminum (alloy 6061), 1/4" Thick X 3/4" Width X 6' Length
9329K12 1 Each Abrasion-resistant Uhmw Polyethylene Rect Bar, 1/4" Thick X 3/4" Width X 5' Length
Notes: The Polyethylene was rated an 'Excellent' Resistor' plus I really like the blue color, I admit it.
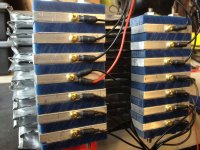
Joining Bolts
95412A821 1 Pack 18-8 Stainless Steel Fully Threaded Stud, 8-32 Thread, 6" Length
94639A751 3 Packs Nylon Unthreaded Spacer, 1/4" Od, 1-3/4" Length, #8 Screw Size
91841A009 1 Pack 18-8 Stainless Steel Machine Screw Hex Nut, 8-32 Thread Size, 11/32" Width, 1/8" Height
Notes: I would have preferred fully threaded nylon standoffs instead of multiple spacers which could move during the build process. I couldn't find the right product though so I added a bit of silicone adhesive on the threads of the bolts to keep things stable while I was putting it together, just in case
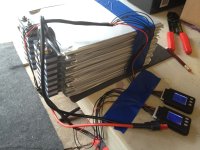
Main terminals
90498A030 1 Pack Plain Grade 2 Steel Heavy Hex Nut, 5/16"-18 Thread Size, 9/16" Width, 19/64" Height
90276A576 1 Pack Znc-pltd Stl Round Head Slotted Machine Screw, 5/16"-18 Thread, 3/8" Length
69405K76 1 Pack High-temperature Crimp-on Ring Terminal, 900 Deg F, Noninsulated, 12-10 Awg, 5/16"stud
Notes: These screws and nuts are really big. Too big. I think I could find something less obtrusive to use. Also, I put them in-line with the compression bolts which means they get in the way. I needed to drill the tab hole in the last + and - in the center of the tab so it would be in between the joining rods.
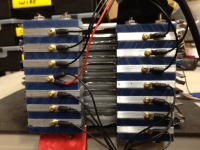
Balance Wires
25995A145 1 Each Carbon Steel Hand Tap 4-40, 3 Flute, Plug
94070A108 1 Each Brass Pan Head Phillips Machine Screw 4-40 Thread, 3/8" Length, packs of 100
7113K264 1 Each Standard Crimp-on Ring Terminal Nylon Insulated, 26-22 Wire Gauge, #4 Stud, packs of 50
Notes: The brass screws are very easy to snap at this small size. I might switch them to some sort of steel though, I admit it, I like the look of the brass. Also, 3/8" length is really longer than necessary. 3/32" drill bit used to make pilot holes for tap.
If something isn't listed, it's something I already had on hand such as heat shrink, 22 gauge wire, washers, etc. Also some of the quantities you'll get are way more than needed but extras are always good to have on hand.
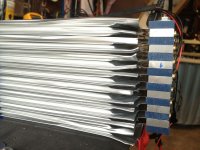
I think the build is pretty straight forward and obvious but here are a few things to maybe think about:
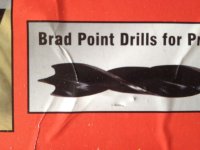
Getting holes into the tabs: I bought a punch meant for thin metals but didn't like wildly swinging a hammer toward my A123s and it was really not easy to align. I then tried a 'normal' drill bit on my tiny drill press. This did not produce a very neat hole since the bit grabbed the thin tab and started to shred it if you weren't careful. I went to the brad point drill bit pictured and it worked perfectly. The center point held everything centered and the outer edge cut the hole from the outside making perfect holes. I also placed a piece of wood underneath the tabs when drilling to support the rest of the tab so it wouldn't deform. To place the tab holes I cut a piece of thin cardboard the size of the tabs then placed it under an extra bar with the holes already in it and drilled out the holes. Placing the thin cardboard on the tabs and marking the holes with marker was more accurate and easier than trying to do it through a 1/4" bar or by manually measuring it out. I made the holes 1/32" larger than the standoff/spacer diameter.
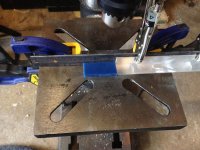
Holes in bars: I made a jig to make sure all of the holes were in exactly the same place. It made everything much faster as well.
Tapping holes for balance wires: I might be the only guy who didn't know to do this before I saw a YouTube video but… I put the tap into my hand drill and set the drill's clutch torque setting down to 3. When the drill started to ratchet, I backed the tap out cleaning out debris and then went back in, repeating as needed. So much faster than doing it by hand with that little T wrench they give you!
Hope bits of this info helps someone else in making their pack. Good Luck!

")