I'll explain some of the settings so you can tweak them later if you need, as I didn't have the time yesterday:
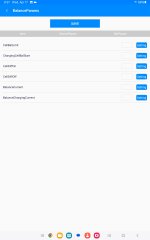
Cell high protect : I advised setting it at 4.175. The maximum allowable voltage of your cells is 4.200V, meaning that the cell will be 100% charged at 4.200V. But staying at a high voltage isn't great for battery life, so with this setting you limit the charge to 4.175V per cell. At this voltage the cell will be 99.5% charged, so it won't make any difference in terms of range, but it should make a difference in terms of how long your battery will last.
When this voltage will be reached by the highest cell, the BMS mosfets will cut the charge to disconnect the charger.
Before that, the BMS will beep when the highest cell will reach 4.150V (CellHighWarning), which indicates that the charge is almost finished.
CellLowProtect is set at 3V, the cells can go a little bit lower but it's not really good for their life. The BMS will start beeping once the lowest cell will reach 3.3V (cellLowWaring), so you'll be alerted a little bit before the battery is empty.
CellDiffWarning is an important parameter, it monitors the maximum difference between cells. If you get this error triggered it means something is very wrong with your battery and that one cell is possibly dead (or something is wrong with the BMS sense wire). It will beep at you if the difference between the lowest and the highest cell is over 0.5V (which is already a lot). The BMS will completely cut power if the difference exceeds 1V (celldiffprotect). If you ever get this error, sotp using the battery immediately and do not attempt to recharge it. It is already a very huge difference, in general if the difference between the lowest and the highest cell reaches more than 0.100V you can consider that the lowest cell is toast.
Discharge OverCurProtect is the maximum discharge current allowed by the BMS.
For the first tests, I suggest you limit both your controller and the BMS. You can easily increase the values later once everything is working well. I suggest you at first to put a maximum value of 150A line current (battery current) in the fardriver controller settings, when you'll receive it. I've set the BMS value to 350A but it would be better to lower it to 200A during the first tests.
Short circuit protection is set to 550A, but I forgot what fuse you bought. It should be set to a lower value than your fuse, this way the BMS wil cut power before the fuse burns. So for example if you're using a 400A fuse I suggest to set 350A as the ShortCircuitProtect value. This is important, you want the BMS to cut before the fuse does.
CharginCellBalStart is the voltage at which the BMS will automagically start doing the cell balancing. I've set it at 4V but you can set it to a lower value if you prefer so that the balancing starts earlier (if the pack is way out of balance sometines it doesn't have enough time to finish balancing before the charge is over). Once the cells reach this voltage they will start being balanced. The balancing will stop after the difference between the highest cell and the lowest cell has reached less than 0.002V (CellDiffOff), so they should be pretty much all equal once the balancing is done.
Balance Current is set up to 180mA per cell. I think the maximum should be 200mA but I'm not sure on the new versions of the BMS. You need to monitor the BMS temperature when it is doing the balancing. If the BMS reaches 60 degree celsius it will start throttling down the balancing, so you might want to lower this value or add some kind of heatsink. If it never reaches 60 degreeC then you can increase this value to 200mA
PACK-ID: I believe this is the name of your BMS but I'm not sure as I don't have it in my older version. Set it so you can know what bike it belongs to.
100%_OCV, 90%_OCV and so on: these are used by the BMS to calculate the remaining battery capacity. I've set it up according to the discharge curve I found on the battery cell datasheet, you will need to slightly adjust the values to better match reality. This is to be done by trial and error, by riding the bike until the battery is empty.
TireLength: measure your tire circumference and the BMS will use this value to calculate speed and distances. If you want to use this function you'll need to derivate a wire from one of the hall sensors to the BMS. It's pretty convenient and it works well, so it's a nice thing to have.