ASI 855 hall sensor connector ?

carl507

100 µW
Joined
Dec 2, 2023
Messages
8
Location
Maryland
My setup:
72v 20ah batt.
60v 2000 watt gearless hub motor (T5) Leaf Bike brand
ASI 855 controller
I have an existing thumb throttle, and a basic bafang display and egg rider as well.

my dilemma/question?. The custom harness is mainly setup for the bbshd. Specifically the hall sensor jt connector. It's a 4 pin. The new hub motor is a 6 pin. Im guessing the 6 pin is positive and negative, speed signal and the 3 hall sensors.

is there a connector to join the ASI to the hub motor? Or cutting it and Soldering is the best option. How do I ensure I'm connecting the correct wires between the 2?
 
A 4pin wire harness won't have enough signals for a hubmotor's hall sensors--that requires at least five--5v, ground, and the three signals.

What signals or voltages are in your ASI 4pin harness? (what specifically was it connected to in the previous system the ASI came from?)


Note that you will need the ASI software and whatever password/login it requires from ASI in order to use the controller with this new different motor / system, It is not plug and play and requires you to set up all the motor parameters, battery voltages, throttle settings, etc., for it to work.
Thanks for the help. Wow, I didn't realize all this.
#1 , I believe it's for the bbshd. As I ordered it with the custom harness thinking that will cover the gamit of connectors.
and it was ordered new and I have yet to install it. (still waiting on battery)

Before ordering it, I explained my setup to setup before shipment
 
#1 , I believe it's for the bbshd.

Then you can find the pinouts for the BBSHD internal connectors (of whichever version BBSHD it is for, as there are multiple revisions over the years that may not all be the same), and that will tell you which pins are what signal and voltage on each connector of the ASI, assuming the seller doesn't have this info.


As I ordered it with the custom harness thinking that will cover the gamit of connectors.

As for connectors, there are hundreds or more different kinds (at least a dozen common ones) and all sorts of wiring orders used for each of the different parts of a system that have to connect to a controller (and colors are not used consistentlyso it 8s unsafe to color-match wires). To "plug and play" something, you have to get parts all matched and wired up the same, which is only likely to happen if you get them all from teh same place at the same time as a kit.

Otherwise, you'll have to determine which wires are which signals on each part of the system so you can either directly splice the wires together, or cut connectors off of whichever things you need to and splice connectors (with pigtails) to them, or install (crimp, solder) bare connectors to them that match the other things you need to connect them to. Figuring out the wiring of things is a PITA and is one of the most common thread types here on the forum. Getting and posting as much info as you can from the sellers of the items in question is the best first step, and posting links to those sellers' pages for each and every one of the specific items you have is another good step to helping us help you figure it out.


and it was ordered new and I have yet to install it. (still waiting on battery)

Before ordering it, I explained my setup to setup before shipment
Well, hopefully they have already done the setup and tuning on that combination. Sometimes just generically setting them up with the basic properties of the motor, battery voltage, etc., will get things working in a usable way.

If not, it's fairly likely you'll have to do some system setup and tuning yourself, then doing test rides and retuning, etc., and for that you have to have the ASI setup software (and login if required) and cable to your computer. Or work with the seller to have them do this remotely via your computer, if they can/will do that.

(sending them the controller probably wouldn't help since these kinds of systems (FOC controllers) need to be tuned to the actual setup they're used on and in the conditions they're used in, to respond the way the rider expects).

If they had to custom program the controller, then knowing what parts it was going to be connected to, I would have expected them to at least tell you that what you were ordering couldn't plug into the things you were going to use it with, even if they didn't offer to put the proper connectors and wiring on it for you.... :/


Even things like a throttle have different voltage ranges for different ones vs the mechanical position they're moved to during use, and the controller should be tuned to that for best operation.
 
good news, first and foremost. I bought it from affordable ebike.ca
they've responded to all my questions and in a sense, have held my hand through the ordering process. I can not recommend them more. pricing and service has been nothing short of "shocking"...

the 4 pin connector is the pedal assist. there's a 5 pin connector for +/- and the 3 hall sensor input, that's the connector for the hub motor. they mentioned to download the kilowatt app to finalize the setup once i get my battery. I'm sure if more assistance is needed. these guys will help.
 
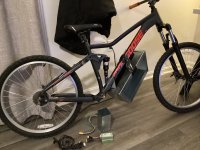
again thank you for helping the newbies. here's my winter project. XL mongoose frame with 29er's. I mocked up 24'' wheels and really like the feel. I had a bbshd on this frame and rode it to test the ride. the steering is super responsive which is good and bad. a bit squirrelly at higher speeds. which is fine with me,, cause the hub motor i ordered is a T5 and not meant to go 45 mph.

I personally made the control box and battery box. and will rivnut them to the frame. the 24'' 60v 2000 watt hub motor is in customs :rolleyes:. can't wait to receive it.

just waiting for the funds to build back up lol to order the 72v 20ah.
bike.jpg
 
Some thoughts, questions:

I personally made the control box and battery box. and will rivnut them to the frame.
If you want to hang that box from the frame, you'll need clamps around the frame tube. Rivnuts are very likely to just rip out of either the box or the frame from vibration, lateral box movement, and shock loads. Then your battery will either be left bouncing down the road behind you, or dragging under the bike / rear wheel and causing you to crash. (and it may also rip the downtube apart, forcing you to replace the whole frame).

For the controller box, does it have sufficient ventilation and airflow thru it (like a fan and inlet / outlet vents) for the controller to keep itself cool?

If not, you'll need to bolt the controller's heatsink portion to the box in a way that lets the heat properly exit into the material of the box (if it's aluminum; if it's steel it may not conduct heat well enough and you may need to also either add a heatsink at that point on the outside, or cut a hole in the box for the heatsinked portion of the controller to fit thru and stick out completely into the air.

good news, first and foremost. I bought it from affordable ebike.ca
they've responded to all my questions and in a sense, have held my hand through the ordering process. I can not recommend them more. pricing and service has been nothing short of "shocking"...

the 4 pin connector is the pedal assist. there's a 5 pin connector for +/- and the 3 hall sensor input, that's the connector for the hub motor. they mentioned to download the kilowatt app to finalize the setup once i get my battery. I'm sure if more assistance is needed. these guys will help.
Ebike.ca doesn't open. If you mean this site
I don't see the ASI controllers as an available option? (just the ASI-based *Runner series).

I also can't find anything on their site about a kilowatt app. They have the Grin Phaserunner Setup Suite for the ASI-based *Runner series of controllers (I use the Phaserunner v6), but that's all I found.

Perhaps it's not Grin Tech (Home page) you bought from?
 
good points. in my experience, rivets will definitely become a failure point. a riv nut is almost like bonding the metals together. if they fail then its time for a new frame anyway. as far as mounting the battery box. I'm going to braze 1/8 angle iron to the top of the box and bolt it to the riv nut. there'll be 1/8 x 2'' steel bar, encasing and brazed to the box as well. lastly will be bolded to riv nuts underneath the downtube.

the controller box will be open on the top and bottom, I'll be utilizing the controller mounting holes and secure it to the box.

its affordableEbike.ca
 
good points. in my experience, rivets will definitely become a failure point. a riv nut is almost like bonding the metals together. if they fail then its time for a new frame anyway. as far as mounting the battery box. I'm going to braze 1/8 angle iron to the top of the box and bolt it to the riv nut. there'll be 1/8 x 2'' steel bar, encasing and brazed to the box as well. lastly will be bolded to riv nuts underneath the downtube.

Just some advice from someone that has broken many many things over the decades, learned from the experiences, and would like to help others not have to go thru that. ;)

Rivnuts aren't really anything like bonding the metals together. They are only as strong as the metal directly around the rivnut that the rivnut is clamped onto from the inside during the riveting process****, and only strong in a particular way (tension directly thru the axis of the bolt thru the nut). The mounting location you have is unsupported except by the bolts, so it will swing like a pendulum laterally constantly while riding, as the mass of the box moves at a different rate than the frame, and this will put stress on the bolts and hte nuts and the frame that none of htem were intended to take.

(for low-mass things like a waterbottle this isn't too much of an issue, but the battery is going to be more than several times that mass, and stick out much farther from the frame, and hang below rather than sit on top of the tube, all of which make the stresses much more severe).

Using clamps around the frame itself that provide a flat surface for the top of the box to apply some of the load to will significantly change this problem, and prevent that kind of failure.

Even these
would probably be better than the rivnuts, perhaps by a whole lot.

The clamps around the frame also distribute the shock loads from the mass of the box and contents over a much larger area of the frame than the tiny area around the rivnuts.

**** If you're using rivnuts that are actually just "nutserts" then they don't even have any connection to the frame beyond a tiny bit of friction where they're pressed in the thin tubing wall....rock them back and forth just a little and they can fall right out. :(


its affordableEbike.ca
They're a new one around here, never read anything about them before (there are references to Affordableebike but not that specific address except for one item****). Hopefully they stick around if they're as good as you've had experience with so far...but if they were *really* good they would have given you all the info you needed to get things hooked up to start with, if you gave them the correct info on which specific motor, battery, and other hardware you were going to use that you didn't get from them. Or they would have advised you not to use the "wrong" type of controller / wiring harness / connections, etc.

Hopefully they really did set the controller up correctly for your parts (which is difficult to do without having them connected, especially the motor, unless they have setup this controller for that specific version of that specific motor before, for other people). Guess you'll find out once you get all the parts hooked up. ;)


**** this post
references a poorly built battery from "affordableebikes" but doesn't link the site.

This post
references buying a new custom built pack from affordableebikes.ca specifically, but it is difficult to tell if the problems reported with it are actually for it or some other pack as the poster had multiple packs being discussed and was never clear, and never responded properly to the various questions.

This post
is by the actual person running the site you've bought from and gives his email address (which a google search turns up on that website). Hopefully they've learned a lot since they stopped posting here a couple of years ago, given some of their posts' content. :/
 
thanks, much appreciated. I will always concede to people who have real life experiences. but I'm too prideful to throw my box away lol. Maybe a shark battery is best. hard to find a 72v shark with 40-60 amp continuous
 
No reason to not use the box, just change your mounting system to something that won't break. ;)

Plus...would a shark (or other frame-mounted battery with cradle) fit in your frame in a way that lets you actually install / remove it?

Which battery are you intending to put into it? (to be sure that it can actually do the job you need it to)
 
I'm looking for a 72v with a discharge rate between 2500-3000 watt bursts. The bike will mainly be used off road or a quick run to the corner store. At most I'll maybe do 15 miles per charge. ideally I want 20ah. But I know I can get by with 700 or so watt hours for my riding style.

Man I'd love to put the battery in the triangle. But the rear shock prevents that. when it's time to replace the frame I will definitely use a steel hardtail and get a high quality seat and a seat suspension thingy. A full suspension bike is awesome but complicates the build. And trying to get good chain alignment on a full suspension with a bbshd is tough too in my experience. I had to try different sprockets and in the end I was stuck with whatever worked vs what I wanted.
 
Back
Top