Bafang SWXH Repair Opening One Up

AWWWWHHH

why did you have to go and tell him. he must have cold sweat popping out worried about this. plus he hasn't seen how the pliers are gonna gouge the aluminum, but i am still not certain he has bad hall sensors.

maybe go do a recheck, try to establish where the ground is and then measure the resistance back through the hall sensors first.

now that you got the macho pliers, take a second to double check, confirm they are bad.
 
All rigthy then. Leftey loosey it is.

New Problem with my freewheel tool I bought. I'm starting to wonder if this is all worth it :x

I can't seem to drill a hole in it so I can get it over the Banfag axle. See pics. Cobalt drill bits didn't work.

What kind of freewheel removal tool do you guys use?

bafang-axle-small.jpg

filzer-drill-small.jpg
 
zukster said:
New Problem with my freewheel tool I bought. I'm starting to wonder if this is all worth it :x

I can't seem to drill a hole in it so I can get it over the Banfag axle. See pics. Cobalt drill bits didn't work.

What kind of freewheel removal tool do you guys use?

I have opened up the bores and/or cut counterbores into a few freewheel tools (Park brand). It does not take special cutters, but it does take very slow cutting speeds and lots of lubricant/coolant. I used a lathe.

If you don't have machine tools and you are determined to do it at home, consider annealing the tool, drilling it, and then hardening it back up and tempering it.

Chalo
 
How about a dremel?
 
Might work I have a little one could try.

The tech at the local bike store said he had a puller with a bigger hole that he thought
would work. If it does I'll put a pic up here. I'm not too hopeful until I have it in my hands though.
 
Progress Report

Much more work was needed. The freewheel puller that the shop thought would work did not fit, so I
had to drill and dremel the Filzer shimano freewheel puller. I'll let the pics do the talking. I had to use
bits in between 13/32, which was about the size of the original hole, and work my way up through all
the 64th of an inch sizes. 27/64, 7/16, 29/64, and 15/32 finally fit. I had to work the bits at an
angle to get the hole big enough to cut more material before the next size would finally go through.
Later - I discovered that the dremel was actually more effective at removing material, if worked in
circles around the hole - never again.

Then the 20 inch channel locks made quick work of the cap on the motor attached to the wheel.
I just sat on the wheel to hold it steady, and it came off pretty easy. The motor that was not in
a wheel proved to be another story. It defeated my tools. I broke my favorite leather belt too.
I got an auto shop down the street to get it off for me. They used a chain clamp, 2 pin adjustable
face spanners and my channel locks at the same time. So much for Chinese factory assembly
line girl tight :|

If I have to do more of these I'll be getting a 6 inch bench vice. The Irwin is only $80 cdn up here.

So here are the pics of final success. Now to troubleshoot the failed motor too.

motor-open-01.JPG

motor-open-02.JPG

motor-open-03.JPG

motor-open-04.JPG

motor-open-06.JPG

motor-open-10.JPG

motor-open-12.JPG

motor-open-14.JPG

motor-open-20.JPG

motor-open-22.JPG

motor-open-40.JPG

motor-open-41.JPG

motor-open-45.JPG

motor-open-47.JPG

motor-open-49.JPG
 
I might attempt to repair the hall sensors as posted in a Knuckles thread.

Keywin suggested that he send me a sensorless controller so it would not need
the hall sensors working. Or a module for the Infineon that would change it to
sensorless. I have a couple of little 36V/350Wand one bigger 48V/600W to
play with.

I'm putting my new motor in the laced hub right now. I'm looking forward to
getting e-mobile again. My bike is currently my primary transportation. So
I'm be getting that vice soon, and an extra motor that can be swapped in
more quickly next time if it has a problem.
 
you should be able to determine if any of the halls are bad by measuring.

glad you found someone with a spanner to get it open. i finally got my wheel trued yesterday, so we are even. my first wheel.

maybe that's why holmes could not get his open, they may put the thread lock on now and did not back then when your old motor was built.
 
good work. Much harder to get out then mine.

The motor core is the same construction as my black front bafang. Check that the sensors are still glued tightly in their slots while you can access them. Once you've found the short, you might wish to add more epoxy around the sensors to make sure they stay in place.

Cheers!
 
Thanks guys,

I almost smoked the new motor today since this last post. Went up a big hill with a
child trailer attached to the bike (and child (5 year old)) to visit a friend. At the top
of the climb, the motor cut out and was really hot, and smoking a bit. I got lucky.
After it cooled down after an hour or so, it was working again. I guess I'll have to
be more careful.

Setup was:

- 48V/600W Infineon.
- Bafang motor hub.
- 3 Canadian Tire 20V Yardworks batteries in series = 60V.

I thought this was not too much for it but it was. I was not even really
pushing it too hard. I might switch back to 2 batteries in series = 40V and the
little 36V/350W Infineon to stay on the safe side. I'll just have to peddle assist
a bit more.
 
Hello zukster, couldn't you use the channel locks when the freewheel was on the motor? Then it might be that the freewheel puller could fit without drilling, i.e. on the removed motor cap.
 
i doubt if there is enuff space behind the freewheel for his channel locks.

there may be enuff space for the 2 pin spanner (not scanner!) to fit behind the freewheel without removing it, maybe even would help hold the pins in place while unscrewing.

it is surprising it was so tight, fav belt too, bummer. i shoulda never said that.

zuk, did you replace the hall sensor? or ever even determine if it was bad?
 
dnmun said:
zuk, did you replace the hall sensor? or ever even determine if it was bad?

It was bad so I just ordered a sensorless controller from Keywin. It works with just the three
main wires. Will be testing it over the next couple of weeks. We just moved.
 
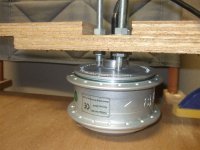
I ended up making my own three pronged "cover coaxer" to open up my SWXH with.

DSCF6836.JPG

DSCF6838.JPG

Initially tried an adjustable 2 pin spanner but it started to chip around the holes. Couldn't find anything to grab the outside of the cover for the "jar" technique. Unfortunately here down under we aren't spoiled for choice and price when it comes to tools, so had to improvise with some 10mm threaded rod (ends ground down on bench grinder) plus some scraps of 18mm plywood.

I held the motor case by bolting through the plywood base to the disk brake holes.

I was surprised by how much persuading the cover needed - for an unused motor. I don't look forward to trying to open one up that has been in service for a while.
 
Hi Zuckster,

How did that Keywin sensorless controller work out? Does it start up smoothly enough to suit you? I want to get one. Should I just be asking Keywin for a "36v, 350w sensorless, with CA?

Thanks,

John
 
marshy said:
any verdict on that sensorless controller zukster? I may have to go that way myself. http://www.endless-sphere.com/forums/viewtopic.php?f=2&t=13135

Sorry, not yet. I ended up rebuilding a 26" wheel mountain bike for my kid that I got
for cheap to replace his 24". For $200 and a major tune up, he gets what was a 2-3K bike
when it was new. Next is the ebike setup.

Can anyone else comment yet?

I thought of a great way to use the controller attached directly to my slide-on battery pack

http://www.endless-sphere.com/forums/viewtopic.php?f=2&t=9451

If I put the sensorless controller right on the slide-on rack, I'll only need to connect the
3 motor wires and the 2 throttle wires when attaching the rack. Because the batteries
can stay wired directly to the controller since they are all on the rack.

Then a 5 pin Anderson connector block would be all that's needed when attaching the
rack to the bike. Without the rack, the bike will only have the extra weight of the
motor, so you can ride in non-electric mode too, without too much extra weight.
 
marshy said:
I ended up making my own three pronged "cover coaxer" to open up my SWXH with.

Dude, that looks like the best thing I've seen so far. I think I'll d it with your method
next time I need to open one up.

btw - after I burnt out one motor with the Infineon 30A 600W controller, I bought a bunch
of metal gears from keywin along with a new motor.

I went back to the 20A 350W controller, but I have not damaged the nylon gears yet, even
pulling a trailer + 5 year old + car parts occasionally.
 
marshy said:
I ended up making my own three pronged "cover coaxer" to open up my SWXH with.

View attachment 1


Initially tried an adjustable 2 pin spanner but it started to chip around the holes. Couldn't find anything to grab the outside of the cover for the "jar" technique. Unfortunately here down under we aren't spoiled for choice and price when it comes to tools, so had to improvise with some 10mm threaded rod (ends ground down on bench grinder) plus some scraps of 18mm plywood.

I held the motor case by bolting through the plywood base to the disk brake holes.

I was surprised by how much persuading the cover needed - for an unused motor. I don't look forward to trying to open one up that has been in service for a while.

why did you open a new motor? you coulda mounted your plywood "spanner" to the bench and turned the wheel. then you would be able to push the wheel down on the pins to keep them engaged so the don't "chip" out the holes in the cover when you unscrew the cover. imho.
 
dnmun said:
why did you open a new motor? you coulda mounted your plywood "spanner" to the bench and turned the wheel. then you would be able to push the wheel down on the pins to keep them engaged so the don't "chip" out the holes in the cover when you unscrew the cover. imho.

I opened it up on the incorrect assumption I had hall sensor/wiring problems. Anyway, had planned to open it to make sure that the cover thread was well lubricated in case I needed to remove it after some use. Plus, I was keen to have a peek around inside.

Yes, I actually did initially try fixing the "spanner" down to the table as you describe but found it a little awkward. That might be the way to go if the motor was already laced up into a wheel. As depicted it worked very well. The pins from this device didn't do the chipping, it was the very first attempt with a 2-pin spanner (the type you remove angle grinder lock collars with). In that case the pins were too small and there was insufficient and uneven leverage.
 
Back
Top