
Buttom line up front: this headlight is the brightest that I've ever seen, much less used, and because it has a sharp cutoff it doesn't blind oncoming traffic. The taillight is really good, but it's also a fair bit of work to get all together. The headlight is low-hanging fruit that I think most people could get going with very little trouble. The taillight is challenging.

Headlight on a dark road:
[youtube]XqsgoLw8PKQ[/youtube]
Nighttime taillight fading:
[youtube]UpD_2eAJcXE[/youtube]
Daytime taillight flashing:
[youtube]VGiX7Yh7mGc[/youtube]


On my commute I'm frequently on a shoulder that's littered with construction debris, furniture, glass, you name it. It's a busy road with a lot of commercial and industrial traffic. In my last commute I was content with my Chinese knock-off Magicshine (one front, one back, both with 10 deg. high, 40 deg. wide Fresnel lens), but for this road I simply want more light on the pavement.
With a few exceptions, most of the lights marketed to cyclists have a conical "flood" pattern, where a lot of the light is not only "wasted" in the upwards direction but can prove distracting or even blinding to oncoming traffic.
My solution was to select a 5 3/4" motorcycle headlight with a hard cutoff in the distribution pattern (DOT certified). I bought a Chinese knock-off of a Harley Daymaker: https://www.amazon.com/gp/product/B01L1SK9Y6/
I also wanted to improve my rear lighting, so I ordered a real of 5630 SMD strip lights "16ft/5M 5630 Waterproof 300 LED Light Strip Flexible Ribbon DC12V LED Tape Lamp" https://www.ebay.com/itm/401516721115
As the linear regulator in the headlight gives full power down to 10.5V, had I just been content with the headlight, it would have been much easier from a power and control standpoint, as simple as connecting it 18650s is 3S, possibly with a switch to toggle between high and low beams. To improve efficiency, you could use a switch DC/DC power converter to bring your battery voltage down to a steady 10.5V.
XL4015-based switching DC/DC converters: https://www.amazon.com/gp/product/B078JWWDV1/
I wanted more, and here's how I went about it:
4S4P 18650 (fabricated with cells from a pair of cheap 8-cell laptop batteries off eBay) gives me 14.4V, nominal.
One DC/DC converter takes mains down to 10.5V for the headlight. So that I could make the light flash off by asserting 5V, I desoldered the screw-down terminals on the input so that I could get to the XL4015 chip and then lifted pin 2 to mimic the schematic (resister, diode soldered directly to the pin and each other) on page 8 of the datascheet:
http://www.xlsemi.com/datasheet/XL4015%20datasheet.pdf
Output of the converter goes to the handlebars where a SPDT switch selected high or low beams. I used 3-wire marine/waterproof pigtails (like you find on some aftermarket headlights) between the switch and the headlight itself so that I could disconnect the headlight for ease of installation and service:
https://www.amazon.com/gp/product/B07VHHXKSX/


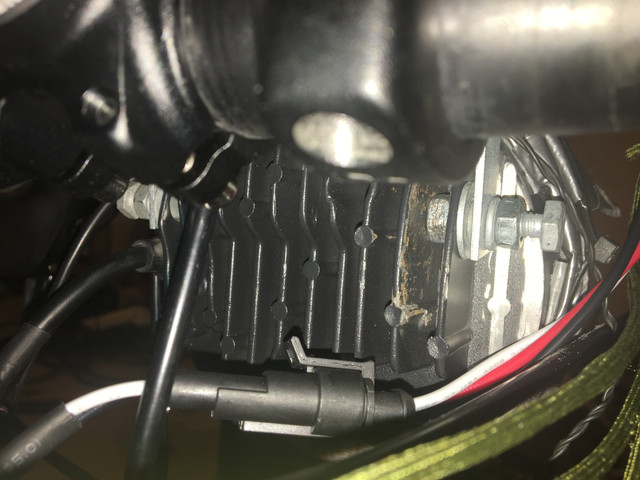


Use a hacksaw and dremel tool, I cut the last two fins off each side of headlight. I drilled holes in the larger fin that was now readily accessible and installed galvanized 1/4" hardware: nut, locknuts, cut washers to distribute pressure evenly, all connected to angle brackets to that go up to clamps mounted on the "skis" of the aerobars (after a couple wraps of rubber to pad and make snug):
https://www.ebay.com/itm/Gs-Power-Tube-Clamp-Brackets-Choices-1-1-25-1-75-2-Inch-Mount-Led-Light-Bar-R/303245443745
The taillight is way more complicated:
Another XL4015 DC/DC converter, now giving "always on" 12VDC. Output goes back to the taillights, but we'll get to that. Output also goes to an Arduino Nano, which has an onboard regulator to get down to 5Vcc. Inputs are buffered with bypass caps and current limiting resistors. Outputs have current limiting resistors. Connected to the inputs are four toggle switches: left and right "turn signal" (on the handlebars) as well as headlight steady/flash and taillight mode on the control box (under/behind the seat). Four outputs of the Arduino plus the ground that I sent from the DC converter all go to four MOSFETs at the back of the bike, that are shielded from weather as well as encapsulated in heatshrink. 12VDC hot gets distributed to the LEDs, and grounds from the LEDs go to the MOSFETs. (If this isn't making sense, sorry: ask a question or look it up.) I ran 12" strips on the twe verticals of the rack mounts plus the middle of the fender, and then I made a 18 LED patch that's right below the saddle bag.
From the handlebars I can toggle the left and right turn signals switches (or both to run an entirely different program) plus select high or low beams. By reaching under my rump I can select steady (night/dusk) or pulsing (daytime) for the headlight; and either flashing (daytime) or fading (night/dusk) for the taillight.

Wires are jacketed in the sheathing of parachute cord protection, separation, abrasion resistance, and so that I could tie off the ends of the cord for strain relief. As I previously mentioned, the aluminum headlight casing is bolted to tubular brackets for the handlebars with galvanized 1/4" hardware. All the circuitry fit snugly into a project box that hangs from the rails of my saddle. (For the Arduino to fit, it's on standoffs so that it slightly overlaps one of the XL4015 boards. If I were to do this again, I would get a bigger enclosure; mine is 100*66*27mm, $5 on eBay shipped from Shanghai.)
(Yes, my seatpost is "backwards." It lets me get my hips farther forward.)


Ask questions or ask for specific pictures.
Headlight on a dark road:
[youtube]XqsgoLw8PKQ[/youtube]
Nighttime taillight fading:
[youtube]UpD_2eAJcXE[/youtube]
Daytime taillight flashing:
[youtube]VGiX7Yh7mGc[/youtube]
On my commute I'm frequently on a shoulder that's littered with construction debris, furniture, glass, you name it. It's a busy road with a lot of commercial and industrial traffic. In my last commute I was content with my Chinese knock-off Magicshine (one front, one back, both with 10 deg. high, 40 deg. wide Fresnel lens), but for this road I simply want more light on the pavement.
With a few exceptions, most of the lights marketed to cyclists have a conical "flood" pattern, where a lot of the light is not only "wasted" in the upwards direction but can prove distracting or even blinding to oncoming traffic.
My solution was to select a 5 3/4" motorcycle headlight with a hard cutoff in the distribution pattern (DOT certified). I bought a Chinese knock-off of a Harley Daymaker: https://www.amazon.com/gp/product/B01L1SK9Y6/
I also wanted to improve my rear lighting, so I ordered a real of 5630 SMD strip lights "16ft/5M 5630 Waterproof 300 LED Light Strip Flexible Ribbon DC12V LED Tape Lamp" https://www.ebay.com/itm/401516721115
As the linear regulator in the headlight gives full power down to 10.5V, had I just been content with the headlight, it would have been much easier from a power and control standpoint, as simple as connecting it 18650s is 3S, possibly with a switch to toggle between high and low beams. To improve efficiency, you could use a switch DC/DC power converter to bring your battery voltage down to a steady 10.5V.
XL4015-based switching DC/DC converters: https://www.amazon.com/gp/product/B078JWWDV1/
I wanted more, and here's how I went about it:
4S4P 18650 (fabricated with cells from a pair of cheap 8-cell laptop batteries off eBay) gives me 14.4V, nominal.
One DC/DC converter takes mains down to 10.5V for the headlight. So that I could make the light flash off by asserting 5V, I desoldered the screw-down terminals on the input so that I could get to the XL4015 chip and then lifted pin 2 to mimic the schematic (resister, diode soldered directly to the pin and each other) on page 8 of the datascheet:
http://www.xlsemi.com/datasheet/XL4015%20datasheet.pdf
Output of the converter goes to the handlebars where a SPDT switch selected high or low beams. I used 3-wire marine/waterproof pigtails (like you find on some aftermarket headlights) between the switch and the headlight itself so that I could disconnect the headlight for ease of installation and service:
https://www.amazon.com/gp/product/B07VHHXKSX/
Use a hacksaw and dremel tool, I cut the last two fins off each side of headlight. I drilled holes in the larger fin that was now readily accessible and installed galvanized 1/4" hardware: nut, locknuts, cut washers to distribute pressure evenly, all connected to angle brackets to that go up to clamps mounted on the "skis" of the aerobars (after a couple wraps of rubber to pad and make snug):
https://www.ebay.com/itm/Gs-Power-Tube-Clamp-Brackets-Choices-1-1-25-1-75-2-Inch-Mount-Led-Light-Bar-R/303245443745
The taillight is way more complicated:
Another XL4015 DC/DC converter, now giving "always on" 12VDC. Output goes back to the taillights, but we'll get to that. Output also goes to an Arduino Nano, which has an onboard regulator to get down to 5Vcc. Inputs are buffered with bypass caps and current limiting resistors. Outputs have current limiting resistors. Connected to the inputs are four toggle switches: left and right "turn signal" (on the handlebars) as well as headlight steady/flash and taillight mode on the control box (under/behind the seat). Four outputs of the Arduino plus the ground that I sent from the DC converter all go to four MOSFETs at the back of the bike, that are shielded from weather as well as encapsulated in heatshrink. 12VDC hot gets distributed to the LEDs, and grounds from the LEDs go to the MOSFETs. (If this isn't making sense, sorry: ask a question or look it up.) I ran 12" strips on the twe verticals of the rack mounts plus the middle of the fender, and then I made a 18 LED patch that's right below the saddle bag.
From the handlebars I can toggle the left and right turn signals switches (or both to run an entirely different program) plus select high or low beams. By reaching under my rump I can select steady (night/dusk) or pulsing (daytime) for the headlight; and either flashing (daytime) or fading (night/dusk) for the taillight.
Wires are jacketed in the sheathing of parachute cord protection, separation, abrasion resistance, and so that I could tie off the ends of the cord for strain relief. As I previously mentioned, the aluminum headlight casing is bolted to tubular brackets for the handlebars with galvanized 1/4" hardware. All the circuitry fit snugly into a project box that hangs from the rails of my saddle. (For the Arduino to fit, it's on standoffs so that it slightly overlaps one of the XL4015 boards. If I were to do this again, I would get a bigger enclosure; mine is 100*66*27mm, $5 on eBay shipped from Shanghai.)
(Yes, my seatpost is "backwards." It lets me get my hips farther forward.)
Ask questions or ask for specific pictures.
") highByte
highByte