Burning Man Electric Couch.

dogman dan

1 PW
Joined
May 17, 2008
Messages
36,380
Location
Las Cruces New Mexico USA
Well, I'm not going to burning man myself. But I have wanted to do this since I got my first hub motor.
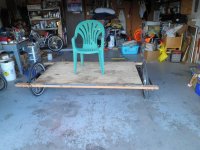
Deck in place.jpg

Still very much a work in progress, but that picture shows the point I'm at now. Two hubmotors, two large casters from Harbor Freight, a pair of steel frames to hold the motor and caster, and a wooden frame and deck that will have a couch attached to it.

One primary design consideration, is to get to something that could plausibly go to the playa, in a hatchback. Nothing longer than 5" except three or four 2x4's, which could be bought in the last town on the way to the party. The plywood deck can easily be done in 3'x4' sections, able to fit in the hatchback. NO need to haul a trailer to carry it to the burn.

Obviously a couch is harder to carry, but you can arrange for a camp mate to bring the couch, or even trade for use of a couch when you get there.

This setup will be ideal for use with two of the E-bikekit trike kits because they have reverse, and a low speed. :mrgreen: (shamless plug) :roll:

But I'm building mine for much more power and speed 0f course. :twisted: I have two of the old 9x7 motors laying around, and will be getting two new controllers with reverse on ebay. 48v 40 amps controllers. So I'm thinking close to a 30 mph couch, and hopefully some fairly quick take off.

It must have reverse, to do what I want in the first place. I want skid steering, one motor forward, the other in reverse, and spin till you puke. A search of motorized couch vids on you tube did not show any skid steer couches.

You will also notice as I get into the build details, that the two motor frames will easily adapt, to create a dual rear drive trike. But no pedals, since I built it for front motors. Still possible to change the frame for one rear motor though, and make it able to pedal.
 
Tools required, the minimum, a small angle grinder and a wire feed welder, and the welding hat. I cannot weld, at all. So if I can do it with a cheap welder from Harbor Freight, you can too. Just burn a roll of wire practicing on fairly thin steel first.

So the tool budget is about $200. You won't regret it, wire feed welding is a blast! I had a large metal cut off saw to make it easier for me to do the cuts, but an angle grinder will work fine too. None of the cuts are big stuff.

First step of the build was to find some steel for the axle dropouts. I had an old mower blade laying around, some fairly thick steel, so mower blade it is. Use something thick, but 1/4" is as thick as you need. The mower blade is about 1/8"

Mower blade cut for dropout..jpg

Marking the steel for the axle notch. I then make the cut a bit on the narrow side. Test, then make wider. Aim for a real tight fit on the axle flats.

Marking the axle notch.jpg

Test fitting the axle in the notch. In this pic, I tried to use the existing round hole in the mower blade, but the notch turned out too shallow. So in the end, I just used the grinder to notch it deeper. About 1.5" deep in the end.

Test fitting the axle.jpg

Here is the finished dropout piece fitted to the axle. I cut these about 3" long. But you may want them longer, if you use a 20" wheel. So the wheel will level up with the height of the casters on the other end of the frame. You need 4 of these.

finished dropout piece.jpg

Next, the frame. It's made of 1x1 thin wall steel tubing. Many places sell this in 20' lengths, so I was trying to get the frame made with one piece. But I did not think ahead about some of the parts I'd need, so just get 40' of it. Extra for a cut you screw up helps, always. You will need more for the handlebars support, or some other steel to make that. Square tube is much easier than round, so just get plenty of the square. Unless you are doing the whole thing from repurposed steel, like bed frames. About $40 should cover the steel.

So the frame is two pieces of the steel, about 4.5' long. I should have made it just a bit longer, 5.5' perhaps. To set the width of the frame, you need the motor axle width, plus the thickness of the dropouts. I then added a few mm. Better to be too wide than too narrow. Washers fix too wide easy. So for my front motors, the width I cut the steel was 110 mm. two pieces, each one gets welded in between the two 5' long pieces of square tube.

To find the best location for the axle, I test fit the whole wheel on the frame. I want to leave room for a tire, and a 2x4. Go generous, you don't want it tight, unable to fit a 2" tire. Then the axle pieces get welded to the inside edge of the frame tube.


Attachments

  • setting the axle width.jpg
    setting the axle width.jpg
    91.6 KB · Views: 2,716
Here is the motor, fitted into the almost finished frame.

motor fits the frame.jpg

Once I have two built, time to see how the casters fit. The casters were $15 each, at harbor freight. 10" pneumatic wheel casters. With two 2x4's I just used C clamps to mock it up. The question was, what height the caster mount needs to be, for a horizontal frame using the 26" wheels. Turns out, I needed to mount the casters 2" below the rail on my wheel frames.

mock up fit.jpg

If you used 20" wheels, the casters would be too tall, unless you made the motor dropout pieces longer. I got super lucky, because dropping 2" is easy with pieces of 1" tubing.

Installing the casters.jpg

Close up of the caster mount. This shot also shows how the wood cross pieces bolt to the metal. Two boards will bolt to both rails of the motor frame. Two more boards will be added, which bolt only to the inner rail, clearing the motor wheel. 4 crosspieces should be enough to support the plywood and couch. If not, add more till it's strong enough.

Caster mount detail.jpg

Back to the semi finished platform. I need longer 2x4's to make this thing wider, so it will fit a 3 person couch. But for now, this will do.

frame finsihed.jpg

With plywood in place.

View attachment 1

Still to do. See if any repairs are needed on these old motors. I can't remember if the halls work on them. Weld brake mounts to the wheel frame. It needs rim brakes. Those will be scavenged from old bikes. Build a handlebar mount. This mount won't steer the bike, but it will support a pair of flat bars, so I can mount throttles with reverse switches, and brake handles with brake switches. To corner, grab one brake, throttle the opposite wheel.

And when some bills get paid, buy two controllers to run it all. Battery will be Hobby King lipos, At least 20 ah of it so I can run two 40 amps controllers at once.

Lastly, find an old cat pee couch in the desert, Toss the cushions, and sit on some cleaner dog beds I have.
 
dogman dan said:
I have two of the old 9x7 motors laying around, and will be getting two new controllers with reverse on ebay. 48v 40 amps controllers.
You can use the same controller type you sent me, if you keep in mind it may not give you 40a, but only 32-33a. If the board is the same in them then you can also use my tech thread on it to wire up any options you need out of what it has.

Keep in mind if you use this or any other similar one you will have to stop the rotation fo the wheel completely for at least a second or two, before it will go into reverse from forward, or forward from reverse.


It must have reverse, to do what I want in the first place. I want skid steering, one motor forward, the other in reverse, and spin till you puke. A search of motorized couch vids on you tube did not show any skid steer couches.
FWIW, I tried that with the trike once I got two motors on teh back, since teh x5304 has reverse, but it didnt' work. Must be because of the front wheel or weight distribution, etc. But it tries and then jsut jams up, even if I have th front wheel turned sideways.

I didn't expect it to work well, but thought it might work a little.

On yours, it ought to work fine. :)


But no pedals, since I built it for front motors. Still possible to change the frame for one rear motor though, and make it able to pedal.
No need--just modify one cover of one motor liek I did on teh same motor, and add a freewheel threaded side off an old steel bike hub, and voila, you have chain driveability. ;)

Probably would take you an hour at most, if that.

There's pics of it in the trike thread where I put the thing back on there to use it like that on the trike.
 
Thanks for this one. I got a big laugh at the 30mph couch line. Please wear excellent gear and find a good empty road if trying it out at those speeds. And get video.
 
Yes, gotta have video.

Also, a good time to go solar -- couple of hundred watts of panels would make a good shade /awning / umbrella.
 
Definitely could carry a nice solar awning. Just add money.

Re the reverse, Hmm, maybe that's why I never saw one on you tube. It should work though, it does on skid steer mowers. This is where I got the idea, from all the fun hours I spent mowing golf course greens. The question is will the reverse have the power to spin it on the casters. It might just jam the casters with that much weight on it. I didn't notice reverse on that controller I sent you, the one I'm liking does have it.

You could charge people to ride those zero turn mowers. Mow a pass, spin on a dime, mow another pass, spin on a dime. A regular amusement park ride.

Big parade 4th of july, a night parade with electric lights on the floats. Not sure if I can get it going by then. Lots of bills piling up. At this point, the most likely public debut will be a balloon rally in the fall.

If it runs without folding a wheel, definitely video. :mrgreen:
 
dogman dan said:
I didn't notice reverse on that controller I sent you, the one I'm liking does have it.
It does have it, just not wired out. The tech thread I made for it has all the pads I could find functions for either via the forums or by testng.

Reverse is slower/lower power than forward, IIRC, and has been on most controllers I've tested that have the function, so you might need to learn to limit your throttle use when doing a turn.

Or even do a little bit of complexity, and make a "turning" button for left and for right (or on-off-on toggle switch, like those turn signal switches on some kits?) so that it switches relays to put a resistor divider inline with your throttle on the non-reversed side to match the power level/speed of the reversed side.

You could even set it up with a single throttle to run both wheels and ti would stil work this way, with the un-divided throttle output to the reversed wheel, and the divided to the forward wheel.


If it runs without folding a wheel, definitely video. :mrgreen:
Oh, no you don't, you have to post THAT vid, too. :p
 
DOGMAN AND AMBERWOLF, YOU ARE THE GRATEST AROUND. You like to make things like me, so keep it up. :lol:
 
Hahaha nice!

Reminds me of a coworker of mine that made an electric card board box with mario kart style steering.
 
So, where's the video? :p

This member has theirs working already:
https://endless-sphere.com/forums/viewtopic.php?f=12&t=72225#p1141623

;)


(and are you doing any roadtrips out this way this year?)
 
Oh, never got the project complete due to lack of funds to buy two new controllers with reverse.

Then recently, I did get some money, and couldn't resist the temptation to do some hot air balloon flying instead with the cash. Take a hundred , light it on fire each flight, but so much fun.
 
How 'bout a "hot air couch"?
 
Not exactly a couch, but this is me flying my cloudhopper.Cloudhopper.png

Needs a lot more than $100 to get it maintenanced to fly, and insured again though.
 
Can't even call that a basket-case. ;)
 
That thing was very fun, but honestly I've lost the nerve to fly it anymore. Always wanted to take that to burning man, and fly it buck naked.

Look, a guy dangling, and I mean DANGLING.
 
Back
Top