Controller Overheating Possible inside plastic case?

broloch

1 kW
Joined
May 10, 2008
Messages
358
Is it possible, or likely that the controller will overheat inside an airtight plastic container? Is keeping the controller in such a box a bad idea?

I am doing it for the purpose of security. The case will be locked, but no air will get in.

If I add air holes, it won't be so weather proof.

Waterproof breathable fabric, will that let air in?
 
If your controller outputs heat (meaning you draw enough power thru it to do this), and is designed with a heatsink that is expecting airflow, then either the heat will damage it (if it has no thermal protection) or will lower your performance significantly (if it has a thermal-based current limiting or similar).

If you're not drawing a lot power it might not get too hot too fast, but it will still get toasty in there, most likely.

I would suggest that you replace one wall of the plastic enclosure with metal (aluminum, for instance), which can be sealed with silicone/etc where it joins with the plastic for weatherproofing. Then find a way to mate the largest amount of controller heatsink surface area to that metal plate, to at least give it some way of getting some of the heat out of there. It may still not be enough, depending on how much heat is generated.
 
Thanks for the idea. I will look more into heatsinks.

My only experience is with those for CPUs...too small...

ebay has industrial sized versions

It is a Crystalyte controller, 20A,

It generates a bit of heat. I will be upping the voltage to 12V though, so that might increase the heat.
I would ideally like some sort of venting system, but the water issue may be a problem, though I will not be using the ebike when it rains, but I can't help it if it suddenly rains.
 
Like amberwolf said, you have to either provide venting or heatsink through the walls. A little bit of passive ventilation isn't enough, either - you'd want a fan to provide reasonable airflow, unless your vents are set up so that convection will work well.

For one of my projects at work I built a unit which had a small handful of network switches, serial adapaters, etc. in a weatherproof steel box. The whole thing only took about 25-30W, most of which was just the main DC power supply. It was inside a good-sized box, like 24"x18"x8". We sealed it and let it sit overnight for a temp test, when we came back in the morning it was a toasty 95F inside! We added a dinky little computer fan for a little airflow, and the temp went down to basically ambient.

To make vents and keep some degree of weatherproof-ness, take a look at the ducting/ventilation section of your local home improvement store. There are many places where a house needs something that lets air in/out but keeps water out, so they'll have a variety of louvers, hoods, etc that could be made to fit your needs. If you only need something to protect from rain but not too worried about splashing, that should be easier.
 
If you were only looking for waterproofing, and not security, I would suggest simply opening up the controller and finding all the screwholes, wire holes, joins, etc, and applying GE Silicone I sealant (the version that smells like vinegar) to them. Just don't get it in the threads or holes for the screws, or you probably won't ever get them out again. ;)

Then it would be totally sealed against the weather, even submersion would be possible, at least up to whatever connectors you have on it that aren't waterproof.
 
The problem is further compounded because I store the battery in the same box.

It is a Pelican military style box.

pelican%20laptop%20overnight%20case%20sml.jpg

Pelican_1945_Laptop_Case.jpg

pelican-case.jpg

.
.
.
I would like to have my cake and eat it too. (Would that require that I not use my ebike for awhile?) :mrgreen:

Security would be maintained by the case. The case would be locked shut, and locked onto the bike.

I may need some sort of louvre/vent system to make it waterproof, and air cooled. A computer fan is useful, as per posts above.
 
If you didn't mind the power wastage, you could use a Peltier junction, heatsink, (and if necessary, fan) out of one of those portable battery powered "refrigerator" beer coolers. :) Then find some of the old laptops that used to use heatpipes under the keyboard to move heat from the CPU to the chassis/frame, and carefully remove and bend the the heatpipes to a shape that lets them move heat from the controller to the Peltier on it's heatsink (bolted to the *outside* of the case). But that's a lot of wasted power, and is mechanically complicated. Waterproof, though.

It can also be done without the Peltier, but it won't be as efficient and would probably require the fan, which would be exposed to the weather outside the case.

A liquid cooling system from a PC would also work instead of the heatpipes, and as long as no hoses ever rupture or come loose, is also a waterproof solution. If you place the radiator next to the wheel spokes they'll generate enough air movement that you won't need a fan for most riding, depending on how much heat is generated. Then you would only be wasting power on the pump (which could be setup with a thermal control switch, so it only comes on once the heat buildup gets to a certain point).

But both of those solutions are fairly complex.

The best way to ensure heat conduction outside the case is to directly connect the heatsink of the controller to the outside of the case. If the controller is physically designed so that one side of it is the heatsink, a hole could be cut into the case large enough for all of it to be exposed, and sealed at the edges with silicone to waterproof it.

The second best way is to connect the controller's heatsink to a heatsink outside the case. If the controller's heatsink is not separate from the block the MOSFETs are bolted to, then you could unbolt them and replace the heatsink with a solid block of aluminum shaped and sized to allow maximum surface contact with the MOSFETs/etc and to allow direct contact with the outer heatsink's flat side, then sparingly use thermal paste to fill in scratches between the two (lapping their surfaces first if you wish for better conduction), and securely bolt them together thru a hole in the case just large enough for the heat-conduction block to stick thru.
 
In my desert climate, I make sure to mount the controlers where wind can hit em. Usually this is on the seatpost, or the front of the battery box, on the outside. But I have little security issues in the places the bike is left. Your bms will also want some ventilation, so look for ways to vent the box in my opinion, so air gets in but not water. It should only take a few 1/2" holes with a louver or hood over em. I've seen drawer handles that are a metal sheet, formed into a cup that would make a perfect hood over a vent hole. It should be easy to melt some plastic into the right shape to make your own hood over the holes to keep water out. If the rear set of holes is up high, the heat would convect out the back, so you'd get a small flow when the bms was working while charging.
 
amberwolf said:
The best way to ensure heat conduction outside the case is to directly connect the heatsink of the controller to the outside of the case. If the controller is physically designed so that one side of it is the heatsink, a hole could be cut into the case large enough for all of it to be exposed, and sealed at the edges with silicone to waterproof it.


That is pretty much what I did.

Here is the new Clyte controller with 4 - $3 heat sinks:

001-8.jpg


Here are my saddle bags with my old Infineon controller:

001-9.jpg
 
nico, did you silicone seal any part of the bag, or the controller?

is it a bad idea to silicone seal it?

can the red on/off button be silicone sealed?
 
nicobie, how do you mount your current controller? the one with the heat sinks?

nuts and volts...

________________________
..................................\
........................... ___....\
...........................|.....\...\ -------> front of bike
...........................|......\...\
.....CASE................|.......\...\
...........................|.........\_ PIPE (air goes in here as you ride, catches the air
...........................|
...........................|
...........................|
----------------------------

(The dots are meant for spacing purposes only...
 
btw, I was advancing more in my design with the S-Shape intake that you came up with

the idea now involves using a shower hose, or one of those hoses for those pressure washers, or even one of those braided hoses

you could have a pair, where one comes out the front, and one out the back, both of them hanging downwards

the one in the front...the 'out' end is aligned to face forward, where your bike is riding, so that it captures wind, and forces air (by convection) into the case

it would be sturdy too since the hoses for showers are made of metal, and you won't need a computer fan, and no one can really tamper with it, unless they brought along some tools, and another one could be used for your controller cables
lg-metal-shower-hose-16m.jpg
 
broloch said:
nicobie, how do you mount your current controller? the one with the heat sinks?

On the Infineon I just bent one on the tin flanges back to flat then attached it to the leather bags with good sized wire ties. I added a couple of brass grommets to the bag for the ties so the leather wouldn't rip. It's worked great for hundreds of miles.

For the clyte controller I had to make another aluminum end plate to replace the original one as it was made out of aluminum and couldn't be re bent.

I didn't silicone anything as I don't worry about rain where I live. However I do carry a plastic bag and bungee cord that I could use to wrap everything up just in case. Silicone would make it harder to remove the controller too.

Seeing as the off/on button will be inside the case, and that my controller didn't come with a e brake plug, I added a couple of wires to the button switch so I can turn everything off with a key switch and handle bar mounted kill switch.

I could have flipped it around and mounted the heat sinks on the back where the internal fet heat sink is, but the existing mounting screws are in the way and it didn't seem worth the trouble to mill up an adapter plate. After all my Infineon worked fine mounted where it is and it dosen't really have much in the was of a heat sink. What I did on the Clyte is probably over kill anyway.
 
What I thought about was just having piping that you would use in plumbing.
Here is a basic schematic:
2yo1s1u.jpg
 
It would be quite rain proof, still very secure, and there would be good ventilation.

is 3/4" piping large enough for good air flow?
 
Not unless you have either a scoop on the front to gather a large amount of air into it to "ram" air in, or something similar on the back to do the same. If you restrict the airflow *and* force it to go around bends like that, using small hose or pipe, it's just not going to move much air.

You might not *need* much, but that you would have to determine by experimentation.

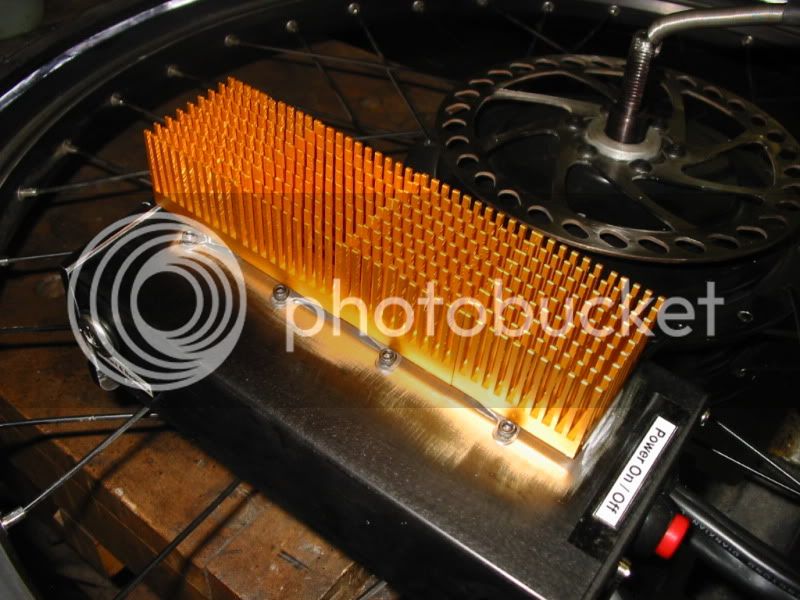
If you can do it, using either the direct heatsink method (to the outside of the case) or using the louvred hole approach would probably work best. The first is completely waterproof, and the second is at least rainproof, though not splashproof. If you have fenders on the wheel(s) then it might not matter.


Oh, and I'd forgotten about this, but for security of my lighting battery pack, tools, etc on one version of my upright bike, I'd just bolted a cat-litter pail sideways to a homemade rear rack (could have used a standard one if it was available), and just used hasps and padlocks on each side of the snap-down watertight lid. It was the cheapest way to make a watertight and secure container that people probably wouldn't want to steal, since it's just a cat litter pail.

I thought about buying hard cases like some of the ones made for motorcycles and scooters, because they're more aerodynamic and look better, but even if I had had the money for them, they were expensive-looking and would have themselves been a target for theft, whereas a cat litter pail generally is not. :)
ColumbiaWithMinerva1.1.0Rear.JPG
CargoTrailerSunlightLeftsideWTestbike.JPG
ColumbiaWithMinerva1.1.0RightsideMid.JPG

For some more aerodynamic and cool-looking yet still made-from-junk lockable pods, I acquired but never used a couple of dead vacuum cleaners. There's a whole post about that here, if you're interested in the idea. I probably will use them someday, for a minimalist bike just for commuting with no real cargo, just a change of clothes for work and whatnot, plus the controller, batteries, tools, etc. I don't think anyone would steal these, either.
Cargo Pods That Don't Suck Anymore
 
yeah, i thought about that....

so I figure I would need some sort of "funnel" to scoop air, or catch air, and to "ram" it in

i have decided on using a pipe instead, judging by your post, i will try for a 1" diameter which seems plenty, if coupled with a funnel

flask_funnel_403.jpg
 
Update:

I wrecked the other controller. I have a new controller, smaller, and it fits underneath the rack and above the rear fender.

I initially rode the ebike with the controller inside the case. After the ride, the controller was very warm, and hot to the touch, but not burning hot.

I rode again at a later time, and the controller was placed under the rack and at the end of the ride, it was ice cold. (It was cold out, around 273°K).
 
Back
Top