GGoodrum
1 MW
I finally got around to doing something with the Cyclone 1000W kit I got a couple months ago. My original plan was to install it on my Townie, which has been out of commission, due to trying to run 100A through the stock 5304 wires (insulation melted and all three phase wires shorted, which blew the controller quite spectacularly...  ), but doing the math on the gearing made me decide to do one of the 20" folding bikes instead. Using Matt's experience with his chain drive cruiser as a performance guide, I decided that It would be hard to get the same sort of gearing with the Townie. Matt basically just had the motor tied directly to the back wheel, with an 80T sprocket in the back, and an 11T motor sprocket, which gives a basic ratio of about 7:1. He used a 3-speed hub, which has a 1:1 ratio in 2nd. He reported that he could use 1st for starting out, then shift to 3rd, only using 2nd for hill climbs. This sounded pretty good to me, and he seemed quite happy with the performance. The problem with the Townie is that it has a 26" wheel, and Matt's setup uses a 20", so to get the same sort of gearing, I would need to go a bit higher than 7:1.
The Cyclone setup comes with a freewheeling crankset, with a 44T large chainring and a 6T motor sprocket, which is about the same ratio as Matt's 80T/11T setup. This crankset also comes with a smaller 36T drive sprocket. In orrder to match Matt's 2nd gear 1:1 setup, that would mean I would need a 36T sprocket on the back, and that is on a 20" bike. Taking into acoount the larger 26" wheel means this rear sprocket would have to be even larger. Anyway, that's when I decided to switch "gears", and put the Cyclone on my 20" Dahon Mariner.
Even with the Mariner, however, matching Matt's gearing was going to be problematic. It came with a 7-speed derailleur setup which had a 30T as the largest sprocket in the cassette, so I couldn't even get to 1:1, to match Matt's 2nd gear performance, much less something taller for 1st gear. In order to get some sort of performance baseline, however, I decided to go ahead, and give this a shot. Unfortunately, I never actually got to try this setup. Because I went from the stock 52T chainring to the 36T on the Cyclone crankset, the chain ended up being too long for the deraileur mechanism to take up the slack, for all but the 1st gear, and even it was dicey, so I decided to take a couple links out. The problem, which I soon found out, was that the master link I added wouldn't fit through the deraileur guides. I found this out by picking up the back wheel and running the motor, which I had already done several times before deciding to take the links out. As soon as the link got around to the derailleur guides, the whole assembly exploded.
At this point, I decided to replace the 7-speed deraileur setup with a Nexus 3-speed hub. This duplicates Matt's setup, but I needed to somehow get a 1:1 ratio from the front to the back. The hub came with an 18T sprocket, so with the 36T up front it would introduce a 2:1 ratio change in the wrong direction. Nonetheless, still looking for some sort of a performance baseline, I decided to give it a try. With the hub set in 1st gear, to get the maximum ratio benefit, it did okay on a flat layout. It groaned from a dead stop, however, so I knew this wasn't going to work without changing the sprockets. The easiest to change was the rear one, so I started with it. The largest I could find that would fit the Nexus hub was a 23T. I was going to just try this with the 36T, but I couldn't get the chain to fit right. There's not much play in the dropouts for adjustment, I guess because there's less need, given the derailleur mechanism. So, that meant going ahead with changing out the 36T for something smaller. My friend Dennis (dirtdad here...) did some searching and found a 24T titanium chain ring for me, with a similar 5-bolt pattern. The bolt circle diamter was larger on the sprocket, so I ended up having to drill new holes. I also had to use a Dremel to cut away a little material in order to get it to fit around the freewheel outer ring. It was actually pretty easy, and I had the new 24T front sprocket on in short order. Luckily, the chain fit much better this time.")
Here's some pics:


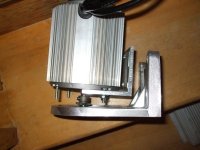
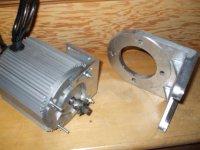
The kit came with a lot of hardware bits, most of which were useless. Even the main motor bracket was ill-fitting, and seemed as though it was hacked up from one for one of the smaller motors they sell. I ended up having to make a couple of undebar supports, drilling new holes in the motor plate, and providing my own bolts and nuts. The motor bracket only has holes for two of the four motor screws, which are pretty puny for something that weighs this much, but I have to say, the motor bolted down is rock solid. I tried pulling on the back of the motor in several directions, but it would not budge, no give at all. Still, one of the first mods I'll do is to add some sort of extra support for the upper two motor screws. The kit does come with a chain pulley, for adjusting the chain tension, but no clear place to put it. I ended up drilling yet another hole in the motor bracket, and again had to use my own screws/bolts. I thought about leaving this off, at first, but decided that with such a small motor sprocket (6T...), you really need to use this in order to make sure as many teeth make contact with the chain as possible. Once adjusted properly, this seems to work just fine.
One thing I really like about this kit is that the electronics are pretty much plug'n play. With no instructions at all included with this kit, this is important. Everything had unique plug/connector types, so there was no way to misconnect something. The kit comes with a matching plug/pigtail of heavy gauge wire for conecting to the batery system. Everything else just plugs together. The throttle, which is similar to the Clyte 1/2 twist variety, has an on/off switch for the controller and a 3-LED "gas" gauge.
I ended up mounting the controller to the two screw hole positions normally used to hold a water bottle. This actually turned out to be a very easy installation. The case is a three-sided aluminum extrusion, with a steel plate for a bottom, and two steel plates for the ends. Removing one end plate allows the steel plate to slide out. Nothing is attached to this plate. I then drilled two holes and bolted it to the bike. The controller then slid back onto the now rigid bottom plate, and then I reattached the side plate. Took about 15 minutes, start-to-finish.
It is now ready for testing, which I will do this afternoon. I test rode the bike last night, but my 16s4p a123-based pack wasn't charged (been using it for BMS testing...) so it was without the motor on. I had a little interaction between the chains, which I fixed by moving the motor sprocket out a little bit. Originally, I was using the stock chain, which is a bit narrower than the "cruiser"-type chain that is on there now, so I needed more clearance. The bike did okay, and the Nexus hub shifted smoothly. With the ratio now, which is pretty close to 1:1, it is like you are pedaling a mountain bike using the "granny" gear. In 3rd this wasn't too bad, but I really don't have a problem with this. That's because with all the extral weight, pedaling this if something dies is going to be a chore, so the extra tall gearing is desirable. One thing I hadn't relized is that when you pedal, it turns the motor. I noticed that it was also feeding the WattsUp I have setup, so I guess it is doing some regen? Anyway, another freewheel on the motor would be desirable, I guess, but that is not going to happen with a 6T sprocket.
One thing I was not prepared for was how much extra noisy this setup is, over a typical hubmotor, but with some more detail in how the motor chain is adjusted, along with the chain tension, I've been able to minimise this to an acceptable level. Good lube helps as well.
Anyway, I will do some test rides this afternoon and will report back here. I'm hopeful that since I now have pretty much matched Matt's gear ratios, I can get similar performance. His setup is a lot heavier, but I'm guessing I outweigh him by a simialr amount, so we'll see. I'm not looking for tire-screeching performance. I just want a 48V setup that will get me up and down hills as easily as the stock 4840/5303 setup does on my other 20" folding bike with my wife on it. To get that before, I needed to use a 5303 on 24s/72V, and a 4110-mod'ed controller with the current limit bumped up to about 60A. That was actually overkill, and would abslutely smoke the front tire, even with me leaning over the front wheel, but a stock 7240 controller, with the 72V setup, was just marginal. My hope is that with the extra gearing, the 1000W motor will provide "adequate" performance on 48V. My life will be a lot simpler if I can get away from having to use 72V setups.
-- Gary
The Cyclone setup comes with a freewheeling crankset, with a 44T large chainring and a 6T motor sprocket, which is about the same ratio as Matt's 80T/11T setup. This crankset also comes with a smaller 36T drive sprocket. In orrder to match Matt's 2nd gear 1:1 setup, that would mean I would need a 36T sprocket on the back, and that is on a 20" bike. Taking into acoount the larger 26" wheel means this rear sprocket would have to be even larger. Anyway, that's when I decided to switch "gears", and put the Cyclone on my 20" Dahon Mariner.
Even with the Mariner, however, matching Matt's gearing was going to be problematic. It came with a 7-speed derailleur setup which had a 30T as the largest sprocket in the cassette, so I couldn't even get to 1:1, to match Matt's 2nd gear performance, much less something taller for 1st gear. In order to get some sort of performance baseline, however, I decided to go ahead, and give this a shot. Unfortunately, I never actually got to try this setup. Because I went from the stock 52T chainring to the 36T on the Cyclone crankset, the chain ended up being too long for the deraileur mechanism to take up the slack, for all but the 1st gear, and even it was dicey, so I decided to take a couple links out. The problem, which I soon found out, was that the master link I added wouldn't fit through the deraileur guides. I found this out by picking up the back wheel and running the motor, which I had already done several times before deciding to take the links out. As soon as the link got around to the derailleur guides, the whole assembly exploded.
At this point, I decided to replace the 7-speed deraileur setup with a Nexus 3-speed hub. This duplicates Matt's setup, but I needed to somehow get a 1:1 ratio from the front to the back. The hub came with an 18T sprocket, so with the 36T up front it would introduce a 2:1 ratio change in the wrong direction. Nonetheless, still looking for some sort of a performance baseline, I decided to give it a try. With the hub set in 1st gear, to get the maximum ratio benefit, it did okay on a flat layout. It groaned from a dead stop, however, so I knew this wasn't going to work without changing the sprockets. The easiest to change was the rear one, so I started with it. The largest I could find that would fit the Nexus hub was a 23T. I was going to just try this with the 36T, but I couldn't get the chain to fit right. There's not much play in the dropouts for adjustment, I guess because there's less need, given the derailleur mechanism. So, that meant going ahead with changing out the 36T for something smaller. My friend Dennis (dirtdad here...) did some searching and found a 24T titanium chain ring for me, with a similar 5-bolt pattern. The bolt circle diamter was larger on the sprocket, so I ended up having to drill new holes. I also had to use a Dremel to cut away a little material in order to get it to fit around the freewheel outer ring. It was actually pretty easy, and I had the new 24T front sprocket on in short order. Luckily, the chain fit much better this time.
Here's some pics:
The kit came with a lot of hardware bits, most of which were useless. Even the main motor bracket was ill-fitting, and seemed as though it was hacked up from one for one of the smaller motors they sell. I ended up having to make a couple of undebar supports, drilling new holes in the motor plate, and providing my own bolts and nuts. The motor bracket only has holes for two of the four motor screws, which are pretty puny for something that weighs this much, but I have to say, the motor bolted down is rock solid. I tried pulling on the back of the motor in several directions, but it would not budge, no give at all. Still, one of the first mods I'll do is to add some sort of extra support for the upper two motor screws. The kit does come with a chain pulley, for adjusting the chain tension, but no clear place to put it. I ended up drilling yet another hole in the motor bracket, and again had to use my own screws/bolts. I thought about leaving this off, at first, but decided that with such a small motor sprocket (6T...), you really need to use this in order to make sure as many teeth make contact with the chain as possible. Once adjusted properly, this seems to work just fine.
One thing I really like about this kit is that the electronics are pretty much plug'n play. With no instructions at all included with this kit, this is important. Everything had unique plug/connector types, so there was no way to misconnect something. The kit comes with a matching plug/pigtail of heavy gauge wire for conecting to the batery system. Everything else just plugs together. The throttle, which is similar to the Clyte 1/2 twist variety, has an on/off switch for the controller and a 3-LED "gas" gauge.
I ended up mounting the controller to the two screw hole positions normally used to hold a water bottle. This actually turned out to be a very easy installation. The case is a three-sided aluminum extrusion, with a steel plate for a bottom, and two steel plates for the ends. Removing one end plate allows the steel plate to slide out. Nothing is attached to this plate. I then drilled two holes and bolted it to the bike. The controller then slid back onto the now rigid bottom plate, and then I reattached the side plate. Took about 15 minutes, start-to-finish.
It is now ready for testing, which I will do this afternoon. I test rode the bike last night, but my 16s4p a123-based pack wasn't charged (been using it for BMS testing...) so it was without the motor on. I had a little interaction between the chains, which I fixed by moving the motor sprocket out a little bit. Originally, I was using the stock chain, which is a bit narrower than the "cruiser"-type chain that is on there now, so I needed more clearance. The bike did okay, and the Nexus hub shifted smoothly. With the ratio now, which is pretty close to 1:1, it is like you are pedaling a mountain bike using the "granny" gear. In 3rd this wasn't too bad, but I really don't have a problem with this. That's because with all the extral weight, pedaling this if something dies is going to be a chore, so the extra tall gearing is desirable. One thing I hadn't relized is that when you pedal, it turns the motor. I noticed that it was also feeding the WattsUp I have setup, so I guess it is doing some regen? Anyway, another freewheel on the motor would be desirable, I guess, but that is not going to happen with a 6T sprocket.
One thing I was not prepared for was how much extra noisy this setup is, over a typical hubmotor, but with some more detail in how the motor chain is adjusted, along with the chain tension, I've been able to minimise this to an acceptable level. Good lube helps as well.
Anyway, I will do some test rides this afternoon and will report back here. I'm hopeful that since I now have pretty much matched Matt's gear ratios, I can get similar performance. His setup is a lot heavier, but I'm guessing I outweigh him by a simialr amount, so we'll see.
-- Gary