
Fatherload
1 µW
- Joined
- Nov 16, 2019
- Messages
- 3
This blog was so helpful in me setting up my ride, that I thought I should add something for a change. There doesn't seem to be a complete build for a Gazelle Cabby on this forum and there were some challenges, so here goes.
After much searching, I found a bargain Gazelle Cabby bakfiets cargo bike on Gumtree for $950 AUD (you can buy them new here for $3000 new which I think is still the best value bakfiets in Australia). I wasn't specifically looking for a Gazelle, but the price was good. Turns out some Dutchies imported it here only to find that hills exist outside The Netherlands. My wife also found out hills exist when she tried to ride our new Gazelle Cabby out of our driveway and I developed quads of steel in just a few weeks. Hence my search for an electric conversion.
The only possible option I could find in Australia involved a disc brake conversion (from roller brakes), a front hub motor and more cash than I could afford. They also told me no one makes a hub motor for roller brakes because they weren't appropriate. Lots of people seem to have that opinion, except Gazelle I suspect. And now me.
My research lead me to buy the Q85 from BMS batteries, along with all the other gear. It is pretty daunting purchasing stuff from this poorly translated website, but there is plenty of advice and experience scattered around this site. I ended up purchasing the following:
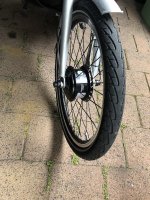
1x Q85 36V250W front hub motor FOR ROLLER BRAKES laced into a 20 inch rim with RPM specced at 201. I ordered it in stainless and it arrived in black, no biggie.
1x 36V17.5AH battery and charger
1x S06S controller
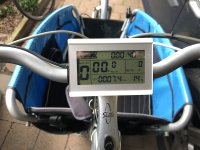
1x S-LCD3 meter
1x Ten pole PAS sensor
2x hidden wire brake sensors (I only used one)
2x extra motor cables to span the long distance to the front wheel (turns out I didn't need either of them)
1x thumb throttle
It might be worth noting that I also ordered a crank puller, new hand grips and roller brake oil elsewhere.
So when $865 AUD worth of wires and bits arrived with no instructions whatsoever, I thought I was about to get in some serious trouble with my wife. Especially since I still haven't used the wood lathe I bought of gumtree 3 years ago (it was a serious bargain). Anyway, I hope someone finds my solutions to the following problems useful. Keep in mind I did assemble the wiring first to make certain it worked. I also have an engineering degree in my distant past. Whilst not required, you are brave to try this without some mechanical/electrical experience.
Step one - take old wheel out, put new wheel in. I didn't purchase a torque arm because this bike is heavily over engineered with a steel frame (which is why it won't go up hills) and the motor is gentle. The roller brake has a lock nut that couldn't be used on the larger new axle. I simply replaced it with a washer. Ideally I would purchase a low profile M12 nut to replace it, but I'm impatient and it works. The axle needed some force to get it seated, but this reassured me about the choice not to buy a torque arm.
Step two - remove the crank. Holy crap. What a nightmare! I do not know how much loctite they squirted on this bolt, but it was stuck. An Allen key with my foot on it, an Allen key with a pole and my foot on it, hammer, WD40, all manner of other spray chemicals I had on the shelf, impact driver and then heat followed by impact driver. This was the final straw that rounded the bolt and ruined any hope. I ended up drilling it out and cursing a lot. Low and behold my woes were not over. My brand-spanking new crank puller actually deformed and splayed the end of the bottom bracket when I tried to wind the crank off. This bike was not assembled by Gazelles! Luckily my impact driver did save the day this time.
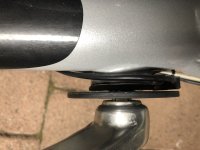
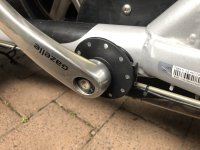
I then had to figure out how to attach the sensor to an over-sized bottom bracket. I tried to pry the dust cap off, only to find that it was cemented in with more Gazelle super-human goop. Serious adhesion. I destroyed it in the process and ended up filing the dust cap back to a smooth surface rather than removing it. I then glued the sensor ring on with some Araldite and fashioned a new dust cap out of my golf buggy hub cap. I don't golf much anyway. I pity the poor sole that ever attempts to remove this resin (perhaps that's what the Gazelle thought when he lathered it in goop and assembled it the first time).
I am not sure if these parts were perished or the bike is really old or if Gazelle just make them like this. Either way, if you are planning this job, be prepared. Their glue can not be dissolved, melted or hammered. I am just glad I did not try to fit a mid-drive as I originally intended.
Step three - fit the brake sensor. Once I realised the controller could not accommodate two sensors without my creative input, I decided to attach one to the rear brake. This should have been a smooth operation, except in the process of threading the cable after clipping the housing, one strand went rogue. I had to remove the entire cable, unwind the offending strand, and re-thread the slightly weakened cable with a little more caution. I am sure I would not be the first bike mechanic to deal with this. It turns out this sensor needs quite a bit of cable travel to activate, perhaps it would be better fitting it at the lever end. But it does look better this way, and the bike is perfectly safe without it anyway. Who actually pedals and brakes at the same time?
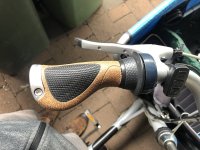
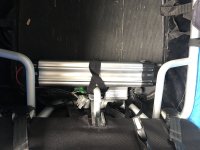
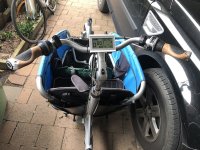
Step four - the handle bars. No hiccups here. I did have to get creative with the new grips in order to save the Cabby's lovely tinkling bell, but that isn't really relevant. The only job left to do was tidy up the wiring, fit the battery and plug it all in. It is worth noting that the motor cable was long enough to reach the back of the bucket where I placed the controller. No extra cables needed.
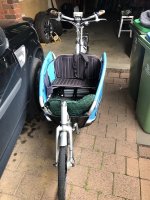
The end result is actually amazing. It is such a smooth effortless machine now, and the front wheel rolls much better than the old dynamo hub ever did. My wife now loves the bike and can take our little girl all over town without raising a sweat. It is not frightening, but also has great torque for punching up the hills. The only real fault is that I have to choose I higher gear than I would like to get the right response. I suspect an 8 pole PAS sensor would have worked better. I am yet to find a setting I can change to correct this and I may well have been better off with a different LCD display. The jury is still out. It feels great regardless.
Here are some photos for those interested. Although my troubles were painful, they do indicate a solidly built bike that may last years. And it rides beautifully. I can't wait to get back on it. Just an additional note about the roller brakes, they work great. I was going to upgrade the front to a bigger, newer roller brake. However, there seems to be a lot of weight over the larger diameter rear wheel which makes it the more potent brake, not to mention more stable. It already pulls the bike up quick even in the pouring rain, just ask the cyclist that ran up the back of me yesterday.
This is the first time I have ever posted on a blog like this. I may well have overdone it, but I hope someone like me stumbles across this thread and finds all the information they have been looking for. Happy to answer questions.
After much searching, I found a bargain Gazelle Cabby bakfiets cargo bike on Gumtree for $950 AUD (you can buy them new here for $3000 new which I think is still the best value bakfiets in Australia). I wasn't specifically looking for a Gazelle, but the price was good. Turns out some Dutchies imported it here only to find that hills exist outside The Netherlands. My wife also found out hills exist when she tried to ride our new Gazelle Cabby out of our driveway and I developed quads of steel in just a few weeks. Hence my search for an electric conversion.
The only possible option I could find in Australia involved a disc brake conversion (from roller brakes), a front hub motor and more cash than I could afford. They also told me no one makes a hub motor for roller brakes because they weren't appropriate. Lots of people seem to have that opinion, except Gazelle I suspect. And now me.
My research lead me to buy the Q85 from BMS batteries, along with all the other gear. It is pretty daunting purchasing stuff from this poorly translated website, but there is plenty of advice and experience scattered around this site. I ended up purchasing the following:
1x Q85 36V250W front hub motor FOR ROLLER BRAKES laced into a 20 inch rim with RPM specced at 201. I ordered it in stainless and it arrived in black, no biggie.
1x 36V17.5AH battery and charger
1x S06S controller
1x S-LCD3 meter
1x Ten pole PAS sensor
2x hidden wire brake sensors (I only used one)
2x extra motor cables to span the long distance to the front wheel (turns out I didn't need either of them)
1x thumb throttle
It might be worth noting that I also ordered a crank puller, new hand grips and roller brake oil elsewhere.
So when $865 AUD worth of wires and bits arrived with no instructions whatsoever, I thought I was about to get in some serious trouble with my wife. Especially since I still haven't used the wood lathe I bought of gumtree 3 years ago (it was a serious bargain). Anyway, I hope someone finds my solutions to the following problems useful. Keep in mind I did assemble the wiring first to make certain it worked. I also have an engineering degree in my distant past. Whilst not required, you are brave to try this without some mechanical/electrical experience.
Step one - take old wheel out, put new wheel in. I didn't purchase a torque arm because this bike is heavily over engineered with a steel frame (which is why it won't go up hills) and the motor is gentle. The roller brake has a lock nut that couldn't be used on the larger new axle. I simply replaced it with a washer. Ideally I would purchase a low profile M12 nut to replace it, but I'm impatient and it works. The axle needed some force to get it seated, but this reassured me about the choice not to buy a torque arm.
Step two - remove the crank. Holy crap. What a nightmare! I do not know how much loctite they squirted on this bolt, but it was stuck. An Allen key with my foot on it, an Allen key with a pole and my foot on it, hammer, WD40, all manner of other spray chemicals I had on the shelf, impact driver and then heat followed by impact driver. This was the final straw that rounded the bolt and ruined any hope. I ended up drilling it out and cursing a lot. Low and behold my woes were not over. My brand-spanking new crank puller actually deformed and splayed the end of the bottom bracket when I tried to wind the crank off. This bike was not assembled by Gazelles! Luckily my impact driver did save the day this time.
I then had to figure out how to attach the sensor to an over-sized bottom bracket. I tried to pry the dust cap off, only to find that it was cemented in with more Gazelle super-human goop. Serious adhesion. I destroyed it in the process and ended up filing the dust cap back to a smooth surface rather than removing it. I then glued the sensor ring on with some Araldite and fashioned a new dust cap out of my golf buggy hub cap. I don't golf much anyway. I pity the poor sole that ever attempts to remove this resin (perhaps that's what the Gazelle thought when he lathered it in goop and assembled it the first time).
I am not sure if these parts were perished or the bike is really old or if Gazelle just make them like this. Either way, if you are planning this job, be prepared. Their glue can not be dissolved, melted or hammered. I am just glad I did not try to fit a mid-drive as I originally intended.
Step three - fit the brake sensor. Once I realised the controller could not accommodate two sensors without my creative input, I decided to attach one to the rear brake. This should have been a smooth operation, except in the process of threading the cable after clipping the housing, one strand went rogue. I had to remove the entire cable, unwind the offending strand, and re-thread the slightly weakened cable with a little more caution. I am sure I would not be the first bike mechanic to deal with this. It turns out this sensor needs quite a bit of cable travel to activate, perhaps it would be better fitting it at the lever end. But it does look better this way, and the bike is perfectly safe without it anyway. Who actually pedals and brakes at the same time?
Step four - the handle bars. No hiccups here. I did have to get creative with the new grips in order to save the Cabby's lovely tinkling bell, but that isn't really relevant. The only job left to do was tidy up the wiring, fit the battery and plug it all in. It is worth noting that the motor cable was long enough to reach the back of the bucket where I placed the controller. No extra cables needed.
The end result is actually amazing. It is such a smooth effortless machine now, and the front wheel rolls much better than the old dynamo hub ever did. My wife now loves the bike and can take our little girl all over town without raising a sweat. It is not frightening, but also has great torque for punching up the hills. The only real fault is that I have to choose I higher gear than I would like to get the right response. I suspect an 8 pole PAS sensor would have worked better. I am yet to find a setting I can change to correct this and I may well have been better off with a different LCD display. The jury is still out. It feels great regardless.
Here are some photos for those interested. Although my troubles were painful, they do indicate a solidly built bike that may last years. And it rides beautifully. I can't wait to get back on it. Just an additional note about the roller brakes, they work great. I was going to upgrade the front to a bigger, newer roller brake. However, there seems to be a lot of weight over the larger diameter rear wheel which makes it the more potent brake, not to mention more stable. It already pulls the bike up quick even in the pouring rain, just ask the cyclist that ran up the back of me yesterday.
This is the first time I have ever posted on a blog like this. I may well have overdone it, but I hope someone like me stumbles across this thread and finds all the information they have been looking for. Happy to answer questions.
Attachments
-
 black.jpg138.4 KB · Views: 4,651
 -
 LCD.jpg72.3 KB · Views: 4,650
 -
 modified left grip.jpg81.7 KB · Views: 4,647
 -
 no sign of prior destruction.jpg60.7 KB · Views: 4,649
 -
 the brains.jpg83.5 KB · Views: 4,650
 -
 the cockpit.jpg113 KB · Views: 4,651
 -
 the evil crank.jpg66.1 KB · Views: 4,651
 -
 underseat battery.jpg112.9 KB · Views: 4,652
