Giant NRS MAC 8T Build Thread

Joined
Sep 25, 2011
Messages
80
Location
Dublin, Ireland
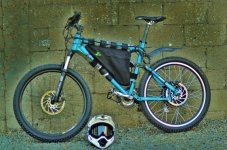
The time has finally come to start my own build thread after much time contemplating the ifs, buts and maybes :D

I would like to think that my time spent dreaming here has been time well served and that now i am in a position to make the correct choices to suit my needs.

My history in electric bikes has been a run of the mill shop bought 250W special. I am certainly glad i bought that bike second hand and i now realise what a ripoff the full shop price was. This trusty steed has served me well in the past few years and has clocked up at least 3,000 miles in the past few years on my 12.5mile each side commute. While it was fun its performance was somewhat puny and now my sights are set on something a little more hair raising.

But it must still be practical. Also i wanted to increase my range in this project and be able to travel 25miles at 25mph and still have my motor be reliable. So my requirements for this project are as follows.

1. A non teeth rattling bicycle with a bit of comfort (Yes now i know i a getting old :D )
2. Max speed 30 and a little more (anymore would stretch the limits of reliability with my motor choice)
3. Range of 25-30 miles and a decent clip and more if i baby it

I am a complete novice and i hope to write my build thread to help newcomers to this great hobby on the right path and to give the information and photos that i search many threads for in the beginning.

I guess it is my first real contribution to the forum. All the rest and been take take take :twisted: :twisted: :twisted:

Introduction Over!!!
 
And now introducing my new and improved candidate for trusty steed.

2003 Giant NRS2

bike001.jpg

bike002.jpg


The all important dropouts
bike011.jpg

bike010.jpg

bike009.jpg


Bike bought completely as is for a very decent price indeed.

It is far from perfect but it is a good start.

Good Points
Full Suspension - (from my time here i realised it is pretty must a must for anything approaching decent speed not to seem like the Enterprise in warp drive
Fox Forks - Good quality fork a plus
Weight - A light bike so a good start

Bad Points
Brakes - Average
Tyre Clearance- A little tight
Dropouts - Awkward
Saddle - Ouch :D
Triangle - Despite appearance it is a little small

I hope to write this build thread as clear and concise as possible
 
I made my rear torque arm out of 1/4" plate using a hacksaw and an angle grinder. You have to be very careful to get the slot a nice fit on the axle (10mm). Then I cut another bit and welded it in so that the slot can't spread. I did the final dressing of the slot with a file. I think your drop-outs are 9mm, so you'll need to file them a bit. I'm not sure of the axle size of the MAC, but you'll need to file the drop-outs deeper to get the centre of the axle back where it should be. If the MAC has a 14mm axle then that means 2.5mm deeper, or 1.5mm for a 12mm axle like on a Bafang BPM.
It's very discrete. You have to look hard to see it because it matches the shape of the sub-frame exactly:
torquearm.png


SANY0089.jpg
 
You think that triangle is small? Check out the triangle on the FSR frame I just picked up:

(Norco VPS Six: not my photo below, wheelset is different)

Picture_411.jpg


Nice pickup though!, I was looking at some NRS' near my area, but the prices they wanted and the colors weren't quite right. I like your red frame though. Looks great.

I'm going to subscribe to your thread since I have very similar goals and plan to use a MAC 8T or 10T depending on how much I like my wife's bike after I finish it.
 
These FS Giants are probably the most commonly converted bikes here on E.S. and why not, they are good for the job.
In fact, the Giant/rear Mac or BMP is so numerous that I call them the UCE[Universal Chinese Ebike].
For something different, you could try out one of the new BMP CST's, allowing you to keep all the stock drive pieces, including the cassette.
Or maybe dual MXUS mini-motors from Cell-Man. With the stock controllers, you wouldn't need a rear torque arm.
Unless that's a very small size frame, the triangle space will fit a Falcon EV bag.
 

Attachments

  • dsc0185we.jpg
    dsc0185we.jpg
    168.6 KB · Views: 5,755
Nice Bike cal3thousand - Yes the triangle space is the big head scratcher on the full suspension frames.

d8veh's builds had a lot to do with my decision to go full suspension and the NRS was just in the right place at the right time and for the right price.

Torque Arms :(

Sadly Dave i have already put in some elbow grease on the torque plate front today and i missed a trick from your design.

I go some scrap steel plate that is used from crash barriers in warehousing. I choose the approx 5mm version but i think it may be hardened steel which may cause a softer axle deforming problem.

First update the junior hacksaw. - :D :D :D No match for the steel and the blade was shot relatively quickly.
Next a carbide tile hand saw - It was cutting but very very slow. I would be all year getting a prototype torque plate as this rate.
Lidl Angle Grinder - Then i took the Lidl angle grinder to it. Yes it cut but the disk was shot in minutes.
Then success - got my larger hacksaw with HSS blade and i pleased to say like a knife through butter relative to all above

Torquearms002.jpg


a little

Torquearms001.jpg


on width

Torquearms004.jpg


and very happy with myself for this rough cut (relatively quick)

Torquearms005.jpg


My idea was to use the slight recess on the non drive side of the frame and fab my plate to bolt into the brake mounting holes. The axle will be pushing the force against the frame and the brake bolts will hold the plate in place.

Sadly, I have missed a trick since seeing your design. If i had seen it earlier i would have extended my plate lower to add extra security by pushing against the frame where your plate is also.

I am thinking to maybe add an off the shelf torque arm on the drive side also.

The MAC axle is 10mm flats and 14mm axle. There is a little extra inside the dropouts that may need to be filed and i am really not looking forward to tring to get the holes correct :D :D :D
 
Thanks for sharing your successes and not so successes in cutting a torque arm. It's good information for those of use without heavy machinery access. I'm contemplating using a hacksaw for these 1/4" plates that I have, but am dreading the effort required.

Luckily, I found a shop nearby that (most likely) be able to cut it up cheaply for me. Good luck on getting those curves down. How do you plan on tackling those?
 
cal3thousand - plan on filing the curves but i will see hot it goes.

Wow the is an Expensive Hobby - Money has been Hemorrhaging from my wallet.

Yes the upfront cost is a little painful but the payback should come with time. I have made all of my bif purchases and now I will wait patiently until my new gear arrives.

After much deliberation. Looking into MAC, Bafang, Mini-Motors, DIrect Drive and round in circles again, I have decided that the cellman kit most closely matches what i want from an ebike.

My order for this bike made yesterday:

- Mac 8T Kit with 12Fet 307726" all black rim (upgraded phase wires)
- 2 X Full Twist throttles
- Programming Cable
- 7 Speed Free Wheel
- 2 X DC/DC Converters
- Cycle Analyst

All in all the best value all round including shipping with the ability to program the controller for 3 different speeds, cruise controll and direct plugin to cycle analyst.

Some photos of what i hope to get.

Mac Rear Rim
MacinRim.jpg


Controller 12 Fet 3077
12FetController.jpg


Full Twist throttle with 3 Speeds (Programmed with cable) and Cruise button
FullTwist.jpg


LHS Switch - For use as power on/off and i hope to use the momentary button for a precharge circuit
Powerswitch.jpg


And of course the Pièce de résistance - Cycle Analyst
CycleAnalyst.jpg


It was a case of forget the rest and go with the best :D :D :D
 
Batteries – Feel the Power

And yet more cash flying out – but this is my fuel and well worth it.

My requirements were as follows-

1. 30 Miles Range
2. Safe
3. Possible to remove from the bike
4. Charge at work
5. Good Cycle Life

My final selection was as follow.

Lipo – No way. Cannot provide the range (30 miles each way). Hard to remove from bike. Cannot charge at work. Care need at home. Charging setup difficult. Lots of wires. Cycle life most likely short enough making it a false economy for commuting.

Other Batteries LifeP04, Li Co-Mn, Headway
Probably just not suitable for me and cycle life of the cheaper batteries could be questionable

Final Choice.

A123 16S 48V 20Ah with X 2 3amp Chargers pre made pack from Victpower. The performance should be spot on my requirements at this voltage but I understand I am taking a small risk about the quality of the pack. Time will tell.

The problem with the Victpower pack was the A123 cells are to big to get mounted inside of my frame. I consider a rear rack mount of the battery but to may cause issues.

My idea was an optional rear rack mount and a more that likely mount either side of the downtube. But a 48V Pack would have 8KG one side of the downtube. Then I thought maybe 2 X 24V pack and then wire in series and blah blah blah.

This was a lot of messing around.

After consulting a little with Ms Xin of Victpower we settled on this Badboy

A123split.jpg


I hope the quality of the build is good and this will give me the option of rack mounted in one bag/box or more likely split either side of the frame.

Now i feel like a kid at Christmas. A poor one :D
 
And now for some other parts:

48T Single Speed Crank mated to DNP 11t should be good enough for 25MPH pedalling

Cranks.jpg


mated to 123mm bottom bracket

BottomBracket.jpg


Hopefully this will be enough to allow my crank to clear the chainstays.

Got this to replace the razor blade at the moment. Hopefull a bit more comfort
Saddle.jpg


Next up something for two lights and my Cycle Analyst slap bang in the center

BarExtenders.jpg


Finally a seven speed shifter for my new freewheel

AltusShifter.jpg


So i will be going from 24-Speed to 7-Speed :D ... but that should be all i every need. Front deraileur will go (if i do not have chain jump issues) and LH shifter gone freeing up more space for on/off/precharge switch and future light switches.

Jeezzz i really must keep track of costs :D
 
Hi there HomebreNeuvoElectro,
Great choice of frame. I have done over 5000km on my NRS MAC 8T bike and love it.
You may be interested in this build log http://www.endless-sphere.com/forums/viewtopic.php?f=6&t=17330.
Cheers,
Matt.
 
A wonderful build 1000w. Found that thread and spent much time looking at your builds...

I am glad to see you are still enjoy the bike. I also considered the 24inch rim route but in the end went with 26".

At one point i considered stealing your torque plates design (simple and effective), but big sissy like i am i did not want to drill the frame :D
 
Electrics ... i need big help here

I would like to try and have everything i need to interface all the electrics and i cannot decide on which connectors etc... to go with.

I would like everything i my hand before the motor/battery arrive and not have to wair looking on connectors etc...

With this in mind i hope to make a shopping list for small parts and maybe a few members can help me out with this.

Here is a quick schemtic for want i hope on the battery side of the controller (Maybe this can be critqued by someone as i am not sure i am on the correct path)

Initialwireschematic.jpg


Requirements:

1. Quick Disconnet of Battery - Anderson 45amp best (But then i will have to buy the crimper for a few connections :oops: tightass)
2. Maybe 3feet between controller and motor (what extensions and connectors from controller to motor???
3. All 12 guage cable
4. Amp inline fuse
5. precharge reistor 200ohm???

From here http://www.scriptasylum.com/rc_speed/_nospark.html

PrechargeResistorCal.jpg


Precharge resistor for fully charge a123 16s circuit comes to 200ohms. Would this be correct?

Ok i need to think a bit more about electric but hope i am on the correct path
 
For a simple way to get rid of the connection spark and be able to use a small switch to power the bike on, mounted pretty much anywhere, with no need to run heavy power leads to the switch, you might want to take a look here: http://endless-sphere.com/forums/viewtopic.php?f=3&t=40142
 
Thank you for that Jeremy. But as usual the electrics seem way beyond what i could put together :oops: !!! If i could read circuit diagrams it would be a start :D

Now more on my non-drive side torque plate

A fair bit of filing, a few blisters and a lot of on the bike trail fitting i have finally managed to get my shape of my plate. It sits no perfect but good enough and the send the forces of the torque up the swingarm.

Like i said, I missed a trick by not extending the plate further down and getting a futher curve into it.

Torqueplate004.jpg

Torqueplate001.jpg

Torqueplate003.jpg


I will need a washer before the plate to have it sit flat.
Torqueplate002.jpg


Of course the holes must come next and these may be a little tricky.

I was now considering looking at the other side. Does anyone know if it is necessary or is it overkill?

My constant amps should be well under 30 but i am unsure if i need two
 
HombreNeuvoElectro said:
Thank you for that Jeremy. But as usual the electrics seem way beyond what i could put together :oops: !!! If i could read circuit diagrams it would be a start :D

Now more on my non-drive side torque plate

A fair bit of filing, a few blisters and a lot of on the bike trail fitting i have finally managed to get my shape of my plate. It sits no perfect but good enough and the send the forces of the torque up the swingarm.

Like i said, I missed a trick by not extending the plate further down and getting a futher curve into it.


I will need a washer before the plate to have it sit flat.


Of course the holes must come next and these may be a little tricky.

I was now considering looking at the other side. Does anyone know if it is necessary or is it overkill?

My constant amps should be well under 30 but i am unsure if i need two

Those cuts look pretty good. It will look even better once they are they same color. I don't think there is ever 'overkill' in the torque plate game if you have the room. :D


You might decide that you want to increase your power goals later and this will definitely cut out any chances of twisting in the other dropout. Plus you have momentum right now... roll with it :mrgreen:
 
cal3thousand : Not that i want to sound wimpy but i will wait to the file blisters heal :oops: :oops: . Just having a look at the other side to see what i could do for a plate.

I have been thinking about the electrical side of the bike and it is not my strong point but i think i have it settled in my own mind what way i will go about wiring it up. This may have all sorts of errors and maybe some members could help me out on the electrical side.

Jeremys switch seems ingenius but is way beyond me for now. Maybe in the future i could be capable of constructing a circuit board but for now i will settle for a very simple precharge setup. Sacman linked to a document in a old post which helped me no end with a simple setup for this.

So here is the way i see my complete circuit:

MyEbikeCircuit.jpg


Can anyone critque this setup?

For this my shopping list would be:

18 Guage wire for pre-charge circuit and light circuit (would this be sufficient or overkill for light circuit?)
12 Guage for any extensions required
Anderson Specific Crimper
Posi Tap to tap of the main battery positive

Hopefully now i can ordered what i need and now move on the prepare other areas of the build now that i have the electric circuit in my mind. Helps so much to draw it out!!! :)
 
Torque Plate Update

Earlier in the thread i began on my non drive side torque plate the dropout and this torque plate are below

From This
bike010.jpg

To This
Torqueplate001.jpg


This plate still needs refinement and hole drilled for brake mounting.

Today i decide to make hay while the sun shines and do a little work on the drive side torque plate. I did not want to drill the orignal frame so i shaped a piece of 7mm steel to slot into one of the holes in the dropout.
I then drilled this to accept a bolt.

Drive side before
bike009.jpg

With shaped insert and bolt hole. Very tight fit
DriveSideTorquePlate006.jpg

Torque Arm Dilled and shaped
DriveSideTorquePlate007.jpg

Bent to suit frame
DriveSideTorquePlate008.jpg

And installed temporary on the bike
DriveSideTorquePlate009.jpg


I am very happy with that in its looks very discreet. I think i will wait until the motor arrives until i cut the axle hole and the file little by little until they fit tight.

I was dreading making torque plates but i feel very satisfied now that the back is broken out of it :D :D :D more so given the tools at my disposal are very limited. Never work with metal before either so it was pretty daunting to begin with.

....onwards and upwards
 
Battery Mouting

For anyone interested in what should be a perfect sized bag for A123 pouch cells, get yourself a washbag. Two of these bad boys arrived yesterday.

BatteryBag002.jpg

BatteryBag003.jpg

BatteryBag004.jpg

Cable Exit Holes to boot
BatteryBag005.jpg

Water Resistan material inside
BatteryBag007.jpg

Rear compartment for adding additional battery protection
BatteryBag008.jpg


And three layer when everything fold over to protect from rain.

Before i bought the bags i lashed up this to see how it looks. My choosen current battery position.
BagTestOnBike003.jpg

BagTestOnBike001.jpg

with bag
BagTestOnBike004.jpg

BikeCurrent.jpg


Both will have to be sewm together with velcro added to tie everything in together. Hopefully shock resistant foam and polycarbonate to protect the battery. But i cannot do anything until i get my battery and see the exact demensions. My battery arrival is maybe three week off.
 
7-Speed Shifter And CA Mount

Some new parts arrived this morining. Thought i might aswell throw them onto to the bike to get it ready for the more beefy parts

ShifterNExtender002.jpg


CA Central Mount and hopefully enough space for lights either side since the darker nights will be arriving soon!!!
ShifterNExtender1001.jpg


New Shifter Installed - Needs refinement when the DNP Freewheel arrives
ShifterNExtender1003.jpg


Current Bar Layout - Left Hand shifter will go when the single crank arrives
ShifterNExtender1004.jpg


Little by little i suppose
 
Got a link for the Bar mount you have there?
 
Nothing much happening at the moment with the build. Many parts have arrived but waiting on many more parts. More importantly still waiting on the Mac kit and Battery.

I have been trying to prepare the bicycle side on the build and also some modifications on the parts i have received.

I took apart a bag i had and was never used to supply some material to modify my future battery bags.

BagConstruction001.jpg


Got hold of a old sewing machine (no clue in the beginning how to use it)
BagConstruction003.jpg


And some scrap foam for additional protection for the bag contents
Foam.jpg


After a little while
BagConstruction004.jpg


And then complete with velcro to tie the two halves together
BagConstruction005.jpg


Mounted on the bike
BagConstruction006.jpg

BagConstruction007.jpg

BagConstruction008.jpg


Pretty neat at the moment but will spread out when the split battery pack goes in. 4Kg each side.

Also converted from front triple to single 48T front crank, new bb and old pedals. Worked out very well and chainline is almost directly straight to where my new 11T freewheel will be. I figure i should be in the highest gear most of the time so the chainline should be good.

CrankNShifters001.jpg


Front deraileur gone
CrankNShifters003.jpg

Plenty of space on the bars at the moment with only one solitary 7-speed shifter
CrankNShifters004.jpg


Here is a frame bag that i modified a little to fit nicely in the frame. I will hold all the electric components including the 12Fet controller (if it fits). I know the controller in the bag is a big no no, but i have seen a few projects completed successfully with controller in the bag. I will wait and see how it goes and maybe change my mind later but for now i want this bike to be stealthy and look just like an MTB carry some bags and luggage.

CrankNShifters002.jpg
 
Back
Top