Giant Trance Dual Suspension daily commuter build

tycreek

100 W
Joined
Feb 8, 2010
Messages
102
For my first ebike I started with the plan to use dual suspension with a cheap bike and changed up in the final days with an end of season deal on a commuter style bike (Giant Transend). Well, it's a great ride IMHO ... but now it's time to make the bike I planned originally. 

Many days and months of craigslist got me another Giant, but in a full suspension with some triangle space in their largest 2005 22" Trance frame. Either of my current LiFePo4 packs would fit in the triangle if I was so inclined. Though a LiPo pack is ordered and if it works well will be the daily power source. 

As purchased...
trance1_400.jpg


First must have as a daily commuter is fenders and street tires! Next a battery mount/carry option. Since I can't decide ... I picked up both a frame bag and rear rack with pannier trunk bag. Both had to be easy to remove. I favor frame mount but like the clean fit of everything in a rear bag. 

Ready to start adding electronics 
trance1_ready4electrics3_400.jpg


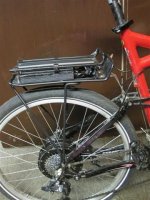
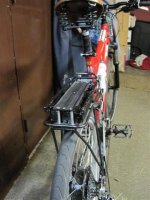
The rack took a bit of work to mount low, max forward while clearing during compression and somewhat level. Mounting hardware that came with the rack was pretty useless on this type of frame. Now that it is very usable with bag in place, I think dropping it to fender height is in order.  

ebike2_fender_rack_small.jpg


The fenders are only slightly modified with 3 new holes and one set of QR brace wires bent to fit. The rear swing arms are too low so I used one of the arms of the rack. I consider the current rear mount temporary until all gets dialed in and I'll clean up and make the wire supports look better. Hoping that I can mount top of rear fender to the rack and eliminate the need for one set of supporting wires.

The parts added so far are pretty light individually but all mounted makes the bike noticeably heavier. The heavy stuff is ordered and pending shipment... I'm guessing about 70lbs total?   

trance1_ready4electrics_400.jpg


Epart decisions include a BMC V3 kit, some LEDs, DC-DC converter and 10AH Li-Ion 14s 5C cells w/3C PCM limit. I plan to cook the battery in a large Dutch oven so wherever it goes it must be easy to connect and mount daily. The tiny battery is a big unknown but worth a try. Much contemplation about alternative motors, RC & hub, went full circle back to my current setup.

Parts still undecided include LED flashing unit, turn signal and taillight options. How to easily add and trade out batteries for long rides such as with my dual 15ah packs. A few more... etc... enough for now.

My use targets were:
- 10mi daily
- 30mph cruise speed
- 40mi or so long ride
- comfort 
- handling in adverse conditions
These last 2 are big reasons for this new bike. 

Anyway... just thought I'd share my build with others here on ES.
 
Got the V3 hub & wheel and it was very nicely centered and the drop-out width fit was perfect. It has one washer to keep the freewheel from touching the inside of the drop-out.
laced_wheel_small.jpg


Drilled out the wheel so the shrader valve would fit, mounted up the Big Apple 2.35 and discovered it wouldn't fit into the drop-outs without letting out the air ... still it rubbed on my bottom fender mount. Wow, that's a tall tire! A good number of hours messing with torque arm, rack and fender mount possibilities. Discovered that I couldn't lower the rack mount point below the swing arm to the torque arm as I hoped because the tire was too tall. Had I known this I would have done the right side torque arm in the other direction so there would have been less cutting and grinding needed. Oh, well ... if the derailleur touch is an issue I'll flip it around later.
torque_arm_r_small.jpg


Where-oh-where to mount the controler? It just doesn't fit anywhere! Tried the lower part of the down tube... and it's ok there but my front fender would need to be rotated back for a bit more coverage. Another spot is under the rack. A bit of grinding off the corner of the aluminum fins allowed it to push down on the fender a little less so that the tire doesn't touch. It's pretty close on the other side under full compression where first contact with the seat tube if it should happen would be the rack bar vs. the controller.
controler_mounting_small.jpg
 
Coming along nicely! Love the frame choice, if you want to frame mount some or all of the batts.
 
That is a great looking bike. Huge triangle for a full suspension bike, just such a pity the rack and fenders make it look too metro...

Anyway, who am I to talk with my roll of duct tape decorated build...
 
I hear ya on sort of ruining the "looks" ... but I'm building it to "use" daily and I need to carry stuff such as additional batteries for longer rides. Most days the rack will be empty, but just about every morning the ride has sections of water from sprinklers plus the rainy days make fenders a necessity for me. I don't want to have to change clothes when I get to work! I really enjoy my other commuter style bicycle except for the ride above 20mph. I'm hoping this FS version improves on the ride enjoyment even more than I get from ebike1. Then second comes looks... I welcome any suggestions to make it look better etc... but you can't have the rack or fenders! LoL...

A little more progress... found a bracket for mounting the controller and painted it black (should do the same to the controller). Got some of the bag electrical stuff out to figure how and if things will fit ... of course the answer was NO, not quite!
epower_parts2_small.jpg


That darn little battery is just a skosh too big when the bag is mounted! So I picked up a small canvas tool bag at Harbor Freight and cut the zipper top off of it. Then slit the rear of the bag and sewed the zipper in to extend the bag a little bit. This also makes getting the battery in and out super easy. It took a really long time as I started trying to get an old sewing machine working ... BTW I've never sewed before! LMAO... broke a few needles... discovered bobbins and all sorts of cool things! Ended up using a needle and HD thread with pliers to stitch it all together.
framebag_extended_small.jpg


Made a little plastic plate to mount the switches and DC-DC converter. Position 2 of the key switch will be for the lights... on the bench that DC-DC converter draws 3W with 50V according to my Turnigy meter and nothing else hooked up. Might need some holes in the bag for circulation?
switchplate_small.jpg


Ran most of the main wiring and fit everything into the frame bag. Everything on the bike except for grips and lights and it feels lighter in weight than my other ebike.
framebag_wire1st_small.jpg


Put the bike up in the air so I wasn't getting up and down so much. I sure am slow at this… seems I’ve put in quite a few hours to get this far. Certainly couldn't make a living putting these things together!!!
bikestand_small.jpg


Wonder if this week will let me tinker with it some more?...
 
I put my controller under the seat to keep it out of the rain and away from the harsh ride of the rear wheel.
I tried the right side torque arm, I wanted duals, similar to what you have done. Looked to me like before I got the clearance I needed the arm would be compromised so after some hours of grinding and fitting the derailleur still rubbed and shifted funky for a few rides so I removed it.
Nice job on the fenders and rack I know it's not easy getting things to fit well.
Don't know how you got that kickstand on I fought with mine for hours and finally just screwed it to the toque arm and rack mount holes in the triangle. This seems to werq OK so far.
I should have near 2500 miles on mine about now. Only problem was one the bearings in the BMC V2 went bad and I found a sloppy fit to the cover plate. A new bearing and some epoxy stuff for the plate and things are still tight several hundred miles later.
I am running about thirty miles on three 2p14s 4.6-hour A123 packs that's at just under 20MPH if I go thirty they only last about 20 miles. Recent upgrade to 2p16s should get me a little bit further down the road though. Hope the 60V charger gets here soon. Your triangle bag looks good and would help me carry more batts I will have to think about that.
It's never quite finished I have learned.

More info on what I did to one of these.
http://endless-sphere.com/forums/viewtopic.php?f=6&t=235&start=390
http://endless-sphere.com/forums/viewtopic.php?f=14&t=15600#p232413
 
biohazardman said:
... controller under the seat ... right side torque arm ... that kickstand ...

You've a sweet looking ebike there! Yours is one that I found here on ES to inspire me when considering this same line of bike when I saw some on CL.

Behind the seat was my original plan, but to make it fit, the low swing arm mounted rack would have to be mounted way back to keep the front bar from smacking it under compression! Right now the rack bar would just tap the seat tube if I ever actually hit full compression. With the large frame, a rear rack mounted to the seat post would be WAY up in the air so I'd have to figure out a way to mount it lower on the wide seat tube frame section. Though post rack mounts I found had bolt spacing too narrow to mount on the main tube. Might consider again sprung mount options like that down the road... as it does look good!

That right side torque arm is sort of temporary until I order another one that I'll mount the other way (upper arm), though I don't shift rear gears, ever. I do have a 51t chain ring that will stretch the tensioner and make it push even harder on the torque arm. I didn't have the derailleur on the last 11t cog when I did the initial fitting so I didn't see the pivot housing touch issue.

The kickstand took a bit of grinding to get it to fit the lower swingarm ... certainly didn't just bolt on ... will see if it continues to work for the long haul. The resting angle is perfect, with just the right amount of lean to be stable with or without an additional 16lb battery mounted in a rear bag.
 
The things we addicted souls must do to quiet the incessant voices! Looks like you have it pretty well figured out. We really attacked the kickstand thing differently but both werq quite well. Mine rattles a bit on larger bumps. One of the few noises it makes. Every time we do one mod it changes everything for future mods.
You did good mounting the batts down lower it will handle much better. Mine handles very well at 30-35MPH although the 4.6AH batts don't last nearly long enough at those speeds good thing I keep a couple more in the backpack and continually dream about having more on the bike. Plenty of nice wide bike lanes that are most often empty to be safe at those speeds around here.
I was evil today and came up behind some poor soul fighting the wind and rain on a deserted stretch of a several mile long bike path along Marine drive next to the river. I let off the throttle, pedaled past at 25-30, then throttled up and quickly disappeared. It was miserable out kind of made my day. ;^) I past him going the other way a few minutes later he probly thought I was insane. Rain gear is great my shoes were wet when I got home from the 13-mile ride but the rest of me was dry.
Did not notice but do you have a motor cutout switch installed on the brake? I had an incident when I took mine out for a test ride and I went brain-dead, HCV thing, I almost ran over a police officer standing on the sidewalk as he had blocked the road with his car. I missed him by about 18inches at best while dragging the right of my handlebars through a laurel hedge at 10-12 MPH. Throttle locked on, I was unfamiliar with the bike, and had no cutout installed yet. I am now a firm believer in the wonderful motor cutout switch.
 
Connected power tonight. Set the CA and ran a short distance down the street (break in the rain).
trance_1st_testride_small.jpg


Quick impressions:
- Ilia's direct CA mod with a BMC kit is great!
- 30A limit in CA worked great and still pulled smartly right up to 30mph
- watts stayed under 1500 the full way from 0 to 30mph when I backed off and headed back
- bike feels very light and super smooth
- Brakes need to be adjusted :shock:
- NO weird noises! :D

Need new grips as I don't like the ones that came with the bike. Still waiting on some LED light parts. Haven't mounted the 51t chainring yet...

Ready enough to start using ... Now the fun begins!
 
I had a similar issue. The controller doesnt fit under the rack and over the rack does not leave the ability to carry luggage. It helps to have an extra old rack to canibalize. It seems wasteful to buy a new rack and chop it up. I happened to have 3 old racks lying around.
 

Attachments

  • IMG_6520 (Small).JPG
    IMG_6520 (Small).JPG
    36.9 KB · Views: 7,385
  • IMG_6521 (Small).JPG
    IMG_6521 (Small).JPG
    33.4 KB · Views: 7,385
Hey... that's a great idea! I do just happen to have a couple extra racks now ... long story with order issues.

On the rack topic... from an incorrectly sent baby seat rack they didn't want returned, I cut a leg off each side that had a connecton spot already built in for supporting the front of the rack for this bike.
bracket_controler_small.jpg


I had planned to use a single pole electric terminal adapter with extra rack leg sections for supports, but the built in connector points really did fit perfect.
arm_terminator_small.jpg


It's a very rainy day, so a good time for a weight check vs. a ride ... and ... it comes in at about 60lbs. I like that ... hope additional battery weight is not needed for my daily use.
Trance1_weigh_small.jpg

trance1_lbs_small.jpg
 
I think my bike is around 60lbs too.
Can't wait for a nice SF-Marin ride. I am too busy to use my ebike but some how I find time to spend hours working on it. Still trying to achieve the 1hr riding / one hour tinkering ratio.
 
New battery first charge ... fingers crossed!

Sitting at about 53v it slips into the cooker
batchrg_start_small.jpg

Measures right on the charger's stated voltage of 58.4v
Left to cook...
batchrg_cook_small.jpg

Measured voltage stayed constant during periodic checks
After some hours the light turned green. Only the charger got warm.
batchrg_done_small.jpg

I find it odd that now the voltage is higher than charger put out? Hum...
batchrg_v_small.jpg

A couple hours later, still at 58.6v
batchrg_v2hr.jpg

I'd be interested in why volts are higher after charge than during charging. I did miss the just before end of charge reading but +v doesn't fit behaviors of other non-Li-Ion batteries I've taken the time to observe.
 
There was a break in the rain when I had a chance to take a real ride. Perfect 70F test day with wind blowing, puddles, debris in the bike lane etc... Left the house with a fresh CA reset and at 58.5v from last night's charge. These CA shots are upon return prior to being turned off. The heat spots were warm including the battery but not hot.
Voltage ended up about 53v, where it was when I charged last night
v_ah.jpg

vmin looks ok to me considering I pushed it hardest right before getting back home.
maxa_minv.jpg

The wh/mi looked to be a bit better than my previous bike with similar conditions.
wh_whmi.jpg

Top speed of 37mph was right before home when I held the throttle open for a bit. Don't know what direction the wind was blowing but it felt like head on? Most of the ride was near my normal 1kw load and the CA limit held nicely at 1.5kw when allowed to with only short moments above. Again, Ilia did a great job with that BMC controller mod!
maxs_avs.jpg

This ride normally averages 22-25mph with my other bike and I'm guessing that average will go up a little with this bike?

The ride is great! Really! Much more stable over rough stuff, especially going through dips in the middle of corners. I think the CA set to 30Amp limit is perfect for the V3. Peddling at 20mph+ is pointless so I really need to get my 51t chainring installed. This hub seems to have slightly more whir sound from the gears, but nothing nasty.

Battery or BMS doesn't get warm during charge and seems to me that 60% of stated capacity use is about right. Time will tell how well things hold up... for now ... all good. I call this bike usable and will now say goodbye to my Giant TranSend.
 
Thanks GC...

I got one of the torque arms threaded past connectors on the wire side of the axle and charger from Ilia (ebikessf.com). The other arm is exactly the same one, ampedbikes universal from ampedbikes.com/accy.html ...
The charger looks the same as other one I got with a LiFe pack from cycle9.com I beleive, but with different output settings (check marked on case). They make more fan noise than my other cheap bulk chargers, though I like the nice looking and compact aluminum case.
 
So how is the climbing power with the motor off road? Also, what is the general consensus on making the Phase wires bigger or better quality???
 
Short answer:
I can't answer off-road hill climbing or durability as I've not tried those conditions. I've done a number of inclines that I thought it did well with ... but would not consider any of them the same as what I would see if riding off-road trails.

Thoughts:
It's weight to usable power ratio would certainly be a great combination ... for a hub. But, the little bit of time I've spent analyzing the clutch and gear information I've seen ... would make me question if they could hold up to constant transitions of air to ground contact forces that would take place off-road. I don't think of forest service roads (places you can take cars) as off-road.

Personally, if I wanted an off-road rider, I'd probably build a non-hub flavored ebike as I would think a heavy wheel would ruin any stock MTB suspension design. Suspensions are adjustable for rider weight but not wheel weight. If I had to pick a hub for off-road, I'd probably "bite the weight bullet" and go clyte 5xxx something (DD).

I ran stock wire for a long time and through many controllers before having a bit thicker phase wires spliced in from the axle exit. People have had some luck feeding larger wires but since I use the hub at or near the 1000w area, as it was designed for, an alternate set of phase wires through the axle should not be needed. My target speeds and conditions for commuting fit the V3 well ... IMHO ... so far...

You have to pay to play...
 
Thanks for the help, I know I will end up paying, I just want to pay for the right motor! LOL! Thanks again for the help if I had to buy all these different motors to try them I would never get my bike built!
 
Ok... where was I with this bike build ... Oh yea... out riding! :)

So, my charger blew and I had to use a different battery until a replacement charger arrived. Well... that started a few domino's to fall!
1) My Rear rack mount was not sufficient to prevent movement with 16lbs of battery loaded in the bag.
2) Rear weight on swing arms caused rear suspension to be sluggish and not work as well as it should.
3) Round switch key would fall out ... and did so one morning. Short story = locked out! Back to a simple toggle!
4) Switches in the frame bag prevented removal for running an alternate battery solution in the frame.

Good news a seat post mounted rack that I ordered came in so I could try it.
racknbox_small.jpg

The battery up higher like that makes moving the bike around by hand more cumbersome but any awkwardness is gone when riding. Lesson learned was that the weight suspended was better than fixed to the wheel (by far).

A 51t sprocket mounted works great but the derailleur is now gone as it couldn't make the jump. Even use a larger ring set but the jump was too much.
chainrings_compare_small.jpg


New way to mount the fender and the 51t chainring here:
chainringon_small.jpg


Pulled switches from the frame bag and put them in a plastic fishing box. I think the LED driver stuff will just fit too...?
wire_box_small.jpg


Mounted the controller in a central location (very few options where it would fit)
wireboxmount_small.jpg


This bike is soooooo much fun to ride!!!
 
I have to chuckle at the Plano box ... but it works to make things plug & play for other battery sources.
The lower blue tip is the pre-charge, the top black tip is regular power. Another switch will be for a DC converter going into the bottom and hope a flasher will fit in the middle of the box.

This FS bike compared to my previous commuter type bike is absolutely nigh and day! Having the tires in contact with the ground is so much better than dancing across the surface at speeds above 20mph. It stops, corners and floats down the road with ease.
 
Nice bike and VERY clean install! Where did you get the frame bag? I likey!
 
It was the largest pre-made bag I found and it was ordered from Cycle9.
I made a frame trace template for sending off to Epic Designs Alaska when contemplating a custom made bag. Still considering it... but also thinking I might make my own ... ? Though it will probably be winter before I have a good enough reason to make time. That's if the Lipo is still alive and doesn't like the cold, as then I'll want a larger Life pack mounted in the frame space.
 
Hey great find on the Epic site! That's a fair deal for a custom bag! Some of their other items look very good as well! Thanks! Have you used any of their stuff? Is it built as well as it looks??
 
Back
Top