Joe T.
100 W
I found myself here at endless-sphere.com over 3 years ago when I started looking for information on Ebikes. Since then I have built several ebikes as well as helped friends with theirs. This summer I built a bike using a GNG Gen2 kit. I am very pleased with this kit. I have built about 7 bikes this year all using this same kit. Most of these bikes are destine for rail trails and basically light duty flat riding. I test ride the bikes I build and I like to punish them to make sure they will be reliable. I have no doubt that this drive would be at home single tracking in the woods.
I decided to put my money where my mouth is. I bought a fat bike from the internet for $500 and installed a GNG Gen2. I have a few pictures of the bike I will share. The install had a few bumps like the 100mm BB but otherwise a simple bolt on like the others.
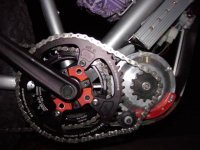
I pressed apart a bottom bracket cartridge to see what is inside. Basically a 16mm shaft and two sealed roller bearings. I grabbed a ¾” grade 8 bolt off the shelf and turned it into a new wider BB spindle. I re-used the bearings and threaded cups and created a new properly spaced BB.
The motor mount is nothing more than two flat steel plates that squeeze against the BB of the frame. The kit is for a 68mm BB and the fat bike is 100mm so I made a 40mm spacer to bridge the gap between the motor and the frame.
The kit comes with a large hose clamp to keep the motor against the down tube of the bike. It works O.K. but is a little tacky. I usually cut a piece of rubber belt ( Subaru timing belts are plentiful here) to protect the paint. On this bike I decided to support the motor a little differently. I took some 3/8 X ¼ aluminum stock I had and made a skid plate – mud guard – motor support. I then riveted some plastic sheet to keep the mud off.
Fat bikes are a bit unruly on pavement and this one is no different. In the woods and on the trails I am very impressed. I took it out today and this thing doesn’t blink an eye when it comes to the hills.
What I fix from the kit.
I made my own chain tensioner and I have yet to get the supplied bottom bracket lock ring to thread on the shell. Some I reused the original one from the bike. Others I pressed and welded the ring to the shell. That is about it.


I decided to put my money where my mouth is. I bought a fat bike from the internet for $500 and installed a GNG Gen2. I have a few pictures of the bike I will share. The install had a few bumps like the 100mm BB but otherwise a simple bolt on like the others.
I pressed apart a bottom bracket cartridge to see what is inside. Basically a 16mm shaft and two sealed roller bearings. I grabbed a ¾” grade 8 bolt off the shelf and turned it into a new wider BB spindle. I re-used the bearings and threaded cups and created a new properly spaced BB.
The motor mount is nothing more than two flat steel plates that squeeze against the BB of the frame. The kit is for a 68mm BB and the fat bike is 100mm so I made a 40mm spacer to bridge the gap between the motor and the frame.
The kit comes with a large hose clamp to keep the motor against the down tube of the bike. It works O.K. but is a little tacky. I usually cut a piece of rubber belt ( Subaru timing belts are plentiful here) to protect the paint. On this bike I decided to support the motor a little differently. I took some 3/8 X ¼ aluminum stock I had and made a skid plate – mud guard – motor support. I then riveted some plastic sheet to keep the mud off.
Fat bikes are a bit unruly on pavement and this one is no different. In the woods and on the trails I am very impressed. I took it out today and this thing doesn’t blink an eye when it comes to the hills.
What I fix from the kit.
I made my own chain tensioner and I have yet to get the supplied bottom bracket lock ring to thread on the shell. Some I reused the original one from the bike. Others I pressed and welded the ring to the shell. That is about it.