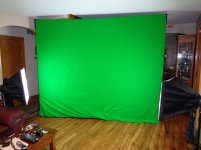
Got me a Green Screen !

Green-Screen-Clamps.jpg


Small update, i picked up some better clamps ( to replace the crap dollar store plastic one's ) so i can stretch the screen tight.. the light weight cheap tripods however, don't like this and slide towards eachother with the slightest pull... will need a bottom rail of some sorts. but it's getting better.
 
Getting it tight is important. Most green screen studios I've been in have the walls painted green, and they are big with very high ceilings.

To mitigate the green from "spilling" on to your back a "back-light" or a "rim-light" should be used if at all possible. Just don't let the light get into the lens and cause a "lens-flair". A "lens-hood" is useful for that.

Looks like you have a standard 8 foot ceiling. If you can't get a light high enough to act as a back-light or a rim-light, then try to bounce the light off a white ceiling, or maybe a shiny board attached to the ceiling. Just make sure the light is the proper color temperature to match all the other lights you have.

An alternative is to shoot outside during the day. (although you then might need to acquire C-stands, large silks, sand bags, reflectors and maybe 6,500K lights. )

Your productions would look good that way.

:D

Edit: Just saw this site: http://lenses-and-lights.blogspot.com/2008/03/shaping-light-with-flags-silks-and.html
 
OK, call me lighting, but it just occurred to me that if you have a light socket on the ceiling you could put a put a light bulb with the proper color temperature for your shoot into the light socket and stand underneath it.(The same color tempature as the rest of your lights.) Put the green screen behind you and light the screen and yourself to taste. It could keep the green spill off the back of your head and solders. Problem solved!

:D
 
So I start to get worried you're going to overwhelm him with worries like what IS the color temp. of his lights, etc. I remember in school when they started getting us thinking about 'Painting with Light' the talk was of painting with a fine brush, or with a broad brush. Maybe with a paint roller. Or a spray can. Or maybe just throwing it onto the wall a gallon at a time. Nobody makes a huge transition overnight.

I don't know where our boy starts out in his lighting knowledge, but it's always safe to assume someone in the throwing to spray can range. These home green screens work pretty well for such people. Let's just let him work his way up a little at a time.

CRW_2898.jpg


Not that seeing this doesn't start me thinking of infinity walls. If it's white you put gels on your lights and get whatever color you want. . . .

[youtube]fvj-P3Y1mLE[/youtube]
 
Dauntless said:
So I start to get worried you're going to overwhelm him with worries like what IS the color temp......I don't know where our boy starts out in his lighting knowledge, but ....... Let's just let him work his way up a little at a time.......Not that seeing this doesn't start me thinking of infinity walls. If it's white you put gels on your lights and get whatever color you want.

Why D., it's Ypedal were talking about. Won't take him long to get it all sussed out. Just give him some clues and he will get it right and do it well.

But, I do have to say that you having any idea or more then an idea of what an infinity wall is,...well that is a nice surprise. I am impressed. :lol:

In fact the .jpg's you posted look like a miniature version of the big sound stage at Sony Studios in Culver City. (Formerly MGM). It has been a while since I have worked in it, but looks like a giant version of the .jpg's you posted. Good find!

Although, I do have to say that the relative nature of green screen or blue screen or any other keying screen technique remains constant. The background has to be evenly lighted, (flatly lit) and the color of the background screen cannot spill on to any part of the subject/object that is observable to the camera. So, if you use green or blue gels to light the infinity wall, you still need some sort of back-light or rim light to remove the color from the camera's observable view of the subject/object. And all the lights should have the same color temperature to keep the flesh tones of the subject...(our boy) constant. This assumes, of course, he knows how to white balance his camera.

:D
 
Yeah, started writing he just HAD to be a beginner, but I was thinking about it as I was writing it, NOT a safe bet with that guy.

I don't recall even getting a walkthru at Sony. Did get to The Burbank Studio, Universal and Fox. DIdn't work with their cyc walls. Had to BUILD the first one I ever worked with, at least in a bigger better space than the video shows but still a little place. Most of my work has been low budget.

3 point lighting makes anything work better. But sometimes it's not what you want.

[youtube]AcMX1RcNRYA[/youtube]

[youtube]jCN_uk9agDo[/youtube]
 
Dauntless said:
.......3 point lighting makes anything work better. But sometimes it's not what you want.......

Yep, good ol' 3 point lighting. If one can learn that then things get easier. Then one can add or subtract lights to get the mood they want.

@Ypedal: Do you have your spot meter yet? If you really want to learn lighting then you will want one. Using your spot meter you can see where the range of light is without actually putting the meter on or near the surface of your subject. I always thought it was a faster to use a spot meter then a traditional light meter.

In case you asked....why a hand held meter? Well, it used to be that photographers and cinematographers needed to know how much light was available to expose the film properly. Film shooting has mostly died now, but the theory remains the same. Video (digital cameras) do not like harsh lighting, like direct sunlight. (direct sunlight ='s 1 point lighting). Digital likes "softer" lighting. So how does one know if they are controlling the light properly? Use a meter.

As an example, if you want traditional soft lighting, 2:1 lighting, then your key light needs to be a factor of 1 and the fill light a factor of 1/2.......1/2 + 1/2 = 1....or the Key light a factor of 2 and the fill light a factor of 1. 1 + 1 = 2.

From there you can change lighting as you wish...3:1....4:1 etc. depending on what you want.

Learn every mode of meter your camera has and then learn what a 1 degree spot meter can do. You will probably find that it is easier to leave the camera on the tripod and use your spot meter while moving around and setting up the lighting.

:D
 
Oh, and BTW, if you really want to learn lighting, start by studying the light and shadow work of the great painters from the past. They are the ones that set the standards for all photography / cinematography / videography that still applies today.

EDIT: Note the shadow from the nose pointing to the edge of the mouth. This lighting setup will also cause the Key light to create a triangle of light under one of the eyes. This is one of the classic Key light positions.
Rembrant Self Portrait with Two Circles.JPG

In this one note the shadow of the light directly under the nose. This another classic Key light position.
Rembrant Self Portrait.JPG

These are the two most used Key light positions used in people photography.

Now notice how one Key light can be used to obtain both shadow types.


:D
 
How about a mini-lecture on white balance? What you see is not always what you see. In other words, what your mind perceives is not always what is really there. Color is one of those cases. The human eye (actually the human brain but you know what I mean) is very good at auto white balance. It’s so good at white balancing that most people don’t even realize that it is happening.

Every different type of light source produces light of a different color. The same object lit by those different sources will reflect different colors. A white shirt in daylight will look bluish but under an incandescent light will look amber. The purpose of white balancing is to keep white (or grey) objects looking white. If white looks white, then the other colors in the scene should look correct also.

Color temperature:
From Wikipedia - “The color temperature of a light source is the temperature of an ideal black-body radiator that radiates light of comparable hue to that of the light source”. As a black-body heats up, it’s radiant color changes. From red to yellow to blue. A black-body can be a lump of iron or the filament in a light bulb. Color temperature is measured in Kelvin. Black-body radiation tends to be full spectrum but will shift up or down depending on the temperature.
Some typical color temperatures:
1,850K – Candle Flame
2,500-2,800K – Incandescent bulbs
2,800-3,200K – Halogen bulbs
5,500 – 6,500 – Daylight (noon)

Fluorescent and LED lights:
Since fluorescents and LEDs produce white light using phosphors, they tend not to have full spectrums but rather several spikes that are perceived by most as full spectrum white light. These types of lights can also have spikes in colors that are not related to color temperature (color temperature adjustments typically deal with amber – blue adjustments) such the greenish tints that many inexpensive fluorescents have. This can make it more difficult to get good color balance with these types of light. Having said this, color corrected fluorescents and LEDs are getting better.

So what does this all mean? Most of the times you want to light a scene with all the lights having the same color temperature. While the pros will use gels etc. to get all of the light sources in a scene to have the same color value it is usually easier to just use the same type of light (at least the same color temperature) to light everything in the scene.

All the lighting is the same color temperature; now what?
If you are using a digital camera (back in the day, you had to use different film for different color temps), you should be able to use the “White Balance” function to get the proper colors. To do a white balance, set up the lighting and point the camera at a white object (a white balance card is the best but anything white can be used) and tell the camera to do a white balance. The camera will then analyze the image assuming that it should be white. It will then adjust the red, green or blue values so that they are in balance (for white or grey colors the rgb values should all be equal). The camera will continue to use these adjusted values until you do another white balance. As long as your lighting stays the same, the white balance should stay the same. If you change the lighting, then do another white balance.

Why not use Auto White Balance? When a digital camera is using auto WB, it is constantly analyzing the image and trying to guess at white is supposed to be. Sometimes it’s right and sometimes not so right. If at all practical, I prefer to do a manual white balance every time the lighting changes.
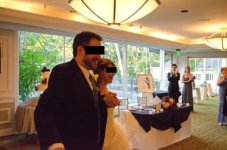
MixedLight.jpg
The image above is an example of mixed lighting. Half of the scene is lit by indoor lights and half of the scene is daylight lit. Notice the color of the white wedding dress and the white table cloths (in the back). This image is color balanced for daylight. The table cloths look white and the dress looks yellow. If the image was balanced for the indoor light, the dress would look white and table cloths would look blue.

 
My light pods are 5x compact fluo 6500K

The next big ticket item on my wishlist is a better quality camera, right now i have a Sony DSC-WX200 and a Handycam HDR-CX110 , both low budget entry level cams. Good enough for now so i can learn the software / editing side of things, then i'll invest in a higher end unit.

I have a Lumen meter, will have to read up on that bit of info...

All very good reading.. thanks guys !!. 8)
 
This made for Sony video covers white balance in a nice way. Then it is up to you and what your camera can do.

[youtube]CE4fa6ZSuEU[/youtube]

:D
 
IMO Lightsphere all the way!!! Virtually everything else was a mug shot. Also, did you notice the nice lighting in the intro?

:D
 
You do realize that is a marketing video for Gary Fong's Lightsphere and most of the other diffusers could have produced images as good or better if they had been used properly. For the intro lighting, Main upper left, fill light (not much) upper right. It took me a while to figure out that annoying light above his head was not a hair light (doesn't seem to be separation light) but it is being used to light the room in the background.
 
So i have had the tripods in the living room with the screen pulled over to one side for a while now, figured if i left it up and in the way, it would motivate me to get shit done... took a while.. but it finally did .

Yesterday i dusted off the old iron and cleared up the fold marks from my diffusers, thought they would eventually go away with the light from the bulbs.. but no.. so :

green-screen-diffuser1.jpg
 
After one more round of the steamer, re-adjusted the clamps a bunch of times.. etc.. finally got this puppy pretty flat !!!


Picked up a 3 pack of 6500K 23w twisties, put one on a tall pole lamp ( seen above, on the right, has a broken bowl on top.. but it works ) .. put the 2nd into the overhead living room fixture .. and the 3rd was broken ..argh..

Used a 2700 Lumen LED trouble light " Snap-On " brand from costco to light wall in front of me, behind the camera. With that combination of lights, i get no shadows, and the handicam takes a great clear picture with the white balance set to outdoor setting. . ( auto gave me a red face.. and indoor setting made me look a bit too pale lol )
 
I had the screen doubled up to keep the transparency down, but turns out that one layer is fine, if you make sure to turn off all the lights behind the screen, and close the window blinds.... the camera does not see through the screen once it's lit just right.

Then comes the hard part, standing in front of the camera and talking !!! :|

I have like 90 + video's on youtube, most were just shot out of the blue with no prior thought and this makes it easier, when you try and make something rehearsed ahead of time, i get all tongue tied and just can't get the right words out.... spent hours last night taping and deleting.. and this morning, 10 minutes and i got all the footage i need for stage 1 of the Cycle Satiator video !

Installed Adobe Premiere, watching YT vids on how to use it, along with After Effects, so much to learn... but it's fun !
 
You can make yourself a prompter easily enough.

Put the monitor of your computer (or a laptop, or your TV, but the biggest screen you have) out of camera view but at eye level (or rather, camera-level, so it looks like you're looking at teh camera and thus audience). Right over the top fo teh camera or beside it should work.

Create a text file with your dialog and cues, setup Notepad to display it in a font large enough to read it from the distance between you and the monitor.

If you have an old mouse laying around, open i tup and solder a pair of wires to the left mouse button. Run those wires to a switch inside a foot pedal. Or alternately, *make* a foot pedal by stickign teh mouse electronics inside something like an old gas/brake pedal setup from a game controller (I did this to make a sustain pedal for my music stuff after losing mine in the fire). (Or use an Apple USB mouse that has only one button--the oval clear ones are nice cuz teh button IS the whole top of the case). Take the ball out of the mouse or tape over its optical sensor so it can't move the cursor.


Plug the mouse into your comptuer, via however long a cord you need so ti reaches from where your feet will be while taping yourself to the cmputer.

Maximize Notepade, then use yoru regular mouse to put the pointer on teh page-down scrollbar of Notepad.

Everytime you tap your foot on the foot-mouse, it'll scroll a page of text. If you get bounce, there's anti-bounce circuits available or you can fix it mechanically depending on how you made your foot-mouse.
 
Yep, I thought so, ....just hint at it and Ypedal will figure it out. That's our boy, right D! :lol:

You are doing fine boyo! Figuring out the tricks on your own will really make if easier later.

The lighting sounds like it is coming together. The reason 6500 k lighting works with outdoor white balance is because 6500 k is the theoretical color of noon day sunlight. A bit blue really, but the If you would later like a slightly warmer skin tone then get some 1/4 CTO gels (one quarter CTO) and put in front of your key light to give a slighter warmer look. The warmer light bouncing off the wall in front of you may already be doing some of that anyway.

As for the written script and flubbed takes....Been there done that. ..., gives you a whole appreciation of good acting doesn't it? Imagine having to perform from memory a whole play and be convincing the whole time. No wonder actors go nuts!

A teleprompter is a fine tool. AW has a good idea with the foot pedal idea. I haven't looked around in a while but there are some free teleprompter web sites around that might work. Although last time I played with one, about 18 months ago, it didn't really have a satisfying speed. It was either to fast or too slow. So if you can somehow hack an old mouse and get it to advance the text in a scrolling manner in your word processing software, then you only need to read your written text and not memorize it. Or if your hand is out of the shot you can do the same thing. Just watch out for the clicking sounds of the mouse.

As for the proper (or standard) position of the teleprompter is either a lens level beam splitter which the camera shoots through, or a screen just below the lens. It you have your camera just above eye level, and a computer screen of some sort just below the lens, you will be fine.

Then as you read it...."just act naturally." Kind of like talking to somebody you know who is interested in what you are talking about.

Remember to get your mic as close as possible without distortion, or casting a shadow. Only have it in the scene if it is "properly motivated" like when a talk show host is interviewing a guest and the mic is sitting on the desk.

I am still an Avid Media Composer guy, but that is software I came up cutting on starting about the early 1990's. Really low resolution back then but the software got really good over time. (I actually started out cutting physical film. 8mm, super 8mm, 16mm 35mm) Nonlinear came much later for me.

As for Adobe, their software products meshes very well with each other. Premiere Pro, Aftereffects and Photoshop can go a long way. It will take awhile, but once you get even the basics of aftereffects working it will serve you very well with your green screen shots.

:D
 
A coupe of extra thoughts after a nights sleep....


The pole in the back is fine. Anything that works safely. You ever seen a movie scene where a machine gun rakes a wall? Simple squibs placed behind a thin barrier, paper, wall paper etc. Probably all digital now, but You would be surprised how rudimentary those kind of setups were. The special effect guys wound pound nails into a board in a straight line. Connect one wire to each nail. Connect the wire to the squib. Connect the other squib wire to a battery terminal (often 12v car battery) connect the other battery terminal and run that wire to a nail that the special effects guy rakes across the nail board to fire off the squibs in rapid succession. Instant machine gun fire. They tell you it is easier to time out the squib fire this way, like if the "bullets" are just behind a running actor.

As for 1/4 CTO, if you want to use it, place it in front of both key and fill lights, not just the key. With your camera white ballance set at 65k you will warm up the skin tones a bit.

:D
 
When looking at lights, pay attention to the color rendering index ((CRI) http://en.wikipedia.org/wiki/Color_rendering_index ) of the light along with the color temperature. It's a measurement of how accurate the color rendering is. The closer to 100 (natural daylight) the better. Be aware that these are the manufacturer's numbers and are about as accurate as battery specs (some accurate and some...).

If you do decide to upgrade your camera, give some serious thought to a Canon DSLR (60D-70D, T4i-T5i). Not only do you get an excellent still camera, but you also get outstanding video.
 
Back
Top