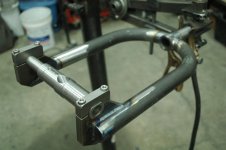
Half-upright/half-recumbent electric cargo tandem

haulincolin

100 W
Joined
Apr 28, 2013
Messages
103
Location
Seattle, WA
Hi everyone!

Several years ago someone gave me an old ATP Double Vision tandem recumbent frame. I had to do some frame repairs, and then built it up and rode it that way for a while. Later, I decided I would rather have a half-upright/half-recumbent style tandem like a Bilenky Viewpoint or a Hase Pino. It seemed like there would be so many advantages over a regular tandem--both riders get a nice view and their heads are closer together for easy conversation, shorter wheelbase for better handling, if close enough in height, riders can swap out positions for variety, and I figured I could build a big rack and swap it in place of the front seat when I wanted a cargo bike rather than a tandem.

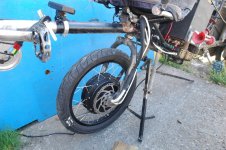
So after a few years of planning, amassing parts, and working on it in my spare time, this year I finally got it all together! My plans evolved to include an extended rear end with enormous cargo bags and an electric assist. I've been riding it for a few months now (often on my own, but sometimes with a stoker) and it's so much fun! I bought the Magic Pie because I wanted a strong hub motor in a 20" wheel without having to deal with very short spokes. I fried the internal motor controller a couple weeks ago, but that's ok because I needed an excuse to upgrade to something bigger anyway. Now I have a Grinfineon on the frame, and connectors on the way to wire everything together.
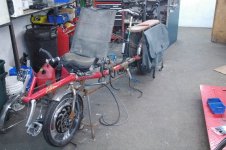
cargotandem2.jpg
cargotandem3.jpg

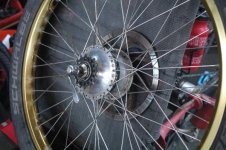
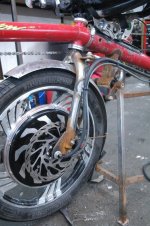
New phase wires and hall wires coming out of the Magic Pie. I customized a beefy BMX fork with thicker dropouts and disc tab. Currently set up with a 203mm rotor and a BB7, but I plan to get a hydraulic brake at some point.
cargotandem4.jpg

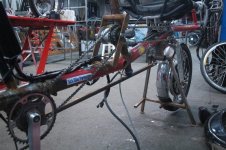
SRAM S-7 jackshaft between the stoker and captain gives the stoker the ability to adjust their cadence relative to the captain. This combined with the front freewheel on the captain's cranks (thanks sickbikeparts!) gives the riders fully independent freewheeling.
cargotandem5.jpg

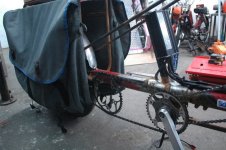
Phantom chainring keeps the chain from rubbing on the frame. This was actually a design mistake on my part. I thought everything would clear in the position I welded the bottom bracket, but I was wrong. :(
cargotandem6.jpg

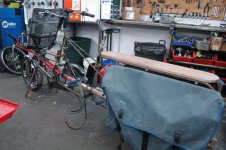
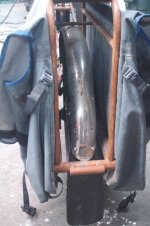
Nice big mud flap on the back. Not a very good picture, but there's a sleeve there for a dummy axle for hauling another bicycle. You might also notice the Rohloff peeking out from in there. :D
cargotandem7.jpg

Someday I'll get around to getting a professional paint job, but in the meantime, everything is getting a nice sheen of rust. The stainless rod I used when TIG welding doesn't rust, and looks pretty cool at the tube intersections.
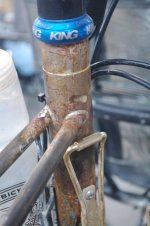
cargotandem8.jpg

Truly enormous bags. My Chrome Metropolis fits in one with room to spare. Thanks Martina at Swift Industries (they don't usually do custom work, but I know her personally and was able to convince her).
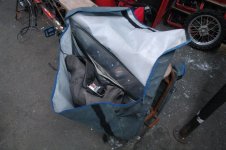
cargotandem9.jpg

Appropriately large centerstand for a large bike. I was considering making a bearing or bushing pivot, then realized that I could easily use an old bottom bracket for the purpose! Now the really fun part: I took another one of those front freewheel cranks, helicoiled it for left-hand pedal thread, installed it on the left, and made a linkage to my centerstand. What this means is that backpedalling deploys the centerstand. Now when I come to red light, I don't even get off the bike; I just backpedal sharply, and pop the bike up onto the centerstand. Then, when it's time to go, I just pedal off the stand, and it swings up. A weird side-effect of all this is that rolling the bike backwards deploys the kickstand. This is sometimes handy, but can be inconvenient, so I have a quick-release pin that allows me to disconnect that linkage.
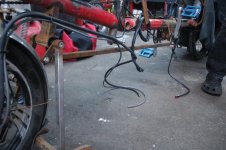
cargotandem10.jpg

Hope you all enjoy the pictures. Let me know if you have any questions!

Colin

Edit: figured out that pics have to be <= 800px wide to show up.
 
The front fork is similar to mine, very strong! What is the bike's overall length, and how long would you anticipate it to be if adding in combination something else like a trailer behind it? 8)
 
man, you have the best OCD i have ever seen. your shop looks fantastic. you even have the tape on it's own hook, i cannot believe i am seeing wrenches on hooks, bins in order on a shelf. i bet you never even thought to do it for a camera shot, it is like that all the time!!!! you my hero. i have never had even the slightest discipline. my projects and stuff is in piles and piles everywhere. you are like god!
 
The bike is about 10 feet end to end. I have towed one of my regular bikes off the back for an overall length of about 15 feet.

Thanks for the compliment on organization dnmum. My two friends and I co-own a business that operates out of this space. We do a variety of machining, fabrication, repair, and wiring work including lots of bicycle and moped repair and custom parts. The three of us are here 50 hours/week each plus two part time employees, so we're all accountable to each other to keep the space clean and organized. Our 1700 square feet starts to feel small with this many people and projects going on all at once.

I guess that's my excuse to show off some more of the shop, so here ya go:

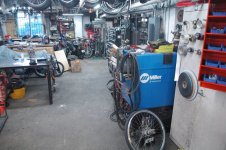
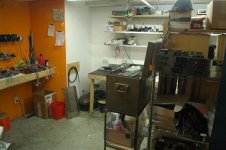
Toolboxes, welders, tables, lots of parts and projects.

shoptour-center.jpg

Grinders, bandsaw, metal, motorcycle lift, more projects.

shoptour-ewall.jpg

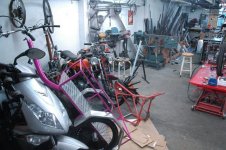
Repair stand, bicycle parts & tools

View attachment 1

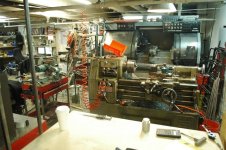
Manual lathe and Automatic Chucker. Behind that is another old Hardinge screw machine that we'll theoretically get around to converting to a CNC lathe this winter.

shoptour-lathes.jpg

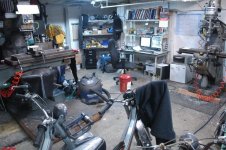
The "office" and two Bridgeports--one manual, one CNC.

shoptour-bports.jpg

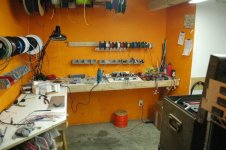
Wiring room. We're currently doing all the wiring for a small commercial espresso machine company, and would love to find more of this kind of work if anyone has any leads.

shoptour-wiring1.jpg
shoptour-wiring2.jpg

Colin
 
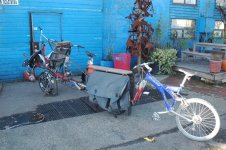
Loaded up the cargo tandem a few days ago to bring some more bikes to the shop. On the back, a nice quality older full suspension bike I picked up for free. On the front, a "spin cycle" inspired by Atomic Zombie (http://www.atomiczombie.com/SpinCycle%20Extreme%20360%20Stunt%20Trike.aspx) I made many years ago. Since I have a bunch of electric stuff now, I'm thinking it will be fun to put a hub motor on the front and turn it into a drift trike.

cargotandem-loaded1.jpg
 
Cool rework of an old 'bent. You added many ingenious features there. Val Kleitz would have liked your centerstand linkage, I expect.

I'm remembering riding my own e-bike around Seattle, and that makes me wonder about yours: Do you experience much wheelspin when climbing hills on that thing with the front seat empty?
 
just way too cool. not OCD after all, just bad vibes from the other guys to keep everyone honest about putting stuff back in the proper place. a 4' long vernier caliper is gonna be the cherry on top of the cake.

i already feel bad about the 6 tables i have covered with year old projects and no space to walk because of batteries in the process of being charged/discharged to calculate capacity all over the floor.

this puts me to total shame. no comments from tourists to my place either please.
 
I've only experienced a very small problem with wheelspin, like only for a moment when starting on a wet, smooth hill with a newly charged battery. I've got my CA limiting my current to 30A right now. Once my bigger battery comes, I'll up it 40, but even so, I doubt it'll be a major problem.

Chalo said:
Cool rework of an old 'bent. You added many ingenious features there. Val Kleitz would have liked your centerstand linkage, I expect.

I'm remembering riding my own e-bike around Seattle, and that makes me wonder about yours: Do you experience much wheelspin when climbing hills on that thing with the front seat empty?
 
Upgrade time!

The Magic Pie 3 / Grinfineon / EM3EV battery combo has treated me well, but the 20" MP3 with a 14s battery tops out around 23 MPH, and I want to go faster. Plus, it's a big heavy bike, and with a lazy stoker, the motor ends up doing a lot of work. I want more power! :twisted: I also want the ability to go long distances without recharging. This bike makes a great overnight camping rig. So I have the following parts on order:

QS 205 V3 motor and Sabvoton sinewave controller from evolutiongts (https://endless-sphere.com/forums/viewtopic.php?f=31&t=78461)
18s of Chevy Volt battery (http://www.ebay.com/itm/Li-ion-72vdc-50ah-3kwh-NEW-2015-VOLT-Batteries-EV-Electric-Car-Boat-Golf-Cart-/181947585813?hash=item2a5cebd515:g:zdUAAOSwrklVHpkT&vxp=mtr)

This should give me lots of power, a top speed of close to 40 MPH, and a huge range with 50 Ah of battery.

I'm going to go against the commonly held idea of not using high power hub motors in the front since I like the way the front wheel drive handles, I like my existing drivetrain (Rohloff), and when I really need the power, with a person or heavy cargo in front, I'll have plenty of traction on the front wheel.

I need to figure out how to mount the new battery. I'm thinking it might go between the front seat and rear "head tube" but I have to wait for it to arrive before I figure out how it's going to fit.

I'll also be building a new fork that can take the 150mm spaced QS motor and is extra heavy duty to handle all that power.

Still need to work out charging and balancing. Maybe a BMS? According to a few threads I've found about these batteries, the high quality batteries make a BMS mostly unnecessary as long as I pay attention, and periodically balance the cells.

Thanks for looking! I'll post pictures when I start putting together the new parts.
 
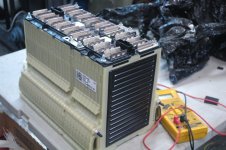
Got the Volt battery module in the mail. Appears to be fully charged--all parallel groups reading 4.20 volts, 75.6 across the whole thing. This is not ideal for storage (or shipping), right? Seller is telling me "li-ion voltage is not an indicator of capacity--they are 60% full" which sounds like BS to me. Am I missing something?

voltbattery1.jpg
 
haulincolin said:
Got the Volt battery module in the mail. Appears to be fully charged--all parallel groups reading 4.20 volts, 75.6 across the whole thing. This is not ideal for storage (or shipping), right? Seller is telling me "li-ion voltage is not an indicator of capacity--they are 60% full" which sounds like BS to me. Am I missing something?
I think there are some graphs around one of the threads about those modules/cells (sorry I don't have a link), but AFAIK 4.2v on that type of cell is completely full.

I expect you'd see more like 3.7v or so if they were only 60% full.

FWIW, with just about any Lithium EV chemistry *except* LiFePO4 (which has a pretty flat discharge curve thru much of it's capacity range), voltage is definitely an indicator of capacity, as long as you have the manufacturer graphs to match the voltage to. Usually there are multiple curves on it, to show voltage under various loads, vs state of charge.

Voltage isnt' the *only* indicator, though, so you might want to make your own graphs for your particular cells, by doing charge and discharge tests under various loads.
 
I made my balance leads for the Volt battery today using the connectors referenced in this thread: https://endless-sphere.com/forums/viewtopic.php?f=14&t=69158. Everything thing looks right when hooked up to the RC charger. I'll probably buy one of the new 72V Satiators for my regular non-balanced charging needs.

Now that I'm digging in with the new setup, I'm considering some further upgrades. First, I'm probably going to change the stoker position to battery recharging only. I know that this type of setup is widely considered useless since the energy transfer efficiency losses are huge, and at high speed, the added air resistance of someone whirling their legs around probably takes away as much power as they're creating. But it does have a few advantages in my case. I can eliminate the crazy chainline and intermediate hub connecting the stoker's cranks to the captain's cranks. I won't have to deal with cooperative shifting when riding with someone. The main boom can be telescoped without having to add/remove chain links. It'll be more easily convertible between stoker seat and cargo platform. And my stoker still gets to feel like they're contributing.

As suggested in a couple other ES threads on the subject I'll use a small hub motor, a controller with the regen permanently turned on, and a potentiometer to set the regen level. I have a little Bafang motor, probably only 350W or something, so that should work fine. I'll tuck it up in close to the front crankset with a short chain drive to it.

Second, I'm considering making a custom axle for the QS 205 when it arrives. Supposedly the QS has a pretty decent axle, so it's probably not really necessary, but I'm still annoyed by the inherently flawed design that all hub motors have of a threaded axle with milled flats. Since I'm building my own fork anyway, I might as well make something nice, like a big hollow axle that clamps in place allows the wires to exit out the side without getting smooshed between the dropout and the spinning heads of the disc rotor bolts.
 
I've thought about such a modification of a Chinese hubmotor. To me it would be much more reassuring to have a keyway or pin in the axle as a failsafe. Like just a clamp on the end with the wire duct, but with a fastpin on the solid end for positive torque retention.
 
Chalo-
I thought quite a bit about how to make a aftermarket hub motor axle that would be compatible with standard thru-axle forks, and that would allow the wires to exit through the end of the axle. Unfortunately, that seems impossible due to the thru-axle needing to slide freely in and out of the hub, but also lock the stator in place with the fork. Maybe with some kind of interlocking keyways it could work... but then how big of a connector or even just wires can you fit through a bicycle axle? With a 20mm axle, you have some space, 15mm not so much, 12mm no way.

So since I'm making my own fork for this big motor, here's what I'm thinking: make a permanent big hollow axle with hex flats milled on the ends. Then my "dropouts" are just a pair of hex bore split shaft collars (for example McMaster #7552K19). I think the bearings in the QS motor I'm getting are big enough to pull this off, but I'm still trying to get a CAD drawing to see for sure, and to see what the interface between the axle and the stator looks like so I know whether I can replicate it.
 
haulincolin said:
Chalo-
I thought quite a bit about how to make a aftermarket hub motor axle that would be compatible with standard thru-axle forks,
:?:
https://endless-sphere.com/forums/viewtopic.php?f=2&t=78698&hilit=thru+axle
 
Yeah, I remember reading that, but none of the ideas there allow me to run the phase wires out the end of a hollow axle, which is one of my design goals.
 
Today I started making the new telescoping piece that has the front crankset, and will now also have a small hub motor to act as a generator. Turned the flanges off the hub, since we won't be needing them. :D
View attachment 3

Some other upgrades from the past year that I never mentioned before:

Drilled extra holes in the Rohloff flanges and laced it into a beefy 48 hole 24" rim. Originally Chalo's idea. More information here: http://www.rideyourbike.com/48spokerohloff.shtml
cargotandem-rohloff.jpg

Simple plunger horn mounted where I can easily stomp on it. Surprisingly loud.
cargotandem-horn.jpg

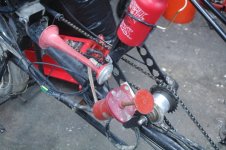
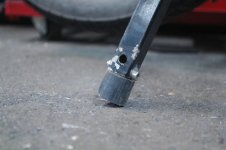
Chunks of ferrocerium rod bolted into the ends of the centerstand legs so I can drag the stand at speed and shoot a huge shower of sparks. 8)
cargotandem-ferrofeet.jpg
 
I'm thinking of doing a very similar thing with a half-upright/half-recumbent tandem that can carry two people or a bunch of cargo.
How did the telescoping boom with generator work on the front? Did you have any issues setting up the controller?

What would you do differently if you were to start from scratch?
 
Peregrine-

I got busy with other projects (moving shop and having to keep up with the actual paying work) and haven't gotten around to hooking up the generator. Just got my new motor and controller today, so it'll get to it soon!

In general, I think this type of tandem is excellent! It handles well with or without a stoker in front. I ride it by myself all the time, but have ridden it with a 200+ lb person in the front with no issues. Very stable at high speed, still fairly maneuverable at low speed. It was convenient for me to build this up from the existing recumbent tandem frame I had, but if I were starting from scratch, I would change a couple things.

I think it makes sense to have a large diameter main tube like mine, but it could be a straight shot all the way rather than segmented, and have the captain's bottom bracket shell mitered directly into it. The hanging bracket for the bb on mine was the first thing to crack. It's now reinforced with some gussets. I would have a little more room between the captain's handlebars and the front seat. You really need a lot of space to swing the handlebars around and I've often found myself limited by the stoker's shoulders even with the unusually short stem I use. The whole length and spacing thing is a bit of a balancing act--you want to minimize overall wheelbase for maneuverability, but you need sufficient space between the stoker and your handlebars, and you don't want the stoker hanging way out in front of the front wheel.

My battery is currently tucked into a nice spot in front of the rear wheel that would otherwise be dead space, but when I'm stoker-less it would be better to have more weight over the front wheel, so my new battery is going to sit on the frame just behind the front seat. I've found that a heavily loaded rear end and light front end is one of the worst configurations for the handling of this bike.

One of the most important features is the large centerstand. You won't regret putting some effort into building a nice centerstand even if you don't do something crazy like my crankset-deployed setup.

Someday I'll get around to building the cargo platform that's interchangeable with the front seat. Maybe you'll beat me to it. If you're ever in Seattle, feel free to stop by.
 
I installed my new battery and controller a while ago, and left my MP3 on there for a while. I turned the Sabvoton up to ~4 kW which felt pretty good.

Now I've finally gotten around to the new axle and fork build, and holy crap, the QS 205 with the Sabvoton turned all the way up is crazy powerful! My weight distribution without a stoker is just right to slip the front wheel a little at full throttle. It's easy to avoid if I want, but it's a nice effect if I want to impress people. Even on my very heavy bike, it pulls hard up to 45 MPH or so. It's hard to imagine putting this motor on a smaller bike, seems like it would be hard to control that much power.

Still need to mount a fender, and try to figure out some other settings on the Sabvoton. Also I now need a higher gear ratio to keep pedalling, and it's probably time to buy a full face helmet.

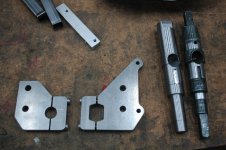
Custom axle and 1/2" thick clamping dropouts:
cargotandem-newforkparts.jpg

New fork mostly complete:
cargotandem-newfork2.jpg

Installed on the bike:
cargotandem-newforkinstalled.jpg
 
Back
Top