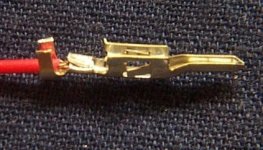
How do you crimp molex connectors?

Joined
Mar 30, 2007
Messages
645
Location
San Diego, CA
Not sure which forum this should be in, but I have never been able to successfully crimp a single pin for a molex connector; it always gets bent so it doesn't fit in the housing, and at the same time it doesn't hold the wire firmly so it slides out of the pin very easily.

Does anyone here know of a foolproof reliable method for crimping them? Can you should what tools you use and exactly where and how you crimp the pin? I've already read many things online and know the theory (the outermost tabs hold the insulation, the inner one crimps onto the exposed wire).
 
You need a special grimper tool to do them properly like OEM quality I use Eclipse Pro'sKit.

Like that : http://www.abra-electronics.com/products/product.php?productid=2109&cat=177&page=2

YAC4.jpg


There is different fiting/end you can buy for this tool to crimp different type of connector. (you need to get the right one)

Robin
 
good crimp tools are typically about $250. you need the right tool for each terminal type. i have used lots of less expensive tools and none of them produced reliable crimps. personally i use a small pair of needle nose with grooves on the faces, strip the wire about 1/8" then crimp each pair of tabs separately, followed by soldering. with a bit of practice this can be done quite quickly and reliably. Even with the right crimp tool i have seen lots of failed connections. when soldering a very fine tip and very fine solder are best, and it can be done quite easily without melting the insulation or feeding solder where it does not belong.
 
bobmcree said:
good crimp tools are typically about $250. you need the right tool for each terminal type. i have used lots of less expensive tools and none of them produced reliable crimps. personally i use a small pair of needle nose with grooves on the faces, strip the wire about 1/8" then crimp each pair of tabs separately, followed by soldering. with a bit of practice this can be done quite quickly and reliably. Even with the right crimp tool i have seen lots of failed connections. when soldering a very fine tip and very fine solder are best, and it can be done quite easily without melting the insulation or feeding solder where it does not belong.


You can get good copy of original crimp tool for about 50$ to 100$ and they work very well!

Soldering the wire on a terminal like that make it rigid and brittle...so I don't suggest that for Ebike unless it's a big power wire that need full connection. Also the solder have flux in it...some flux is water soluble...and some not and corrosif, so it will eat the wire in 2 years.

Robin
 
There's a huge number of different crimp types. A dedicated tool for a particular crimp, capable of production volumes will cost $100's. An alternative is a tool that takes replaceable jaws, but you can then pay $100 per set of jaws.

For small volumes there are simple hand tools. They can't apply the same pressure and they don't have the ratchet mechanism that makes it more repeatable.

It sounds like the type of crimp you need is what is called a "half barrel". Each side is turned over and curved back into the wire. The bad news is that it is almost impossible to do with ordinary pliers (OK, I'm disagreeing with Bob, here, I know). The good news is that Molex do a simple tool that will handle a variety of sizes and Mouser stock it for about $50.

Nick
 
Unless you are manufacturing cables with a certain crimp connector on the end, then crimp tools are a serious waste of money. I'm absolutely with Bob, here. I've been "folding and soldering" crimp pins for years - and I feel MUCH better about the result than I do any crimp. Hell, in some scenarios, I've even formed a loose fitting tube of the crimp "ears", slipped the result on the end of the wire, and soldered it. This way, if I absolutely have to, I can heat the crimp pin and pull it off - then REUSE it.

The trick is having the knack and dexterity to form the crimp ears with a regular pair of pliers. Having the right (small) tool is the key.

There are some Molex connectors which will accept the pin without crimping them AT ALL. I've pulled more than a few of these apart to find the wire just laying (soldered) in the valley of the pin - the ears absolutely pristine. Golden Motor used to ship their stuff this way, and it works fine. On those crimp pins (most of them) that have two sets of ears (one that grabs the insulated part of the wire, and a smaller one that is intended to hold the stripped end), I've crimped the "grabby" part around the insulation - which holds the pin nicely in place - and then soldered the stripped end into the valley where the smaller crimp is. As long as your soldering technique is good, the result is STILL removable and reusable. Most connector bodies don't complain about the smaller ears not being squished.

Manually shaping and soldering the pins isn't something you want to do all day long, but for most of us, it's the best solution.

Here's a link to this same discussion, which popped up last month in the e-Bike General area...

http://www.endless-sphere.com/forums/viewtopic.php?f=3&t=8176
 
Coincidentally, I've had a few connectors to solder today with some of the SMALL pins on them (The example I showed in the other thread was of a 45A Anderson contact).

Out of the bunch, I selected two wires as examples. An average one (Black) and the worst one (White).

soldercrimp.jpg


You can see that the white one "got away" from me (shaky hand, and the solder wouldn't flow - hence the signs of melting the insulation and the general blobbiness of the thing). As ugly as it looks, it still fits the connector body perfectly (and is completely out of sight and professional-looking once assembled :)).

My fellow Canadian, Almasi, commented that soldering makes the wires stiff or brittle. This is absolutely untrue, unless you apply too much heat and solder to them, in which case the solder can wick back up into the wire and stiffen it. Not that I see that as a tremendous issue. Arguably, a small amount of this might HELP with strain relief.

I'f I'm concerned about longevity, I dip the connectors in isopropyl alcohol and wipe them off with a Q-Tip before inserting them into the connector body, just in case the flux causes trouble a few years down the road. The solder I use has a Kester 331 organic flux core and is 63/37 Tin/Lead. The flux is water soluble, but I still feel better using the alcohol. Again, if you aren't overdoing the solder, there isn't enough flux residue left behind to care about in most practical situations.
 
Hi Philf,

I used to solder Andersons too, but then I found a crimp tool at a reasonable price (Pressmaster tool and jaws from Torberry in the UK if anyone's interested). Likewise I've soldered enough Molex's and similar in my time. But its so much easier to crimp these things. And I'm saying that as someone who is an expert at soldering. (BTW, lead based solder is outlawed over here now.)

I absolutely agree that professional, production crimp tools are way OTT. When you go looking, the first tools you'll find will be a rip off. But there are simpler ones available if you keep looking.

Nick
 
Tiberius said:
Hi Philf, (BTW, lead based solder is outlawed over here now.)

Nick

and this from a country that is about to approve a massive new coal fired generation facility in Kent?

politics aside, i have seen many ebike controllers with wires pulling out of the crimps on the connectors for throttle, brake, and hall sensors. i don't know what crimp tool they used but they did a lousy job. I agree that if one uses excess solder and permits it to wick up the wire it can cause it to stiffen, or if it flows down into the connector it can cause problems as well. i have never seen one of my hand crimped / soldered connections fail.
 
Almasi said:
You can get good copy of original crimp tool for about 50$ to 100$ and they work very well!

Soldering the wire on a terminal like that make it rigid and brittle...so I don't suggest that for Ebike unless it's a big power wire that need full connection. Also the solder have flux in it...some flux is water soluble...and some not and corrosif, so it will eat the wire in 2 years.

Robin

some knockoff crimp tools work well, some don't. i doubt any of us is foolish enough to use acid core solder on electrical connections; the typical solder i use has kester 44 or 88 rosin based flux which is non-corrosive and does not require clean-up. 88 is more active and i use it for soldering battery tabs, 44 is gentler and is fine for all other electrical connections.

i generally use the molex "mini-fit jr." type connectors, they are available with 2-18 terminals; i use the 2 and 3 pin for brakes and throttle, and the 6 or 8 pin for hall sensors, and higher pin counts for bms connections, etc. this is the same connector tim uses on the powerpack motor systems for the hall sensors and throttle. the contacts are rated to 8A and typical resistance is 10 milliohms. i would not use them for high power circuits but anything up to a few amps they are great. when the connectors are exposed to the environment i like to seal the wire entry side with plastic epoxy which makes them very weather resistant. they are also quite reasonably priced, and mouser has good stock. Here is a data sheet on this connector family http://tinyurl.com/59h347

the terminals are available in a strip or singly; i pay the extra penny for the single ones. to get an idea of cost, a mated pair of 6P housings cost about $1 and the terminals are about $9/100 from mouser. When i use them i first cut off the longer ears on the insulation covering part of the terminals, then strip the wire to about 2 mm and crimp the forward ears with a pair of needlenose pliers with striations across the jaws. the striations let me get hold of the end of the metal ear and crimp it without it slipping on the jaws. one set of ears covers the insulation and the other bare wire. i usually go around this set of ears with the pliers to get it round and make sure it will fit in the housing, then i then apply .031" solder with a very fine 800F tip to just the ears crimped over the bare wire section, taking care not to wick solder beyond the area where contact is desired. there is absolutely no stiffening of the wire where it exits the housing and no possibility of the rosin flux corroding the contact. this is what it looks like:


mini fit terminal with ears cut.jpgwire prepared for soldering.jpgfirst set of ears crimped.jpgfinished soldered connection.jpg
 
I'm a gearhead, not a sparky. Having said that, I've seen way too many "electrical problems" caused by loose, poor, and intermittent connections. An intermittent connection on a signal wire can be devilishly hard to track down. How much internal joint resistance can you have before before something is affected? In my opinion, anything that can be done to a crimped connection to improve reliability and eliminate variability is well worth it.

I always solder in addition to crimping. Once the decision is made to solder, the only purpose of crimping is to get things properly sized to fit into the connector housing. It doesn't need to be pretty.

My crimping technique is very similar to those mentioned here. I've found that it's easier for me to shape the crimp first to get it started right before inserting the wire. Size the tool for the job. A small needle nose plier with small grips gives much better control.

A frequent mistake when soldering is to use too big of a soldering iron, both in terms of power and in physical size. Irons aren't expensive, get the right one for the job. Same with solder. If you use fine wire solder it's easier to deliver the proper amount of solder and avoid gobs. In my experience, using a heavier flux core solder also contributes to getting too much flux on the joint. The larger diameter core carries more flux, and also, in an effort to not overheat the joint and melt insulation, the heat is removed before the flux fully boils away.

Finally, it really helps to buy or build a small soldering jig that uses a few alligator clips to help hold the wire and connector stationary and in proper alignment. A fringe benefit of this is that the alligator clips act as heat sinks to help protect from overheating insulation. Soldering a fine wire and connector shouldn't take more than 5 seconds. By clamping the alligator clip on the connector as far away from the solder joint as possible, the heat sink effect of the clip isn't really noticed in a short 5 seconds.

Finally, NEVER use acid flux. Don't even think about it. You can't clean it well enough to prevent corrosion. I don't even bother to clean rosin flux residue.

I can see the attraction of crimped joints in a production environment where speed is important or where maintaining proper soldering skills in a variable workforce is a problem. But for home workshop reliability, give me soldered.

MT
 
philf said:
My fellow Canadian, Almasi, commented that soldering makes the wires stiff or brittle. This is absolutely untrue, unless you apply too much heat and solder to them, in which case the solder can wick back up into the wire and stiffen it. Not that I see that as a tremendous issue. Arguably, a small amount of this might HELP with strain relief.


This is what I learned on RACE Car, I'm a profesionnal Tuning expert that spend is time tuning a car on the dyno or making wiring harness for race/street modified car.

http://www.almasituning.com (My company)

I prefer to crimp wire and sometime solder them too(big wire)...reason for that, if you don't heat and clean your connector enough, you soldering job won't be strong enough...and if you do heat it up enough...often the wire will wick back solder in the wire, unless you heat up the connector before the wire(allready prepared with solder on it)

I have tested both for strengh, solder and grimp...and grimp will take more strengh to break it. (If I meet you this summer I will bring 2 connectors with 2 wires...soldered and crimped ...and attached in series...so each pull until it break, then we look who as more wire/connector on is side :p

I guess ...everyone have their own trick.

Robin
 
Almasi,

I agree with your comment about the solder wicking into stranded wire. In your situation, this happens because you must use a lot of heat because the wire is heavy or the connection is dirty, or both. If the connection is dirty and you can't get clean parts, there is not much you can do about it.

But if you have clean parts this may be a situation where you need a *bigger* soldering iron. You need to put a lot of heat into the parts in a hurry to get the temperature high enough to melt solder without having enough time to conduct heat down the length of the wire. Once the wire becomes hot the solder will naturally follow it.

Once the strands have soldered to each other it no longer behaves like stranded wire but instead like solid conductor. All the benefits of stranded wire are gone. Now the wire has very little flexibility and it will break after a few bends or heavy vibration. Wire ties to an anchor point may help keep the wire from vibrating or flexing as long as you cut them before you unplug the connector.

If I need to solder where solder wicking is a concern, I try to apply a heatsink to the wire as close to the solder joint as possible. I have used a small C-clamp, a pair of needle nose pliers (because the jaws are smooth) with a rubber band around the handle to keep the jaws closed, alligator clips, and metal clothespin-like clamps. You can also use a small piece of wet paper towel. The secret is to get in quick with a big enough iron, and then get out.

MT
 
i destroyed a couple of rc motor endbells by using too much solder, then when i ran the motor to full temp the excess solder melted and wicked up the power leads, stiffening them and consequently putting excess torque on the brush assemblies after the solder hardened, and pulling them right out of the molded plastic. Of course this was running a film-can sized motor at 1000w, but the point is to use the absolute minimum amount of solder required to make good contact between the wire and the terminal.

good quality crimp tools are expensive because the hardened faces must be made to very high precision to obtain a gas-tight crimp when the right size wire is used. my experience with less expensive tools has been that they either did not crimp tightly enough or that they would not release the crimped terminal after crimping. The latter was true for a couple of the anderson tools from powerwerx that i used recently; they did a nice job of crimping but it was almost impossible to get the terminal out of the tool without damaging it after crimping. we ended up oiling the tool before each crimp, then soldering anyway. this was not a cheap tool as i recall...

i really think it is important to use a very hot iron, very fine rosin core solder, and clean surfaces before soldering if there is any oxidation. for heavy terminals i like to twist together a half dozen strands of the .031" rosin core solder and use that; it melts more easily than larger diameter solder and still provides the large amount of metal required for large contacts. Of course in a production environment the expensive crimp tools are worthwhile, especially the pneumatic types.
 
Hi Guys,

I don't think we need to let this get heated (no pun intended). We've given the OP some options and plenty to think about.
If you want a tool, then try this
type6a.jpg

Mouser stock number 538-63811-1000

You could always solder it after crimping. And if you want to solder it, then surely its best to crimp it first, as there will be less space between the strands for the solder.

Nick
 
Tiberius said:
Hi Guys,

I don't think we need to let this get heated (no pun intended). We've given the OP some options and plenty to think about.
If you want a tool, then try this
type6a.jpg

Mouser stock number 538-63811-1000

You could always solder it after crimping. And if you want to solder it, then surely its best to crimp it first, as there will be less space between the strands for the solder.

Nick
Thanks, I bought this tool because I always prefer the easiest option, and it arrived yesterday. It does indeed make crimping much easier than normal crimping tools. I can't vouch for the quality of the connection but the ears are bent in the correct shape very easily by the tool.
 
Back
Top