
You are using an out of date browser. It may not display this or other websites correctly.
You should upgrade or use an alternative browser.
You should upgrade or use an alternative browser.
How to increase current on this controller
- Thread starter bigj
- Start date
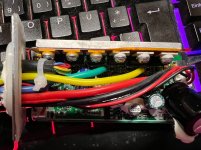
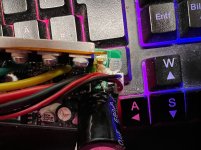

The shunt is the surface mount R002 resistor. The shunt is typically in series with the main battery negative wire. You may be able to solder another surface mount resistor on top of the existing one if you get the right size. Stock is 2 milliohms, so if you want a specific amount of increase, we can do the math on what resistance to place in parallel. Another 2 milliohm in parallel will double the limit, but that may be too much. 4 milliohms in parallel would give you 1.5x stock, which might be more likely to survive.
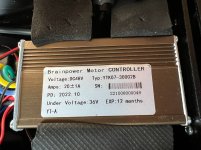
13S3P Samsung E35 with 30A max current BMS.Do you know how many amps your battery can safely discharge? What motor?
If your battery can handle it, just buy a new controller.
Send me link to a controller max length 13 cm. (Shipping to austria)
How exactly would i do that? But i already smoked one of my cheap'o china scooters BLDCCTRL - don't want to invest to much but and don't want to fry my 2nd one, because then 2 scoots / projects are dead..View attachment 336300
The shunt is the surface mount R002 resistor. The shunt is typically in series with the main battery negative wire. You may be able to solder another surface mount resistor on top of the existing one if you get the right size. Stock is 2 milliohms, so if you want a specific amount of increase, we can do the math on what resistance to place in parallel. Another 2 milliohm in parallel will double the limit, but that may be too much. 4 milliohms in parallel would give you 1.5x stock, which might be more likely to survive.
Anyways parallel means soldering on top of it? Maybe some type of wire which would do the job?
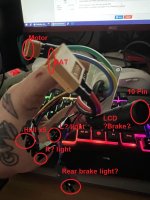
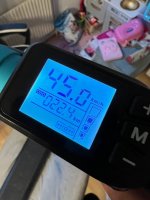
The Motor looks outside identical to a Vsett 8 Motor which is rated 600 Watts continuous.. which doesnt mean to much... I can say with my "higher weight" doing slopes and normal + mixed and fast driving i already manched to reach ~75°C on the hottest outside point of the motor. (Meausured with flir thermal) - whats the max?
** Also: I searched hours for a little "bigger" CTRLer with 9 Fet's ~12-14CM (dont have more space in lenght), but aliexpress wont send to me. Any other recommendations? Without paying 200 € ~ with new display?
Thank you!
** Added picture
Attachments
Last edited:
It's a bit hard to see in the picture. Typically you can just lay another resistor on top of the existing one and solder the ends.
75C is pretty hot. Inside it's going to be even hotter. I wouldn't let it go higher than that. I try to keep mine below 60C.
There are some VESC based controllers that are very compact, but they aren't cheap and there is a lot of programming involved to set them up.
75C is pretty hot. Inside it's going to be even hotter. I wouldn't let it go higher than that. I try to keep mine below 60C.
There are some VESC based controllers that are very compact, but they aren't cheap and there is a lot of programming involved to set them up.
Can i buy that set? https://www.amazon.de/Benefischl-Sttcke-Legierung-Widerstand-Probe/dp/B0BLNRRN1X/It's a bit hard to see in the picture. Typically you can just lay another resistor on top of the existing one and solder the ends.
I think the outside climbed so much because of the rear drumbrake. :/ Got one motor in spare if it fries up the internals.75C is pretty hot. Inside it's going to be even hotter. I wouldn't let it go higher than that. I try to keep mine below 60C.
Well thats to much investment and time spent in this particular model if the motor really sucks that hard.There are some VESC based controllers that are very compact, but they aren't cheap and there is a lot of programming involved to set them up.
Any Idea which stock controller i could use?
Seems like this is at least identical from the size: https://www.amazon.de/Aigend-Controller-bürstenloser-wasserdichter-Elektroroller/dp/B08G1PXTF2
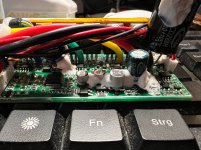
*Added picture of stock controller + display.
Attachments
If you use wire, you are basically preventing the controller from measuring current at all, and so it can't protect itself at all from overcurrent.Anyways parallel means soldering on top of it? Maybe some type of wire which would do the job?
Even modifying the shunt resistance at all means it can't correctly measure the current, and so it can't know when overcurrents are happening that can cause damage or failures. That's what the shunt is there for--to keep the controller from allowing currents that can damage itself. If the shunt isn't reasonably accurate, neither are the measurements it makes, and so neither are the protection mechanisms in the controller.
Some controllers will survive this, some are already designed at the edge of their components' capabilities, and tend to fail when modified for higher current. Experimentation is generally required to find out which.
")
Sometimes you can just enhance the controller's cooling of it's FETs, and sometimes it's interior cooling, such as by forced-fan ventilation, or bigger heatsink on the FETs, etc., and help it survive if it wouldn't without that. Sometimes it's as simple as putting the controller out in the airflow vs being built inside a frame/box/etc where it cant' get rid of the heat it generates.
The stock controller says 20A. The one in the Amazon link is only 15A, so will be weaker. You might want to look for one that's rated for something over 20A.
The resistor kit may have what you need, but you want to check the physical size of the stock shunt resistor and find one that's the same physical size. The kit says 2512, which is 6.3mm x 3.1mm.
The resistor kit may have what you need, but you want to check the physical size of the stock shunt resistor and find one that's the same physical size. The kit says 2512, which is 6.3mm x 3.1mm.
Similar threads
- Replies
- 0
- Views
- 55
- Replies
- 23
- Views
- 383
- Replies
- 8
- Views
- 219