HXT, Staton gearbox, NuVinci build.

Hardcarve1

100 W
Joined
Dec 22, 2008
Messages
125
Location
Brisbane, Australia
Just though I would share details of my build as I have wanted to convert from my ICE to electric.
I have been using Staton drives on my commuter bikes for a few years now with thousands of K's of trouble free travel. I wanted to do the same with electric but I must have reliabilty as my trip to work and back is 50Km.
Having lots of years behind me in RC heli''s I though may as well go the RC path. I know using RC gear is not as reliable as hubs but the more that work out the problems the quicker we will all be on RC style bikes.
I have been using a NuVinci hub for a while now and find it very reliable and friendly to use and the way Staton mods them to be driven from the gear box I thought I would stay with the setup.
002.JPG
As I only have limited funds each month I have had to progress slowly and while waiting did my design for the gearbox. At first I wall going to mount all the electronics & batteries around the gearbox like this.
View attachment Electric power head.pdf
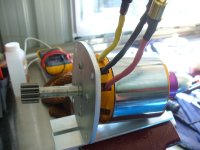
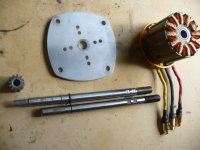
To make to HXT fit the gearbox I had to make an engine adapter plate that I had laser cut from 5mm aluminium along with a new shaft. The gearbox needed to have the imperial bearings form the old clutch machined to suit the new metric bearings for the shaft. I was lucky to find just the right bearing at VXB.com that did the job.
While I had the motor apart I put new ceramic bearings in as well as epoxy all the magnets in.
Electric bike 002.JPG
Electric bike 007.JPG
 
This is the completed gearbox.
 
As for the rest of the build, I will be using CC110HC controler with added caps. The throttle I still have to build but I have an idea on how to modify a servo tester a little different to how most hear have done. As for batteries I will use A123 config. at first to be 12s4p and charging them in 6s1p on a Rc charger.
Cheers.
Alex
 
Hardcarve1, looks great! It looks like the output sprocket is using a roller-locked one-way bearing, instead of the cheaper pawl-style clicking freewheel. If yes, which part number is it, and does is work smoothly and quietly?
 
Nice work, hardcarve.

Have you done any calcs on a theoretical top speed?

Will be interesting to see your comparison between electric vs ICE - I bet the ICE boys will be interested as well. :D
 
Hardcarve,

Nice work and I can't wait to hear about the result, especially regarding sound and durability of the spiced up HXT and controller. I prefer big packs, so I only need to charge every few days, but as long as you can charge at work the 48 A123s may be enough unless you plan to ride fast. I'm sure dumping the smoker will make for a more peaceful commute.

Please keep us posted.

John
 
Spinner,
The drive sprocket is a standard 22T freewheel that I have put many miles through and apears bullet proof. The extra load being placed on it I think should be OK.

Grinhill,
My need for speed is only to do the trip to work in less than an hour so I only need to cruise at 30-35k's. and at this stage untill I can afford more battery I will just need to charge at work.
By my calcs.
I have a 130kv motors that I think under load will drop 12 x A123's from 39.6v(3.3v/cell) down to 36v(3.0v/cell) and that gives me 4680rpm loaded motor. This is only my guess and I base this on no real kowledge just gut feel on flat ground.
So 4680rpm into the gearbox with a 18.75 reduction gets me 250rpm shaft output.
The gearbox has a 22t sprocket driving a 27 sprocket on the hub = 0.8 reduction.
My hookworm tyres measure 680mm diameter with a circumfrenec of 2.136m. Sorry for the long winded explanation but I just would like any errors pointed out to me.
So from this I get a top speed of 25.6km when the hub is geared at 1:1.
At low setting the ratio of the hub is input 1 = output 0.5
And at high ratio the hub is input 1 = output 1.75
That should give me low end of (12.8km 7.95mph) an top end of (44.8km 27.8mph) I made a error on the speeds first time and have fixed thrm up.

Cheers
Alex
 
I think your gearing sounds great! Good ratios. Great blend of torque to climb the steepest hills, and a high enough gear to cruise along at fair pace.

Great looking project! Good job!
 
Sounds like a cool setup. Personally, I would gear it to more than 28 mph. My buddy geared his for 40 mph and it still has the torque on the low end to pull wheelies easily on his full size mountain bike! I would gear it for 35 mph loaded, the motor still wouldn't have to work too hard for that. On 44V and 110 amps I think the Turnigy and CC HV110 could easily top 50 mph to be honest. These setups are amazingly powerful and snappy. Good luck!
 
Due to two operations and a stint in hospital I have not done much work on the bike untill today.
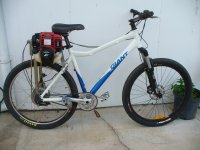
I have mounted the gearbox to the bike and connected all the chains and tensioners. Work has started on the speed controller with some extra caps and bec added.
Electronics is my weak point and while I think I have my head around it from all the great info on this site I feel I need to go slow not to BBQ anything.
I think the comments about the speed are right and I will get a smaller sprocket for the Nuvinci hub. I have done some bench testing to see how all the drive system looks and sounds and found it was very quiet but I guess thats due to the low speed gearing I have.

Cheers
Alex
 

Attachments

  • 027.JPG
    027.JPG
    268.7 KB · Views: 3,804
  • 030.JPG
    030.JPG
    337.4 KB · Views: 3,806
  • 028.JPG
    363 KB · Views: 3,796
This build looks great!

Great choice on the ceramic bearings :) You will never need to worry about bearing failure on that motor :)

Very cool setup! I'm excitied to see how it runs for you :)
 
Hi Alex; I have the same 130 motor that I am going to use with a first stage #25 chain reduction, I took the motor apart to check the bearings for lube. the bearing looked to small to handle much side load, so I will add a out board bearing.

Your added lenght of shaft to get the gear in the right place, to me adds too much of a lever arm, that will strain the small bearing in the motor.

You have lots of room to add a outboard bearing to the new plate/adapter.

The closer to the gear the better.

Jim
 
Hi Alex,

Nice job :)!

Any issues (or additional details) on mounting the two sprockets on the right side of the Nuvinci?

Does the sprocket on the Nuvinci that is driven by the pedals have a FW?

When you get it running please let us know how quiet (or noisy) the Staton GB is.
 
I dont expect to have any problems with side load on the bearings like the belt drives which is one reason I went with a gearbox. You can see in the CAD drawing that while the output shaft is long it is supported by two large bearings and in fact has very little side loading.

The sprockets on the NuVinci are what came from Staton and are all very well made. The peadals are FW to the sprocket on the wheel and are FW to the hub, the system all works very well and is very robust.

Cheers
Alex
 

Attachments

  • Gearbox.jpg
    Gearbox.jpg
    139.5 KB · Views: 1,699
Did Staton in a time past offer a 18:1 gear box with both a gas engine, and electric motor input- longer shaft, or something?
 
Great build!
I am pondering a Stanton 5:1 or 18.75:1 gearbox for my powerpack motors 48V build. The NuVinci with 44T gear would be the perfect fit to simplify and improve the drive train so I will follow your build closely. Thank you for the information and I hope you are feeling better from your recent hospitalization.
 
Hi all,
Just another update on this project.
I have started getting all the electrical elements together and wanted to house them in some sort of weather proof enclosure. I also wanted some safety system that could shut down the system encase a problem accrued. I don’t have a great deal of knowledge on electronics but figured having a contactor was a way to deactivate the system if the sh#t hits the fan as well as saving the life of my connectors.
The system comprises of #8 gauge power cabled and a 500v 100amp fuse http://www.evworks.com.au/index.php?product=FUS-FWH-100B this goes to a 400 amp continuous contactor http://www.evworks.com.au/index.php?product=REL-ZJW400A . I wired a 5W 40ohm precharged resistor between the contacts to eliminate any arcing. The CA shunt is next before the 200amp throttelizer and the CC HV 110 speed controller. I found a real neat 12v marine switch which is all rubber coated and weather proof, this is mounted on my brake lever right above the thumb throttle. I used a CC BEC PRO to power the contactor and cooling fan and in future some LED lights.
I mounted all this on a 5mm poly board to make it easy to work on as it come out all in one piece and made sure I had no other conductive material in the hosing to eliminate shorts. All cables exiting the case are fitted with glands and sealed. I may fit a switch on the case for the precharged resister just so I can have the batteries connected when riding but have no power to the fan or contactor.
I have bench tested the system and it works a treat and feel confident in the system. If things could be done better please feel free to comment.
 

Attachments

  • 011.JPG
    011.JPG
    248.8 KB · Views: 5,334
  • 017.JPG
    439.4 KB · Views: 5,330
JEB said:
Did Staton in a time past offer a 18:1 gear box with both a gas engine, and electric motor input- longer shaft, or something?

Staton has had this http://www.staton-inc.com/Details.asp?ProductID=3319 on his website for 1-1/2 years now. But it still says: Do not contact us about this with any questions---Still in the testing stage--- etc. It could be pretty useful if he does eventually offer it.
 
For some reason I managed to fry the controller and throttelizer just after I did the final install and before I could use the bike. So I sent the controller back for repair and Andrew from Evlogix helped repair the throttelizer and give me some advice which was most helpful. I went back and simplified things and deleted the contactor and reduced the chances of any shorting. Put the thing together and used a 12s1p of A123 batteries for some trial runs to make sure things work. The bike is great and I can’t believe how good it goes on such a small battery. I have no speed readings at this stage as I have not hooked up the CA speedo but I would thinks it’s around 40kmh and I get about 5k range on flat ground. The drive is remarkable quiet with very little chain or gearbox noise unlike the 50cc ICE I had on which made a racket. The NuVinci is a joy to use and makes riding so much better and heaps better acceleration so I would highly recommend one.
I will make up a bigger pack of cells but I really want to get some of the 20ah that cellman has which I think would get me about 40 – 50 range for my 27k trip to work.
 

Attachments

  • 001.JPG
    349.5 KB · Views: 5,324
  • 002.JPG
    002.JPG
    245.7 KB · Views: 5,322
  • 005.JPG
    005.JPG
    189.7 KB · Views: 5,320
  • 006.JPG
    006.JPG
    243.5 KB · Views: 5,327
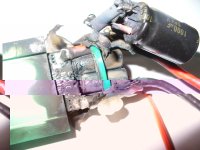
Went out for my fourth ride today and did the same circuit that I have been taking before so nothing special and I was just as easy on it than ever before. I was freewheeling along a path and had not use throttle for about 30 seconds when I heard what sounded like venting gas coming from the controller box. Flames were exiting the vent holes and I went into a panic, disconnected the battery and tried to put the fire out. Pictures explain with happened which still puzzles me as I was not using throttle and all other times the controller was only warm. All I can think of is that I have not soldered the caps on correctly and they have shorted out. One thing I noticed too was one of the 6 cell back was dead and could not read a voltage with the LV checker so not sure if one cell is dead or what. The other 6 cells were OK.
I have sent this controller to Castle Creations before for non warranty work will they repair this again or do you only get one chance?
I really think this RC stuff is a bit much for me and are seriously thinking of going to a sensor motor.
 

Attachments

  • 003.JPG
    354.6 KB · Views: 5,324
  • 006.JPG
    006.JPG
    154.3 KB · Views: 5,322
Hardcarve1 said:
Went out for my fourth ride today and did the same circuit that I have been taking before so nothing special and I was just as easy on it than ever before. I was freewheeling along a path and had not use throttle for about 30 seconds when I heard what sounded like venting gas coming from the controller box. Flames were exiting the vent holes and I went into a panic, disconnected the battery and tried to put the fire out. Pictures explain with happened which still puzzles me as I was not using throttle and all other times the controller was only warm. All I can think of is that I have not soldered the caps on correctly and they have shorted out. One thing I noticed too was one of the 6 cell back was dead and could not read a voltage with the LV checker so not sure if one cell is dead or what. The other 6 cells were OK.
I have sent this controller to Castle Creations before for non warranty work will they repair this again or do you only get one chance?
I really think this RC stuff is a bit much for me and are seriously thinking of going to a sensor motor.

Sorry to hear about your problems at least it wasnt the whole bike that went up in flames.
Its well documented on this forum how to convert outrunners to sensored motors.
 
gwhy! said:
Its well documented on this forum how to convert outrunners to sensored motors.
I would say that it is well documented if you have some working knowledge of adding sensors and wiring them.
Not so well documented if you are a beginner.
 
TPA said:
gwhy! said:
Its well documented on this forum how to convert outrunners to sensored motors.
I would say that it is well documented if you have some working knowledge of adding sensors and wiring them.
Not so well documented if you are a beginner.


Its not to bad, I think all the info is on here somewhere its just spread about a bit...
 
The cost of a sensored solution is certainly much better compared to those Castle Cremations :lol: rofl.... :lol: :mrgreen:
 
Back
Top