If you have a combination shifter and brake on your bike, none of them are made with an ebrake sensor. Mine is a Shimano EZ Fire Plus. I installed the combination unit to free up some real estate for a twist throttle. It has otherwise worked out well, except for the lack of an ebrake sensor. An ebrake sensor sends a signal to the controller to disengage the cruise function (or throttle) when the brake lever is pulled. A lot of us run without them, but it can be a safety issue if you have a conroller with "automatic latching" for the built-in cruise function. Mine has this cruise function, so I wanted to add the ebrake sensor for safety during a panic stop. I looked at a couple of different options and selected the one I thought had the best fit and looks. There are other ways to do this, but here is what I did. I tried to make this a step-by-step for first timers so all you experienced guys may find it boring.
Material List
1. Ebike Brake lever for EV Global Ebikes, right hand side (purchased on Ebay from electricwheelsofflorida)
2. Two SM connectors (purchased bag of misc connectors from http://www.ebikes.ca)
3. Two conductor cable (salvaged from an old thumb throttle) I had to extend mine to reach the controller
4. Super glue
5. 7/64 drill bit
6. Set punch
Remove Parts from EV Global E-brake
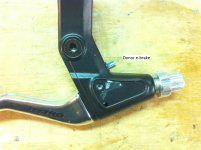
Locate the plastic housing on top of the ebrake. It is open and obvious on top of the brake housing. The tiny sensor is inside, so don't be rough with it. You remove the plastic sensor from the new ebrake housing by removing the tiny screw and then prying gently around the edge of the sensor. Mine had a dab of either paint or some type glue holding it (in addition to the screw), but only a very small amount. It should come off fairly easily. Be careful not to mar the soft plastic around the edge for appearance sake. After removing it, pull the brake lever open and you will see the tiny round magnet that is positioned over top side brake cable barrel. It has the same tiny screw (as the sensor) holding it onto the cable barrel. Remove the screw and it will come off easily. Set aside with the sensor, as both these items will be installed on your existing combination shifter/brake.
At this point, I test fitted both the sensor and magnet on my combination shifter/brake to make sure they fit and also worked correctly. I tested the function for continunity with a multimeter --- worked perfectly. There is a lot of space in the area of my brake handle, and there were no clearance issues.
Installation on Combination Shifter/brake Unit
Pull the brake lever open and place the magent directly onto the top of the cable barrel. You will not be able to use the small screw (like the original), but no matter as barrel is steel and the magnet stuck to it securely without anything holding it. I went ahead and cleaned the top of the barrel with alcohol and used super glue anyway. It should never come loose from this position. This is the same location as it was on the new ebrake.
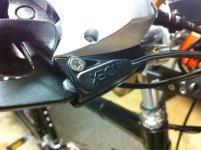
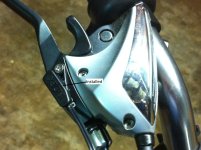
Next, I placed the sensor on top of the brake housing, similar to the position it was in on the donor brake. Take a sharpie (or other marker) and mark the location of the hole for your tiny screw that holds the unit on. Set the sensor aside and you should see your mark on the housing. I used a set-punch to make an indent in the aluminum housing so the drill bit would not walk. I started the hole with the smallest bit I had (1/16th) and went up one bit at a time to the 7/64th bit. After the hole is complete, take the small screw and a phillips driver and screw it into the housing. The hole is just the right size to allow a good bite, but not so tight that it will not fit. The screw is steel and the housing is aluminum, so the screw cuts it's own threads just right. Remove the screw and place the sensor back onto the housing, this time afixing it to the housing with the screw. The sensor installation is complete.
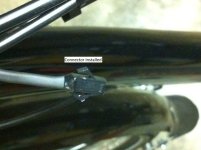
Test the function with a multimeter to make sure you get continunity between the two leads when the brake lever is pulled. All that's left now is to install your connector(s) to fit your controller. I had to run an extension wire to my controller, as the wire on the sensor was not long enough to reach my controller. Your mileage may vary.
This was an easy mod and it has a nice appearance as well. The setup works perfectly and allows me to have an ebrake and use the Shamino combination shifter/brake. See pics below for detail.

View attachment 4
View attachment 3


Material List
1. Ebike Brake lever for EV Global Ebikes, right hand side (purchased on Ebay from electricwheelsofflorida)
2. Two SM connectors (purchased bag of misc connectors from http://www.ebikes.ca)
3. Two conductor cable (salvaged from an old thumb throttle) I had to extend mine to reach the controller
4. Super glue
5. 7/64 drill bit
6. Set punch
Remove Parts from EV Global E-brake
Locate the plastic housing on top of the ebrake. It is open and obvious on top of the brake housing. The tiny sensor is inside, so don't be rough with it. You remove the plastic sensor from the new ebrake housing by removing the tiny screw and then prying gently around the edge of the sensor. Mine had a dab of either paint or some type glue holding it (in addition to the screw), but only a very small amount. It should come off fairly easily. Be careful not to mar the soft plastic around the edge for appearance sake. After removing it, pull the brake lever open and you will see the tiny round magnet that is positioned over top side brake cable barrel. It has the same tiny screw (as the sensor) holding it onto the cable barrel. Remove the screw and it will come off easily. Set aside with the sensor, as both these items will be installed on your existing combination shifter/brake.
At this point, I test fitted both the sensor and magnet on my combination shifter/brake to make sure they fit and also worked correctly. I tested the function for continunity with a multimeter --- worked perfectly. There is a lot of space in the area of my brake handle, and there were no clearance issues.
Installation on Combination Shifter/brake Unit
Pull the brake lever open and place the magent directly onto the top of the cable barrel. You will not be able to use the small screw (like the original), but no matter as barrel is steel and the magnet stuck to it securely without anything holding it. I went ahead and cleaned the top of the barrel with alcohol and used super glue anyway. It should never come loose from this position. This is the same location as it was on the new ebrake.
Next, I placed the sensor on top of the brake housing, similar to the position it was in on the donor brake. Take a sharpie (or other marker) and mark the location of the hole for your tiny screw that holds the unit on. Set the sensor aside and you should see your mark on the housing. I used a set-punch to make an indent in the aluminum housing so the drill bit would not walk. I started the hole with the smallest bit I had (1/16th) and went up one bit at a time to the 7/64th bit. After the hole is complete, take the small screw and a phillips driver and screw it into the housing. The hole is just the right size to allow a good bite, but not so tight that it will not fit. The screw is steel and the housing is aluminum, so the screw cuts it's own threads just right. Remove the screw and place the sensor back onto the housing, this time afixing it to the housing with the screw. The sensor installation is complete.
Test the function with a multimeter to make sure you get continunity between the two leads when the brake lever is pulled. All that's left now is to install your connector(s) to fit your controller. I had to run an extension wire to my controller, as the wire on the sensor was not long enough to reach my controller. Your mileage may vary.
This was an easy mod and it has a nice appearance as well. The setup works perfectly and allows me to have an ebrake and use the Shamino combination shifter/brake. See pics below for detail.

View attachment 4
View attachment 3


