Originally I had a kit with stock controller, new version, so no OSF possible.
I bought an old version controller from China and flashed it with OSF, using stock display VLCD5, which worked great.
However, the reliability of VLCD5 is questionable, so after a few crashes, the internal spring connectors went dodgy, and the display stopped working eventually.
So, I bought a XH-18 display, which is 6 pin, with a 8 pin to 6 pin adapter cable, and rebuilt the conversion.

I like it because the twist assist level control is very nice to use.
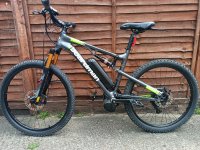
The build base is a Rocky Mountain ETSX-10, which is very solid and capable, featuring 140mm front air fork and 5" adjustable Fox FloatR in the back. I like how it handles bumpers very much.
Being a dual suspension bike, it has just enough space for a battery in the frame triangle. Not many bikes can do this nowadays.

To fit the motor to a dual suspension bike, one can't use the stock fitting, so I made something like this in the picture, without which the motor housing will rotate to touch the tube and eventually most likely crack the housing.

This how it looks like when finished.

I only used the 8 pin to 6 pin adapter cable for testing, and used the 8 pin cable from old display instead, by soldering all lengths of wire needed together.
The pinout of the cable to the controller is as following:

The Xh-18 pinout is here:

I need connections as such:
TSDZ2 < - > XH-18
Blue green
Red white
Yellow Orange
Brown Brown.
This is for the display, I need throttle too as sometimes I don't feel like peddling, such as after a long hard day.
The throttle connections are as such:
TSDZ2 < - > Throttle
Orange Blue
White Red
Black Black
And brake sensors are also very helpful, as I need lights to flash when braking. I Also love the feature of startup assist without peddling, for the sake of which when I am waiting for green traffic light I put my foot on the peddle while braking, if I loose the brake lever and it will assist startup immediately, which is a very nice feature.
The brake sensors for hydrolic brakes need to be bought separately, and they are installed like this using double-side sticky tape:

The connection for brake sensors are as such:
TSDZ2 < - > Brake sensor
Black Black
Green Red
It is just a switch controlled by a magnetic metal object. If you have two sensors, just connect them in parallel.
It looks like for XH-18 to work, when you configure it with brake sensor while flashing OSF, you will need all the sensors in non-braking position, which means no signal passed to the controller.
The lights are controlled through a cable connecting the speed sensor, it is like a Y adapter, which splits the cable from the controller to the speed sensor and light. This Y adapter is part of new speed sensor cable which needs to be purchased seperately too.

Front light is my old headlamp (very bright and adjustable), while the rear light can be any rear reflector, on which I drilled a hole and insert a super bright straw hat 3V LED bulb in.


As to light configuration, I set E02 to 2, and E03 to 6 (press light button to get to E02 and E03 displayed,while assist level is set at 4. For setting details, please read the manual here TSDZ2-Smart-EBike-1/manuals at master · emmebrusa/TSDZ2-Smart-EBike-1. ) I prefer 6 as it flashes even the lights are no turned on. If you don't want them to flash, just select E02.

You don't want them to flash all the time, as at night you need steady front light.
This conversion makes the bike so powerfull that I can climb up downhill trails with ease. Therefore I feel like upgrading the front brake disc to 200mm from stock 160mm will help.

It is a very easy upgrade, just buy the disc and a PM adapter.
I am very happy with the build. Now I love riding it more than driving.
Only issue is, that the odometer reset itself occasionally, not back to zero, but to 1.6km, which is the strangest thing I have ever wondered at.
I bought an old version controller from China and flashed it with OSF, using stock display VLCD5, which worked great.
However, the reliability of VLCD5 is questionable, so after a few crashes, the internal spring connectors went dodgy, and the display stopped working eventually.
So, I bought a XH-18 display, which is 6 pin, with a 8 pin to 6 pin adapter cable, and rebuilt the conversion.
I like it because the twist assist level control is very nice to use.
The build base is a Rocky Mountain ETSX-10, which is very solid and capable, featuring 140mm front air fork and 5" adjustable Fox FloatR in the back. I like how it handles bumpers very much.
Being a dual suspension bike, it has just enough space for a battery in the frame triangle. Not many bikes can do this nowadays.
To fit the motor to a dual suspension bike, one can't use the stock fitting, so I made something like this in the picture, without which the motor housing will rotate to touch the tube and eventually most likely crack the housing.
This how it looks like when finished.
I only used the 8 pin to 6 pin adapter cable for testing, and used the 8 pin cable from old display instead, by soldering all lengths of wire needed together.
The pinout of the cable to the controller is as following:
The Xh-18 pinout is here:
I need connections as such:
TSDZ2 < - > XH-18
Blue green
Red white
Yellow Orange
Brown Brown.
This is for the display, I need throttle too as sometimes I don't feel like peddling, such as after a long hard day.
The throttle connections are as such:
TSDZ2 < - > Throttle
Orange Blue
White Red
Black Black
And brake sensors are also very helpful, as I need lights to flash when braking. I Also love the feature of startup assist without peddling, for the sake of which when I am waiting for green traffic light I put my foot on the peddle while braking, if I loose the brake lever and it will assist startup immediately, which is a very nice feature.
The brake sensors for hydrolic brakes need to be bought separately, and they are installed like this using double-side sticky tape:
The connection for brake sensors are as such:
TSDZ2 < - > Brake sensor
Black Black
Green Red
It is just a switch controlled by a magnetic metal object. If you have two sensors, just connect them in parallel.
It looks like for XH-18 to work, when you configure it with brake sensor while flashing OSF, you will need all the sensors in non-braking position, which means no signal passed to the controller.
The lights are controlled through a cable connecting the speed sensor, it is like a Y adapter, which splits the cable from the controller to the speed sensor and light. This Y adapter is part of new speed sensor cable which needs to be purchased seperately too.
Front light is my old headlamp (very bright and adjustable), while the rear light can be any rear reflector, on which I drilled a hole and insert a super bright straw hat 3V LED bulb in.
As to light configuration, I set E02 to 2, and E03 to 6 (press light button to get to E02 and E03 displayed,while assist level is set at 4. For setting details, please read the manual here TSDZ2-Smart-EBike-1/manuals at master · emmebrusa/TSDZ2-Smart-EBike-1. ) I prefer 6 as it flashes even the lights are no turned on. If you don't want them to flash, just select E02.
You don't want them to flash all the time, as at night you need steady front light.
This conversion makes the bike so powerfull that I can climb up downhill trails with ease. Therefore I feel like upgrading the front brake disc to 200mm from stock 160mm will help.
It is a very easy upgrade, just buy the disc and a PM adapter.
I am very happy with the build. Now I love riding it more than driving.
Only issue is, that the odometer reset itself occasionally, not back to zero, but to 1.6km, which is the strangest thing I have ever wondered at.
Last edited: