cbr shadow
1 kW
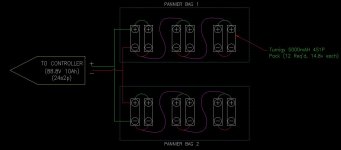
Ok so I'm purchasing (12) Lipo batteries below:
http://www.hobbyking.com/hobbyking/store/__18631__Turnigy_5000mAh_4S1P_14_8v_20C_hardcase_pack_USA_Warehouse_.html
And this charger & power supply combo: ($240! good deal?)
http://epbuddy.com/index.php?main_page=product_info&cPath=17_20&products_id=170&zenid=f6iq68sjuvmj80hd5aprv8h6p3
Unless there's something very obvious about this setup I would rather not get suggestions on other battery types as this seems to be the best price right now and I have several lipo questions below that I'd like to get answered.
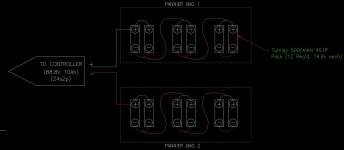
1) Please see attached jpg that I've attached. Does this look correct?
2) How will charging work on this? What do I need to connect/disconnect to charge or balance?
3) Is there anyone on the forum that is known for making custom wiring harnesses for things like this I'd rather buy from someone that make my own.
4) I noticed that on hobby king I'll sometimes get a message saying I can get a discount because I've had the window open for so long.. is there a way to get this come up before I buy these?
I'm looking to purchase right away, so any Lipo experts your help is really appreciated.
http://www.hobbyking.com/hobbyking/store/__18631__Turnigy_5000mAh_4S1P_14_8v_20C_hardcase_pack_USA_Warehouse_.html
And this charger & power supply combo: ($240! good deal?)
http://epbuddy.com/index.php?main_page=product_info&cPath=17_20&products_id=170&zenid=f6iq68sjuvmj80hd5aprv8h6p3
Unless there's something very obvious about this setup I would rather not get suggestions on other battery types as this seems to be the best price right now and I have several lipo questions below that I'd like to get answered.
1) Please see attached jpg that I've attached. Does this look correct?
2) How will charging work on this? What do I need to connect/disconnect to charge or balance?
3) Is there anyone on the forum that is known for making custom wiring harnesses for things like this I'd rather buy from someone that make my own.
4) I noticed that on hobby king I'll sometimes get a message saying I can get a discount because I've had the window open for so long.. is there a way to get this come up before I buy these?
I'm looking to purchase right away, so any Lipo experts your help is really appreciated.