mjp8081
100 W
So I wanted to document my build a bit, to share some of the problems and solutions I encountered so that maybe it will help other people. I wanted to thank everyone that has been answering my posts, especially torqueboards, who is especially generous with his knowledge and time. PICTURES TO COME
THE BUILD***
My main consideration was to keep it inexpensive and use parts I already have. I have more time than money at this moment in my life so, I tried to shave off a few dollars wherever I could by combing the internet for the best deals. I am a big fan of buying cheap tools (ala Harbor Freight) for one particular project.
Everything is working extremely well after a few weeks of use. The only thing I will upgrade is a couple more batteries for more ride time.
THE PARTS***
MBS COMP 95, Matrix trucks, Black RockStar Hubs
Kenda (dual tread) Tires
2x Tacon BigFoot 160 245k Motors (HobbyPartz)
60 Tooth Aluminum Wheel Sprockets (VEX Robotics)
10 tooth 8mm dual set screw hub sprockets (eBay)
2x Turnigy TrackStar 200A ESC (HobbyKing) With these I removed the dual cooling fans, they don't seem to heat up all that much, plus it's pretty cool where I live and they get airflow naturally.
Turnigy 5A/40V SBEC (HobbyKing)
2x 4S (8S) Zippy 45C Batteries (HobbyKing)
DC-4S Charger/Balancer (HobbyKing) I bought one for each battery. When they are not connected to the DC charger they read the voltages without much draw, so I leave them plugged in.
Custom length #25 drive chain (electricscooterparts.com)
7.5" x 10" 1/4"-thick aluminum plate from eBay
2X Aluminum Mounting Bracket For 57mm NEMA23 Stepper Motor
Also, I'm super glad my local ACE Hardware had all the exact bolts/nuts/washers I needed, metric and otherwise.
Some Notes***
I had to upgrade my rear (drive) Rockstar hubs to the black version because they use an aluminum spacer on the inside rim rather than plastic, so I could tighten down the whole 5-bolt hub and sprocket assembly without it bending/collapsing in the middle, which is what the plastic one was doing. I used an old 5/8" cutting board to make 2 circular spacers between the inside hubs and the sprockets.
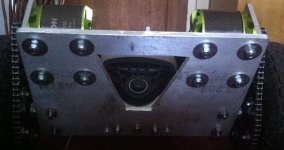
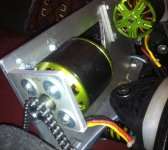
I started with a 7.5" x 10" 1/4"-thick aluminum plate from eBay, bolted it to the flat bottom of the Matrix trucks. Then used 2X Aluminum Mounting Bracket For 57mm NEMA23 Stepper Motor to get the right angle. I found out when I got them that the 4 mounting holes on the side WITHOUT the central motor shaft hole align perfectly with the mounting bolts on the motors. So I drilled another central hole and mounted the motors to that side. I cut out a triangular piece to cut weight and work as a handle. I cut it by drilling 4 holes at the corners and then a jigsaw with a metal cutting bit to cut straight lines between them. Metal files smoothed out the edges.


If you buy wheel bearings, make sure to check quality against price. I bought a 10-pack of ultra cheap bearings only to find out when they arrived that the seals didn't fit and they leaked grease.
Make sure you keep all the drilling/sawing metal flakes with aluminum away from the HIGHLY magnetic open cased motors.
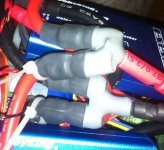
I had to connect a variety of 5.5mm, 8mm, banana, male, female connectors, and I wanted to do it non-destructively, to keep the motors, batteries, ESCs, etc wires intact in case I needed to return anything, So I bought 10-packs of matching male and female gold connectors in the sizes I needed and silver soldered them into the various adapters and connectors I needed, then insulated them with shrink tube or just coated them with A/B epoxy. I used 3/10-gauge braided wire to run from the ESCs to the motors. 12 would have worked.

One problem I encountered was a fairly loud "wailing" keening sound at higher speeds. It was mostly because my chains were too tight, that is, without a small bit of slack. I think if I used thicker wheel sprockets, or just steel, it would probably eliminate it completely.
I used a bit of Shoe-Goo in place of thread lock
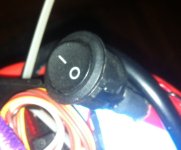
I wired in a toggle switch between the two batteries where the 2 positive connect as a main power switch. That way I can leave the ESCs in the "on" postion and start everything up simultaneously.

THE BUILD***
My main consideration was to keep it inexpensive and use parts I already have. I have more time than money at this moment in my life so, I tried to shave off a few dollars wherever I could by combing the internet for the best deals. I am a big fan of buying cheap tools (ala Harbor Freight) for one particular project.
Everything is working extremely well after a few weeks of use. The only thing I will upgrade is a couple more batteries for more ride time.
THE PARTS***
MBS COMP 95, Matrix trucks, Black RockStar Hubs
Kenda (dual tread) Tires
2x Tacon BigFoot 160 245k Motors (HobbyPartz)
60 Tooth Aluminum Wheel Sprockets (VEX Robotics)
10 tooth 8mm dual set screw hub sprockets (eBay)
2x Turnigy TrackStar 200A ESC (HobbyKing) With these I removed the dual cooling fans, they don't seem to heat up all that much, plus it's pretty cool where I live and they get airflow naturally.
Turnigy 5A/40V SBEC (HobbyKing)
2x 4S (8S) Zippy 45C Batteries (HobbyKing)
DC-4S Charger/Balancer (HobbyKing) I bought one for each battery. When they are not connected to the DC charger they read the voltages without much draw, so I leave them plugged in.
Custom length #25 drive chain (electricscooterparts.com)
7.5" x 10" 1/4"-thick aluminum plate from eBay
2X Aluminum Mounting Bracket For 57mm NEMA23 Stepper Motor
Also, I'm super glad my local ACE Hardware had all the exact bolts/nuts/washers I needed, metric and otherwise.
Some Notes***
I had to upgrade my rear (drive) Rockstar hubs to the black version because they use an aluminum spacer on the inside rim rather than plastic, so I could tighten down the whole 5-bolt hub and sprocket assembly without it bending/collapsing in the middle, which is what the plastic one was doing. I used an old 5/8" cutting board to make 2 circular spacers between the inside hubs and the sprockets.
I started with a 7.5" x 10" 1/4"-thick aluminum plate from eBay, bolted it to the flat bottom of the Matrix trucks. Then used 2X Aluminum Mounting Bracket For 57mm NEMA23 Stepper Motor to get the right angle. I found out when I got them that the 4 mounting holes on the side WITHOUT the central motor shaft hole align perfectly with the mounting bolts on the motors. So I drilled another central hole and mounted the motors to that side. I cut out a triangular piece to cut weight and work as a handle. I cut it by drilling 4 holes at the corners and then a jigsaw with a metal cutting bit to cut straight lines between them. Metal files smoothed out the edges.


If you buy wheel bearings, make sure to check quality against price. I bought a 10-pack of ultra cheap bearings only to find out when they arrived that the seals didn't fit and they leaked grease.
Make sure you keep all the drilling/sawing metal flakes with aluminum away from the HIGHLY magnetic open cased motors.
I had to connect a variety of 5.5mm, 8mm, banana, male, female connectors, and I wanted to do it non-destructively, to keep the motors, batteries, ESCs, etc wires intact in case I needed to return anything, So I bought 10-packs of matching male and female gold connectors in the sizes I needed and silver soldered them into the various adapters and connectors I needed, then insulated them with shrink tube or just coated them with A/B epoxy. I used 3/10-gauge braided wire to run from the ESCs to the motors. 12 would have worked.

One problem I encountered was a fairly loud "wailing" keening sound at higher speeds. It was mostly because my chains were too tight, that is, without a small bit of slack. I think if I used thicker wheel sprockets, or just steel, it would probably eliminate it completely.
I used a bit of Shoe-Goo in place of thread lock
I wired in a toggle switch between the two batteries where the 2 positive connect as a main power switch. That way I can leave the ESCs in the "on" postion and start everything up simultaneously.


