Chalz
1 W
Open Source Build
I’ve seen a lot of sweet builds and learned a good deal. Now I want to build one, but there doesn’t seem to be a good set of plans around. You have to weed through hours of info and try to figure it all out one small piece at a time. I will always have more to learn, and be short on time, which leads me to wonder if anyone would be interested in helping out with this build? We could put together; instructions, bill of materials, blueprints, CAD files, and tooling files for this bike when all the details get worked out. I have been designing this so that a water jet cutter could cut all the pieces out of two flat sheets of 6061 Aluminum. You could also use a laser cutter, CNC, even just a grinder or I know some of the rough necks around here would rather just use their teeth. Even if you don’t know how to work metal, you probably have a friend that could help out and get you through this project. The pieces have been designed to self-align for the welder. It is built off a used Specialized Bighit frame as many good builds around here have been. Here is a short list of the bikes that inspired this design. These are a pre-requisite in understanding this build. Must read info to really get it.
http://www.stealthelectricbikesusa.com/fighter.html
http://endless-sphere.com/forums/viewtopic.php?f=6&t=38799&hilit=bighit
http://endless-sphere.com/forums/viewtopic.php?f=6&t=37489
I know a mid drive is a more powerful efficient build, but the problems seem too great right now. I really don’t like being locked into one motor, the extra noise, extra things to break, lack of stealth with all the drive mechanisms in clear view. So while this design will be less efficient, it will be simple and better looking in my humble opinion. Here are few things that make this build a little different
1. Aluminum frame should be lighter than steel “Fighter” frame.
2. Design is less blocky by distributing the batteries throughout bike “beams” instead of one huge “tank”. This has three small ones.
3. More stealth, as controller is not hanging outside the frame.
4. Internal frame cooling via head tube air scoop input, and seat post output. Controller is thermal pasted and bolted inside down tube. This is also great wire management potential.
5. Internal structure is not locked in to one type of battery. While it was designed to fit the best battery on the market in regard to Power per weight, it could easily take any other battery type. This increases the likelihood of the frame being useful to others. You could even run it with the same batteries but with four instead of eight. You’ll see how this achieved in pictures to come.
6. Motor is not locked in to one type of motor- like a mid-mount. This bike will accept a geared or direct drive hub that could be quickly swapped with two sets of rims and tires. I need this for commuting at higher speed with the Direct Drive and hill climbing with the geared motor when I just want to have fun. This is in line with the ability to use different batteries. I don’t want to lock the bike into a corner. It should be able to use a variety of batteries, motors, controllers or anything else that may develop in the future as things are always changing. This will make it more useful for anyone who would like to build it.
Check it out.
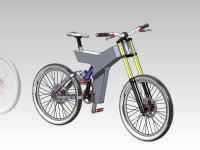
This is created in Solidworks. I started by using the vector drawings that come in the Big Hit manual and comparing that to a photo I took of the actual bike to get my measurements correct.
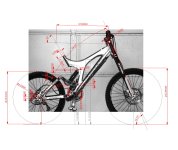
Below you can see how the original big hit frame was used to choose how the location of the batteries and controller.
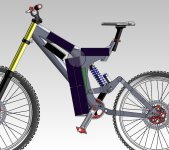
And now, how the new frame boxes it in.
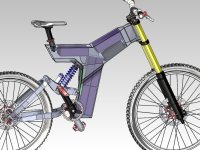
These two images show the front air scoop and rear exhaust.
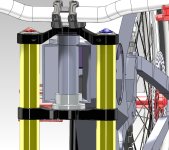
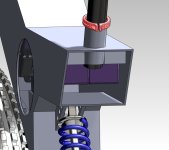
There is a notch for the front shocks to recess into the frame for the proper turning radius. I have read a lot of complaints about this with a Stealth Bomber.
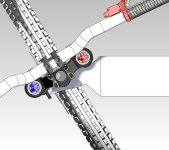
Here is how the batteries will enter the frame. This avoids having a giant panel on the side of the bike that detracts from the stealth of looking like it could possibly be a normal bike.
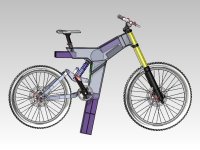
The batteries will be held in place with a wedged block method possibly made from nylon. I have only worked this out for the lower four batteries. It rests against an aluminum battery shield in the shape of a C and the frame leaving room for wire management. The block is in green and wedged shaped. This avoids having to permanently weld a battery holder in the frame which would restrict it to one type of battery. It will also tighten itself over bumps with the help of gravity. Easy to remove, alter, create and adapt. There will be an access panel on one side just big enough to stick a hand into, but not the batteries or controller. The frame is also stronger with this small access panel and therefore can be lighter.
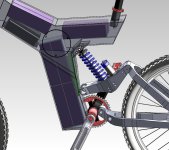
Notice how the bottom four batteries are stacked front to back rather than side to side. This keeps the bike really thin by the cranks and gives you plenty of room for the chain ring.
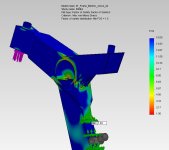
I’ve also done a little Finite Element Analysis to see how strong it is, and take a close look at the weak spots. I have compared this to the original frame and the changes heat treating the aluminum make in my virtual world. I can get into the details of that later if anyone has interest, but I fear it might go on forever with details so I’ll just leave it at the following image which gives a ballpark idea of how it will handle stress.
And here is the Bill of Materials so far. This is going to be roughly a $3500 dollar bike.
Part, Price, Link or description
BB Shell $8.39 http://www.cycle-frames.com/bicycle-frame-tubing/7005-AL-BB-MTB-SHELL.html
HEAD TUBE $6.05 http://www.cycle-frames.com/bicycle-frame-tubing/41.4mm-x-4mm-x-200mm.html
High-Speed Drive $625.00 http://www.pbwbikes.com/product_info.php/cPath/26/products_id/57
Base Bike $650.00 Craigslist
batteries $864.00 http://www.hobbyking.com/hobbyking/store/__18210__Turnigy_nano_tech_8000mAh_6S_25_50C_Lipo_Pack.html
Motor Control $129.00 12 x 4110 MOSFET Extreme Modder Controller LYEN Edition
Frame Metal $200.00 ?
Hub Motor $250.00 Mac, Crystalite, or my top choice the BMC V4S Hub motor, which cost too much.
Computer $130.00 Cycle Analyst
Charger $239.95 http://www.usastore.revolectrix.com/Products_2/Cellpro-PowerLab-8-EC5-version_2/Cellpro-PowerLab-8_516
$3,102.39
As you can see I have put some time into this. I wish I had more time in the day, to finish it quickly. Maybe someone else out there would like to build something like this too and we can put our resources together?
Here are some things that need to be done, or I don’t have an answer for yet.
1. Is there a solution for fitting a torque sensor onto a Schlumpf High-Speed Drive? That would be so good. Looks like the Thun torque sensor is the only one that is highly reviewed, but there is no way that is going to work with the Schlumpf.
2. I have not worked out the charging plug. I need a parts list and design. I think it should be based off of this design and mount into the large opening under the seat post. http://endless-sphere.com/forums/viewtopic.php?f=2&t=39489
3. Speaking of Charging. Do I have the best balancer? Will it even do what I need? What about the charger itself. I have no idea what to use for that.
4. Should I thread the BB shell or just get a tapered shell for Schlumpf? Maybe I should use all the shell and suspension pivots that come with the Big Hit instead of re-creating something that comes with the used big hit starter bike?
5. What about range calculations? I guess this thing is a [2 x 6 Cell Pack (Paralell)X4] = (22.2v) 16 Ah] x 4 Series = 88.8 v and 64ah = 12s4p. It appears as if the stealth bomber uses 30W/m to get to the 50 mile range. So how do you predict range? I don’t have the time in my days to figure all this out.
6. I would love to organize the entire project. Maybe a wiki page type thing would work well? Something with Chapters and an Index? It’s nice to be able to have a group discussion about this in a forum, but I’m so tired of skimming through countless forums just to figure out every variable. I want to get riding quicker.
7. I’m missing something- If I knew what I would ask, but this is the best I can do without knowing
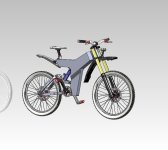
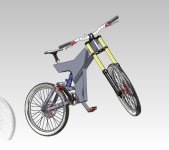
I’ve seen a lot of sweet builds and learned a good deal. Now I want to build one, but there doesn’t seem to be a good set of plans around. You have to weed through hours of info and try to figure it all out one small piece at a time. I will always have more to learn, and be short on time, which leads me to wonder if anyone would be interested in helping out with this build? We could put together; instructions, bill of materials, blueprints, CAD files, and tooling files for this bike when all the details get worked out. I have been designing this so that a water jet cutter could cut all the pieces out of two flat sheets of 6061 Aluminum. You could also use a laser cutter, CNC, even just a grinder or I know some of the rough necks around here would rather just use their teeth. Even if you don’t know how to work metal, you probably have a friend that could help out and get you through this project. The pieces have been designed to self-align for the welder. It is built off a used Specialized Bighit frame as many good builds around here have been. Here is a short list of the bikes that inspired this design. These are a pre-requisite in understanding this build. Must read info to really get it.
http://www.stealthelectricbikesusa.com/fighter.html
http://endless-sphere.com/forums/viewtopic.php?f=6&t=38799&hilit=bighit
http://endless-sphere.com/forums/viewtopic.php?f=6&t=37489
I know a mid drive is a more powerful efficient build, but the problems seem too great right now. I really don’t like being locked into one motor, the extra noise, extra things to break, lack of stealth with all the drive mechanisms in clear view. So while this design will be less efficient, it will be simple and better looking in my humble opinion. Here are few things that make this build a little different
1. Aluminum frame should be lighter than steel “Fighter” frame.
2. Design is less blocky by distributing the batteries throughout bike “beams” instead of one huge “tank”. This has three small ones.
3. More stealth, as controller is not hanging outside the frame.
4. Internal frame cooling via head tube air scoop input, and seat post output. Controller is thermal pasted and bolted inside down tube. This is also great wire management potential.
5. Internal structure is not locked in to one type of battery. While it was designed to fit the best battery on the market in regard to Power per weight, it could easily take any other battery type. This increases the likelihood of the frame being useful to others. You could even run it with the same batteries but with four instead of eight. You’ll see how this achieved in pictures to come.
6. Motor is not locked in to one type of motor- like a mid-mount. This bike will accept a geared or direct drive hub that could be quickly swapped with two sets of rims and tires. I need this for commuting at higher speed with the Direct Drive and hill climbing with the geared motor when I just want to have fun. This is in line with the ability to use different batteries. I don’t want to lock the bike into a corner. It should be able to use a variety of batteries, motors, controllers or anything else that may develop in the future as things are always changing. This will make it more useful for anyone who would like to build it.
Check it out.

This is created in Solidworks. I started by using the vector drawings that come in the Big Hit manual and comparing that to a photo I took of the actual bike to get my measurements correct.

Below you can see how the original big hit frame was used to choose how the location of the batteries and controller.

And now, how the new frame boxes it in.

These two images show the front air scoop and rear exhaust.


There is a notch for the front shocks to recess into the frame for the proper turning radius. I have read a lot of complaints about this with a Stealth Bomber.

Here is how the batteries will enter the frame. This avoids having a giant panel on the side of the bike that detracts from the stealth of looking like it could possibly be a normal bike.

The batteries will be held in place with a wedged block method possibly made from nylon. I have only worked this out for the lower four batteries. It rests against an aluminum battery shield in the shape of a C and the frame leaving room for wire management. The block is in green and wedged shaped. This avoids having to permanently weld a battery holder in the frame which would restrict it to one type of battery. It will also tighten itself over bumps with the help of gravity. Easy to remove, alter, create and adapt. There will be an access panel on one side just big enough to stick a hand into, but not the batteries or controller. The frame is also stronger with this small access panel and therefore can be lighter.

Notice how the bottom four batteries are stacked front to back rather than side to side. This keeps the bike really thin by the cranks and gives you plenty of room for the chain ring.
I’ve also done a little Finite Element Analysis to see how strong it is, and take a close look at the weak spots. I have compared this to the original frame and the changes heat treating the aluminum make in my virtual world. I can get into the details of that later if anyone has interest, but I fear it might go on forever with details so I’ll just leave it at the following image which gives a ballpark idea of how it will handle stress.

And here is the Bill of Materials so far. This is going to be roughly a $3500 dollar bike.
Part, Price, Link or description
BB Shell $8.39 http://www.cycle-frames.com/bicycle-frame-tubing/7005-AL-BB-MTB-SHELL.html
HEAD TUBE $6.05 http://www.cycle-frames.com/bicycle-frame-tubing/41.4mm-x-4mm-x-200mm.html
High-Speed Drive $625.00 http://www.pbwbikes.com/product_info.php/cPath/26/products_id/57
Base Bike $650.00 Craigslist
batteries $864.00 http://www.hobbyking.com/hobbyking/store/__18210__Turnigy_nano_tech_8000mAh_6S_25_50C_Lipo_Pack.html
Motor Control $129.00 12 x 4110 MOSFET Extreme Modder Controller LYEN Edition
Frame Metal $200.00 ?
Hub Motor $250.00 Mac, Crystalite, or my top choice the BMC V4S Hub motor, which cost too much.
Computer $130.00 Cycle Analyst
Charger $239.95 http://www.usastore.revolectrix.com/Products_2/Cellpro-PowerLab-8-EC5-version_2/Cellpro-PowerLab-8_516
$3,102.39
As you can see I have put some time into this. I wish I had more time in the day, to finish it quickly. Maybe someone else out there would like to build something like this too and we can put our resources together?
Here are some things that need to be done, or I don’t have an answer for yet.
1. Is there a solution for fitting a torque sensor onto a Schlumpf High-Speed Drive? That would be so good. Looks like the Thun torque sensor is the only one that is highly reviewed, but there is no way that is going to work with the Schlumpf.
2. I have not worked out the charging plug. I need a parts list and design. I think it should be based off of this design and mount into the large opening under the seat post. http://endless-sphere.com/forums/viewtopic.php?f=2&t=39489
3. Speaking of Charging. Do I have the best balancer? Will it even do what I need? What about the charger itself. I have no idea what to use for that.
4. Should I thread the BB shell or just get a tapered shell for Schlumpf? Maybe I should use all the shell and suspension pivots that come with the Big Hit instead of re-creating something that comes with the used big hit starter bike?
5. What about range calculations? I guess this thing is a [2 x 6 Cell Pack (Paralell)X4] = (22.2v) 16 Ah] x 4 Series = 88.8 v and 64ah = 12s4p. It appears as if the stealth bomber uses 30W/m to get to the 50 mile range. So how do you predict range? I don’t have the time in my days to figure all this out.
6. I would love to organize the entire project. Maybe a wiki page type thing would work well? Something with Chapters and an Index? It’s nice to be able to have a group discussion about this in a forum, but I’m so tired of skimming through countless forums just to figure out every variable. I want to get riding quicker.
7. I’m missing something- If I knew what I would ask, but this is the best I can do without knowing


