Qulbix Q76R Frame Kits & Complete Bikes PRE-ORDER

Lurkin said:
Mine is to be shipped this week.

Any updates? Did it ship? Anybody?


My batteries should be here in a few days, and then in two weeks I should have my spot welder parts and will have everything I need to build the most incredible Q76R with a 3KW battery pack.

Really looking forward to this new build.
 
Offroader said:
Lurkin said:
Mine is to be shipped this week.

Any updates? Did it ship? Anybody?


My batteries should be here in a few days, and then in two weeks I should have my spot welder parts and will have everything I need to build the most incredible Q76R with a 3KW battery pack.

Really looking forward to this new build.

Yep, 1st frame shipped today! Second frame is going to LightningRods in Oregon. Looks like there is quite a backlog on frames right now.
 
That is good to hear you guys are getting your frames already, means mine should only be a few weeks away. I ordered mine real late and already agreed for a late arrival because of my custom modifications. I don't want Qulbix to rush anything. Can't really ride anyway because of the winter so I can wait until April.
 
I got the tracking number for my frame too. I ordered mid-January, and a that time Ziva told me that the ETA would be mid-feb. I didn't expect to hear from him before a week or two !
 
So I received the thing began building it.
[youtube]ETIewFHDTGs[/youtube]
It's fairly simple so far... I struggled a bit for the fork as it is my first "two shoulder fork" (is that the proper name ?). One thing to watch out for is some "spikes" I had on the bicycle seat mount thing :
I'll smooth that out with a file but it will probably ruin the paint a bit. Also I am missing an M8 washer and a M8 self locking nut. Qulbix had realized that before me and already sent out the parts, I'm using another M8 nut I had laying around in the meantime.

One thing I didn't know when I ordered the frame is that they sent some cool parts like the key switch:

and other weather sealed charging plugs. I wanted to put a 5v USB plug (so I could use an old smartphone as a GPS) and some arduino controlled RGB led strips and I was already trying to figure out the electric wiring... the key switch and plugs are one thing less to worry about...

Next I have to unmount components from my santa cruz bike (jackal) and put them in there.
 
Nice, does the bike frame seen thin to you? Feel free to post more pictures of the bike as you complete the build.

I like that charging plug and I will without use that for my build to simplify charging. I don't intend to use the key switch because I use that hole to run wires through to my handlebar.


I have 5v and 12 v accessories on my bike powered from my 74volt battery. The only way I can get the 5v is to have a 72 volt to 12 v DC DC converter, then I have another 12 volts to 5 volt dc dc converter.
I could not find a decent 72 volt to 5 volt dc dc converter.


How do you intend to get the 5 volts on your bike?
 
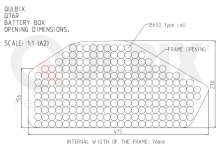
oh yeah it is really thin ! I was a bit surprised, it's just a tiny bit thicker than an normal bike. I measured the inside and it's 72mm wide. I'll post some pictures tomorow so you can get what I mean.

As for the 5v, I'll only run 48v. I just did I quick search and found this :
http://www.amazon.fr/Gratuit-LM2596HV-r%C3%A9glable-dalimentation-Adjustable/dp/B00VAOIQ9M/ref=sr_1_6?ie=UTF8&qid=1455392913&sr=8-6&keywords=step+down+60v
(but it only gives 3A)

or this (way more expensive. what is the voltage of a fully charged 72v bat ? this thing works up to 75v) :
http://gryphondynamics.co.kr/product/gsr-7075-quasar-bec
 
TheBMallory said:
oh yeah it is really thin ! I was a bit surprised, it's just a tiny bit thicker than an normal bike. I measured the inside and it's 72mm wide. I'll post some pictures tomorow so you can get what I mean.

As for the 5v, I'll only run 48v. I just did I quick search and found this :
http://www.amazon.fr/Gratuit-LM2596HV-r%C3%A9glable-dalimentation-Adjustable/dp/B00VAOIQ9M/ref=sr_1_6?ie=UTF8&qid=1455392913&sr=8-6&keywords=step+down+60v
(but it only gives 3A)

or this (way more expensive. what is the voltage of a fully charged 72v bat ? this thing works up to 75v) :
http://gryphondynamics.co.kr/product/gsr-7075-quasar-bec

I look forward to the pictures, can you also take some pictures with the side panel opened to see how much room is around the opening.

Does your swingarm have extra holes to fit these?
http://www.qulbix.com/qulbix-products/frame-kits/item/21-parts/72-dropout-reinforcements#.Vr_hUvIrIuU

For the DC DC converter, I would use the cheaper one if it meets the amp hours you need and you are running only 48 volts. They are only rated at 3 amps and that isn't all that much as cell phones use like 2 amps alone while charging, but it should be fine. I would buy a small heat sink to put on the voltage regulator. Those cheap voltage regulators do work really well and are cheap to replace. Check my links to get them even cheaper if you can wait for shipping.

The expensive one looks really nice, but expensive. I don't think you can really run that at 10 amps without overheating it. But it is interesting to say the least.

Cheapest you can buy these are on aliexpress. I know because I search for DC DC converters all the time.
http://www.aliexpress.com/item/DC-DC-LM2596HVS-LM2596HV-Adjustable-Step-Down-Buck-Converter-Power-Module/1859113573.html?spm=2114.01010208.3.11.88XEPt&ws_ab_test=searchweb201556_2,searchweb201644_5_505_506_503_504_301_502_10014_10001_10002_10016_10017_10010_10005_10011_10006_10003_10004_401_10009_10008,searchweb201560_1,searchweb1451318400_-1,searchweb1451318411_6452&btsid=bb3293c4-0ef2-41f9-a6cc-03746bd6ec49

Why not try one with a CC and a CV. Totally not needed for what you are doing but always nice to have a CC to act as a fuse.
http://www.aliexpress.com/item/LED-Driver-Charging-CC-CV-LM2596HV-Step-Down-Power-Module-3A-15W-DC-DC-5/32441744628.html?spm=2114.01010208.3.20.xG98Xk&ws_ab_test=searchweb201556_2,searchweb201644_5_505_506_503_504_301_502_10014_10001_10002_10016_10017_10010_10005_10011_10006_10003_10004_401_10009_10008,searchweb201560_1,searchweb1451318400_-1,searchweb1451318411_6452&btsid=bb3293c4-0ef2-41f9-a6cc-03746bd6ec49
 
So !

the 72mm inner frame width I was talking about earlier :


The swing arm appears to have the extra holes for the reinforcements :


one pic without the panels :


here's the state of my build now :


I didn't touch any electronics yet.
The headset is too high, I screwed up putting the starnut in place and now I have to order a replacement AND the proper tool to fit it in place (I didn't have one, I tried and lose).
mounting the front brake was pretty easy, but the disc for the rear brake is too smalll (160mm. I'll have to order a 200mm disc).

Also my motor is a magic pie 5 from my previous bike, with standard 135mm dropout. It kinda fit if you squeeze the arm a little but it's not an ideal solution. I'll try to find some 12mm washers or tube and see what I can do with that.


Offreader :
you can run your cables at the bottom of the frame and still use the key switch on top. That's what i'll do :
 
Anyone know of someone that will build a custom pack like this with 240 (20s12p) GA or 30Q cells? Would be great to have one of these built up for us with either a BMS option or 4s leads for Adaptto.

Image sourced from SpinningMagnets article here but original is from Qulbix I think.

Q76R1.png
 
Mammalian04, that is the pack I plan on building. 240 GA cells 20s12p,

I got the SANYO cells here already, ordered 300 of them and they arrived a few days ago. Just waiting on the frame now to get the bike built up.

Once I get the frame and put the pack together I'll give details about how hard it was and anything to look out for. I think it will be fairly easy to build to be honest.

Why don't you build the pack yourself?

Good article on electricbike.com,
 
TheBMallory said:
I screwed up putting the starnut in place and now I have to order a replacement AND the proper tool to fit it in place (I didn't have one, I tried and lose).

What happened? I have never used a special tool to fit a star nut. Did you send it too deep or get it in crooked?
 
I am trying to figure out if a Q76R moto frame would be suitable for my build.

I have been planning and designing bits for a downhill conversion, but a Qulbix frame would be really nice, and shipping is less than I thought, so I may go for it. Planning thread: https://endless-sphere.com/forums/viewtopic.php?f=3&t=73499

I would like to know how much of the hardware of my donor bike, a 2007 Mongoose EC-D, would transfer to the Q76R

Bits:

Marzocchi Bomber 888 RC2 fork
Headset, 1 1/8" FSA Orbit Extreme w/deep cups, Raceface Atlas bar, Raceface D2 stem
Fox DHX 5.0 9.5" rear shock, measures as ~240mm long. Measured bushing width 22mm internal, 35mm external.
Truvativ Hussafelt cranks
Truvativ Howitzer bottom bracket (unsure how to measure, Q76R is meant to be 83mm right?)
E-thirteen chain guide and bash guard
F+R Hope Mono M4 4-pot hydraulic disks with 203mm rotors. The rear pot was going to be too large to fit in between the QS motor and disk without spacing the disk, but I'm not sure I want to space it and risk getting the motor wires caught up on the disk bolts. Could also go E-brake only on the rear, or get a 10" rotor and a caliper adapter.

Electrical bits:

Adaptto Mini-E + 70A charge coil, BMS
Domino throttle
205 LG HG2 cells (was planning to do 20s10p, now considering 22s10p if it would fit, would only be charging to 4.0V, so 88V max input)
QS 205 50H V3 5.5T in 19"x1.6 moto rim, 18T freewheel, came with a few nuts and spacers, unsure if I would need anything else to fit in the 155mm dropout?

Thanks!
 
jmz said:
Fox DHX 5.0 9.5" rear shock, measures as ~250mm long. Unsure if the existing bushings would be compatible, how generic are they?
You can get the right bushings for the frame if it doesn't fit. You will just have to measure.
jmz said:
F+R Hope Mono M4 4-pot hydraulic disks with 203mm rotors. The rear pot was going to be too large to fit in between the QS motor and disk without spacing the disk, but I'm not sure I want to space it and risk getting the motor wires caught up on the disk bolts. Could also go E-brake only on the rear, or get a 10" rotor and a caliper adapter.
IMOP, don't skip the rear brake. I have crashed a couple times when riding without the rear brake (had regen). That could be because I was expecting it to be there and forgot it wasn't but I still don't like the lack of control I "feel" without one. To each his own though...

jmz said:
Electrical bits:
Adaptto Mini-E + 70A charge coil, BMS
Domino throttle
205 LG HG2 cells (was planning to do 20s10p, now considering 22s10p if it would fit, would only be charging to 4.0V, so 88V max input)
QS 205 50H V3 5.5T in 19"x1.6 moto rim, 18T freewheel, came with a few nuts and spacers, unsure if I would need anything else to fit in the 155mm dropout?
I think all that will work. If you still want to run a multi speed freewheel in the rear, you can still special request the 165mm dropout from Qulbix but production time will be longer. Also, be sure to request the rear brake mount kit, the dropout reinforcement kit, and the rear shock mount kit if the dimensions look to work for your fox.

I'm not sure on the other bits.
 
ecycler said:
TheBMallory said:
I screwed up putting the starnut in place and now I have to order a replacement AND the proper tool to fit it in place (I didn't have one, I tried and lose).

What happened? I have never used a special tool to fit a star nut. Did you send it too deep or get it in crooked?

crooked. I didn't have the proper tool so I tried this technique (spoiler: it doesn't work) : https://www.youtube.com/watch?v=K9Dy11NGBIE
As I can't get the nut out, I sent it deeper so I can put another one. I now have the proper tool and I should be good to go this weekend (http://www.amazon.fr/gp/product/B000QSUWI6?psc=1&redirect=true&ref_=oh_aui_detailpage_o00_s00)
 
TheBMallory said:
ecycler said:
TheBMallory said:
I screwed up putting the starnut in place and now I have to order a replacement AND the proper tool to fit it in place (I didn't have one, I tried and lose).

What happened? I have never used a special tool to fit a star nut. Did you send it too deep or get it in crooked?

crooked. I didn't have the proper tool so I tried this technique (spoiler: it doesn't work) : https://www.youtube.com/watch?v=K9Dy11NGBIE
As I can't get the nut out, I sent it deeper so I can put another one. I now have the proper tool and I should be good to go this weekend (http://www.amazon.fr/gp/product/B000QSUWI6?psc=1&redirect=true&ref_=oh_aui_detailpage_o00_s00)

I always just used a screwdriver, I believe I never had trouble because I hit it down very slowly making sure the screwdriver remained straight. So instead of 10 hard hits, I would do 100 soft hits.

Maybe I was just lucky... But things like this suck because you have to wait to order parts. I stripped out one side of my bottom bracket on my raptor 165.
 
Can you use a diy tool like a threaded rod and force the star nut down? Kind of like how to mount head set without proper tool?

[youtube]yAXFyfBJhKU[/youtube]
 
macribs said:
Can you use a diy tool like a threaded rod and force the star nut down? Kind of like how to mount head set without proper tool?
I suppose... I tried with a screw too. When it started to crook, I tried to hammer to the side but it just bent the screw...

Anyway, I'll be able to get everything right this weekend.
 
Hi guys,
my frame arrived!!! Now I need to buy some parts,and I´m looking for the biggest crankset that we could mount in the frame, any suggestion?
I just found the Zee M645, but it´s just 36T :(

https://www.dropbox.com/s/ii0r281v7lipnbz/2016-02-19%2023.19.30.jpg?dl=0

Thanks.
 
Back
Top