RLT Project #1 - 2 wheel drive. (Now startingMk2)

HMM. I was using a different alloy welding wire than I thought I was. 5356 is what I had on the welder. I assumed that I had the more common 4043 alloy on there, but never actually checked; When I bought the machine a few years ago, I just said "give me some aluminum wire too" and didn't pay any attention until after it was all used up (and mostly wasted) .

Anyway, I managed to pick up some 4043 alloy wire locally and get the front rack finished and welded to the head tube. I was pleasantly surprised that the new wire didn't jam even once tonight. I guess 4043 is stiffer, so it push feeds better, even though 5356 is supposed to be stronger. Or maybe I just got a little lucky for a change; I don't know which..

Spent most of the night looking for a grinder, and once I found one, it turned out to be my old beat up one and I had to fix it before I could grind off the massive excess bead/globs from my lousy weld job :roll: (I still have no idea where the new grinder is... I GOTTA clean up the workshop. Every pile of stuff is buried under three piles of other stuff. ).

At least once I got rid of the globs it looks like the welds are pretty well fused and solid where it counts. still need to do some detail grinding and then sand the heavy grind marks out and reassemble the front fork/handlebars etc.

Got tired, so I didn't even start on the extra supports for the rear rack. That shouldn't take too long though.... I hope.... since those welds won't have to be anywhere near as strong as the ones on the front rack.
 
Well got to take the Mk2 out for a short test ride just before dark this evening...
I'm very happy with the overall performance, although it needs some more electrical refinements, and once I get those ironed out, it is going to need some aesthetic refinements before it can even work its way UP to looking like a rolling junk yard and a skein of yarn after the cat got hold of it. Despite trying to be more careful and neater with my wiring this time, the earlier version was actually cleaner looking.

I was using three circuit breakers: a 50A 65VDC on each battery pack, and a 100A breaker just before the controller, that did triple duty as a kill switch, and as a capacitor pre-charge with a big 4.7K power resistor across the terminals:
Well, I don't think that 100A circuit breaker is very accurate, as it is tripping at ( I think) 62A. So, I have to re-think that. The simple thing would be just to run the wires straight, but then I'd lose some electrical protection, lose the capacitor pre-charge and the kill switch.

Some problems with the Cycle Analyst that is monitoring the rear battery pack. (The Watts Up meter monitoring the front seems to be right on). At least I don't THINK I was pulling 676.6 amps peak out of that rear battery pack. ;) It should have gotten a little warm if I had.
That, and the CA speedometer didn't work right... It would start out fine, pedaling or coasting, but as soon as I touch the throttle, it resets to 0 and stays there until you cycle the power off then back on, then repeat as soon as you touch the throttle again.

Maybe just my CA menu settings causing the Amps display problem; And maybe it is stray magnetic fields, with the speedometer sensor being on a powered wheel that is causing that glitch.
I emailed Justin at ebikes.ca to see if he had any advice.

...........Although I think I might just order a high current Eagle Tree data logger and power panel display and use one unit to replace both meters. Should make for neater wiring overall, as well as all the neat features you can add to them. And as I have the packs wired to use those RC 2-6S voltage monitors, I can kind of monitor the individual packs and sub-packs status, with just a little more hassle than to have them metered separately on the handlebars.
What's another hundred and fifty bucks when I've dumped enough money into this project to buy a pretty nice motorcycle? :?: :?

Don't know how fast it can go since the speedometer didn't work, and I didn't even try to 'floor it' on the flats, but it sure seems fast enough for my needs, especially with the ~8V increase from going from the original Mk1 10S4P to 12S5P LiIon packs in Mk2.

Did about 3 miles. Despite the circuit breaker problems, I could climb the two rather steep hills in the immediate neighborhood at good speed if I was careful with the throttle and didn't try to accelerate on the steeper parts. I didn't try the hill that took 88A (AND pedaling pretty hard too) to climb in the MK 1 - 36V version, but I think even that hill will be pretty easy now with the extra voltage and current capacity of the rebuilt packs. At rest, after the ride, the battery packs are only about 1.0 V lower than they were when I started; And as my V(min) didn't even go below the *nominal* pack voltage even on steep hills, it looks like I'll be pretty close to meeting or maybe even exceeding my 30 mile range goal.

So, It looks like I don't have to hurry to replace the LiIons with my Headway LiFe batteries.
 
Well, Finally got in a real ride. Covered about 30 miles, plus or minus one or two miles. I accidentally shut of my Pocket PC / GPS and lost my log about half way through. And the Cycle Analyst speedometer/ odometer function just doesn't work at all anymore. I even replaced the reed switch in the sensor with no luck, and tried shorting the sensor several times to get it to register, and that didn't do anything, so I guess there is an internal fault with the CA. :evil:

Cleaned up the rats nest of wiring as much as possible. Changing the location of the Schottky diode for the front pack from behind the Watts Up meter to in front of it (before the packs blend their power at the controller) seems to have solved the problem with the CA reading the Amps so crazy.

SO: I started off going up the steepest road in the neighborhood, about a 12%-15% slope, for maybe a 200 yards/meters before it heads downhill. That peaked at 130 amps (65A from each battery pack) for a few moments.... And just to be safe, since my battery packs are only supposed to have to supply 50A each /100A total, I helped by a pedaling a little the last 25 yards/meters.

Ran a couple of laps of just under a mile, around the hill in front of my house that has a walking/bike trail around it. The steepest part of the hill is about a 10% slope for a hundred feet, in the middle of slopes of about 7% for another couple of hundred feet. Going up that hill takes about 80-82A with the throttle pegged, Have to dodge trees going up the hill, so I couldn't check the GPS for speed, but I'd guess about 15-17MPH up the steepest part.

Then thought I'd try to see what my maximum speed was. Not many really flat places longer than a hundred yards/meters around here, but on the longest, flattest place nearby, I peaked at 34 MPH... but that was slightly downhill. Turned around and tried the opposite direction, and hit 29MPH.... So, I think it is safe to say my top speed on the flat, sitting up pretty straight, is 30-32 MPH. Which is more than enough for my comfort level.

Rode about 9 miles around the walk / bike path around the golf course nearby. A few 7% grades for a few hundred feet here and there, but mostly flat to 2%. Other than on the hills and hard accelerating, the bike only draws 3-6A... Full acceleration even on the flats draws about 50A, so the first big lesson I learned today is that slow acceleration saves lots of watts.

Stopped at a burger place for a quick lunch, then another couple of laps around the golf course, then a mile ride down to the road to the highschool, then back up via a pretty rough off road trail. There is a 10% slope on that trail for about 100 yards/ meters, with lots of ruts and rocks to further eat up the watts, so I pedaled for about 25 yards when the amps hit a hundred. That and the one mentioned above was pretty much the only pedaling I did today...
Had to go through some pretty gooey mud puddles too. That was fun.... well, maybe not.. Another lap around the golf course and the hill trail in front of the house, then up one of the other neighborhood roads for a couple of miles, then stopped back at the house for a restroom break ... The battery packs (44V nominal) were still above 45V resting, and 37V with a 15A draw.

I guesstimated (and later confirmed) that I had covered 18-20 miles at this point, with three minutes of draws of 100-130A, five minutes of 80A draws, seven minutes of 60A draws and 20 minutes of 40A draws. Was bored riding around the neighborhood, so, (despite my earlier intentions of being within easy walking/pushing distance of home if something broke, blew up or burned out), I headed up one of the nicer drives in the area, up along Cedar Creek; 10.5 miles round trip from the house.

The road is a pretty constant 4%-6% grade for four miles. I was pretty surprised to be able to maintain 24-25 MPH up it with moderate throttle, pulling 40-50 Amps most of the way, with both battery packs still staying at about 36V. At the top, I checked the motors for heat. Warm, but not hot. Controller a little warmer, but nothing to be concerned about.

Then I checked the little 2-6S RC cell meters a little more closely than I can when I'm moving. (2 of them on each 12S battery pack) that monitor each parallel cell group. All the front ones are fine, right around 3.65V each , plus or minus 0.05V. But on the rear pack, one was down to 3.4 V and the other 3.2V . Uh,Oh. Not good.

Despite testing every cell in the packs on the CBA at least twice, assembling the 5P sub assemblies to match capacities as close as possible, then re-testing each sub assembly on the CBA, it looks like I might still have ended up with a couple of cells that under-perform. By the time I got home, under a 10-15A load, one cell group was down to 3.00V, the other to 3.25V, with the rest between 3.5 -3.6V.

Opened up the battery bags. The front pack a little warmer than I'd like, but not too bad.. about 40°C. (ambient temp 21°C) The rear pack, a little worrisome... 44°C in some spots, two spots 48-49°C. I was afraid I'd maybe ruined another pack, or at least part of one, but I looked up the temperature specs of the batteries, and their operating range is up to 55°C... and I doubt that I went over that even at the worst. WHEW! SO, maybe not a disaster. I let the packs cool off to 26°C, maximum before I started recharging. By the time they cooled the two 'bad' parallel groups were both up over 3.5V, so maybe the problem is more temperature related than capacity related??????

They have been on the chargers now for 4 hours, and ALL the cells are within 0.05V, of each other, so that's a good sign, (I think?).

So, I guess I won't rip apart the battery packs right now; just keep a closer eye on those two problem areas. But I got a feeling that I may be building those Headway packs and converting over to them a little sooner than I had hoped.

But other than that, I'm pretty happy overall:
*Goes faster than I need;
*Torque is a bit less than I had hoped for... I wanted to be able to do a half mile of 15% grade without pedaling, but it looks like that won't happen on this machine.
*Range is acceptable; I was hoping for a minimum of 30 miles... Barring a LOT of very steep hills, (and for the moment discounting those two possibly problem cells), it looks like I can probably get 40 miles of hilly country out of the current setup... 50 miles - easy if I was in the flat lands.
*Ride, even off road is pretty comfortable, (despite the bike weighing around a hundred pounds, and the rider somewhere around 230),
*Handling is acceptable, although I need to build some confidence doing 'twisty turneys' and quick maneuvers even at slow speeds,
*Looks like my front and rear battery racks will hold up even on rough terrain... (at least for a while).... I gotta admit I was a little worried, especially about my front one, which I built from scratch.

After it rested for ten minutes at the end of the trip, both packs registered 43.6 V on their respective Watts Up or Cycle Analyst meters.

Looks like I used about 40 AH / 1700WH total, V MIN of both packs, total was real close 3.63V averaged.

Besides those two cells that I gotta watch, the only real disappointment was with the Cycle Analyst speedometer function being defective

That Eagle Tree data logger is still calling me, and it is getting louder. With that and a ten dollar regular bicycle speedometer, I can replace both meters.

OK: I know that this is supposed to be the Photos and videos forum, and I haven't posted many pictures and no videos; Next post, I'll try to add a couple pictures of the bike, although I have a few aesthetic type changes to make on it before I can call it "Done".

The next big test is to see if I can climb this little hill without burning anything up:sb.jpg
It is our local 12,000 ft high mountain. The paved road to the ski run ends at about 11,000 ft... I don't know if they will let me (try) to ride all the way up to the top of the mountain or not, but even I have to stop where the pavement ends it will be a pretty good test. I'll try to video the ride too. I've got everything I need to rig up a tiny "helmet cam"... all I gotta do is put it together.
The paved road is a 5,000 ft rise in about 12-15 miles or so..... I'm not sure, but I think thats what it is... I'll have to double check.
 
OK, getting nearly finished. Went for a short (12 mile), but educational ride today.

But first some photos:

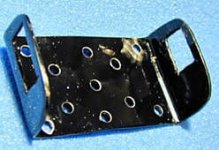
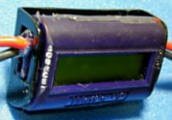
Here is the mount I made for the Watts Up meter, out of aluminum:W-U_mount1.jpgW-U_mount 2.jpgW-Umount3.jpg
ran the bolt through the normal holes of an old handlebar mount... I think from an old rearview mirror, to mount it to the handlebars.
The Watts Up monitors the front pack, a Cycle Analyst monitors the rear.
Oh yeah; I also opened up the Watts Up and replaced the 14Ga wires with 12ga silicone wire... I feel a little better about pumping the watts through the heavier wire. Would have gone with 10ga if it would have fit without wrecking the case: I was able to melt the wire channels out with a soldering iron to fit the 12ga wires pretty well, but 10ga just wouldn't fit.

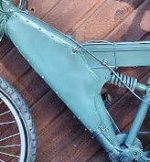
Wiring is a mess:whatAmess.jpg
the other side isn't much better:notmuchbetter.jpg
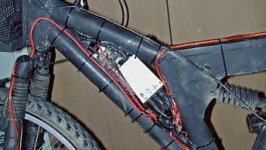
Solution: Make a cover out of aluminum sheet:coverup.jpg

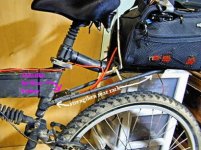
Here are the supports I added to the rear rack to help support the 22 or so pounds of the batteries and whatever when I'm riding the rough trails:rearrack.jpg
I'd have liked to use a wider angle on those supports for greater strength, but there just wasn't any practical way of doing it without getting in the way of suspension travel.
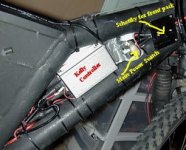
Photo also shows the location of the Schottky diode for the rear battery pack... I originally had it inside the bag with the battery, but, even on a piece of heatsink it got too hot with no air around it . Stays nice and cool even under heavy load where it is now.
Ignore the white rope between the seat and the rear pack ... That's just part of my ceiling mounted hoist to keep the bike standing up, and the wheels off the floor when I need to make sure things are running right. (and ignore the plastic parts bins in the background, too)

I'm not even going to show you any details of the front battery rack. In fact, I'm so ashamed of the workmanship on it that I have the horrible welds and stuff covered up with that rubberized toolbox liner mesh. But it seems to be plenty strong enough, so I'm not going to be too upset about it, (as long as someone doesn't laugh) :lol:
Since that front rack is mounted to the head tube, and is a solid part of the frame, rather than hanging from the handlebars, it kind of throws you off mentally-visually when you turn the wheel but cant actually see it move... But I think it handles better than if the whole 22 or so pounds of the front battery pack moved with the handlebars. In fact, I had to make a quick zig-zag maneuver at speed, today, that I thought was a sure crash, but it handled better than I assumed the bike and my old-man riding skill level were capable.

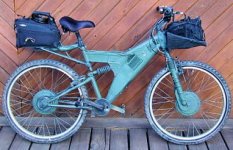
So, here is what the whole thing looks like right now:rt_side.jpg

Yeah, that color really looks horrible.... And I thought the camo paint job from the Mk1 phase was tacky. I started to not like it when I was half way through with putting it on, but after some guy that I talked to on my ride today thought I was trying to make it look like an old Nazi scout cycle from WWII, I really didn't like it, because the last thing I want is for people to actually notice it. I think I'm going back to the dark charcoal gray primer that I had on it last week. (More layers of paint makes the frame stronger, right :?: :roll:
That orange thing on the left side of the handlebar is an inclinometer (bubble level)... I think I'll take it off in the near future, but I wanted to be able to report what kind of hills I could climb without pedaling.
-----------------------------------------------------------------------------------------------------

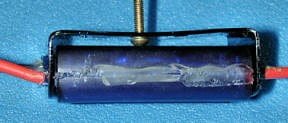
Thanks to Justin from ebikes.ca for the advice on the Cycle Analyst, I think I have all the problems worked out with that. I kind of abused the stock shunt trying to solder on a heavy connector on just a short stub of wire from the shunt, then TRYING to desolder it when I decided to hook things up differently. It may have still worked nonetheless, but since I had a n extra 100A shunt laying around, I decided in the long run I'd be better off with it, even though it is a lot bulkier.

My problems with the speedometer function of the CA were two fold, both of which Justin helped me to figure out, despite him being on a cross country cycle trip at the time... (so Kudos to Justin and Zev at ebikes.ca.).

Anyway, the first problem was that one of the wires from the sensor where it connected to the CA circuit board had a couple of tiny strands that had either frayed loose under my handling, or not perfectly soldered at the factory had shorted intermittently to the next solder pad over. Easily fixed once I knew where to look. The other problem was that the speedometer would go to 0.00 as soon as I actually ran any power to the motors. I figured it had to be that the magnetic fields from the motors and/or controller had to be screwing it up, since the two wired and one wireless regular bike speedometers I tried all did the same thing. I thought magnetically shielding all but the front part of the reed switch in the sensor might do the trick, but that didn't help at all. So Justin suggested using a shielded cable from the sensor to the meter guts. BRILLIANT! That did the trick.

I thought I had some extra shielded 2 conductor cable around here from some earlier project, but couldn't find it. Local Radio Shack didn't stock any either. Fortunately I had an unneeded shielded USB 2.0 cable that worked fine. Less flimsy than regular speedo cable as well.
-------------------------------------------------------------------------------------------------------------
I ordered one of those EagleTree eLoggers, was planning on using it to monitor the TOTAL power situation, rather than having to do the math to combine the WU and the CA. And I thought maybe I'd even get the GPS logger for it in the near future. Well, it worked 'on the bench' on 12 V pretty well, and while I thought that the 12ga wires on it , despite being short, were a little light to be handling the claimed 150 Amps efficiently for more than a moment, I got it programmed and everything, but when I hooked it up to my 44V system things didn't work out so well.

I powered it up with just the rear battery pack, (didn't turn on the front pack or turn on the master switch to the controller) The 'welcome/startup ' message on the power panel just stayed on for a minute or so, but did not progress into actual operation. I recycled the battery switch; there was a small flash from inside the eLogger like a surface mount resistor of capacitor blew and both the logger and the power panel went dead.

The kind of funny thing was that I tried it out on the computer after that, and it would read voltage from 12V and 16V sources OK via the USB connection for a moment, then shut down with an error message. Did that a couple of times, then the COMPUTER program wouldn't load and run at all. I even tried uninstalling it and reinstalling the program, and it wouldn't run, with or without the logger attached. I guess the Eagle Tree software only allows a couple of errors before it does something, probably in the Windows Registry, that doesn't get cleared with an uninstall, to keep you from abusing the eLogger or your computer if you have fried your logger. I'm not sure if that (if indeed that is the case) is a good idea or not. I went into the registry and edited all the lingering Eagle Tree stuff out, and was going to reload the software again, to see if it would work that way, but decided 'to heck with it'.

I wanted to just send the stuff back to Tower Hobbies for a refund, but they refused. (I won't do business with them again). Fortunately, the guys at Eagle Tree answered my email promptly and it looks like they will probably (maybe?) fix it for no charge, so I'm not out $150 completely. I don't think I'll use it on this project anyway, even if it does get fixed, and works properly for me. But maybe it will be useful on project #2 or #3.
-------------------------------------------------------------------------------------------------------------------------------

As to my ride today, I decided to take it easy. No heavy acceleration, and avoid the steeper hills if I could. That turned out to be very educational to me. In just under 12 miles, still with some hills that most of you guys that don't get to ride on often, I didn't run the packs down to even 46 of their nominal 44V. I don't think I ever had to draw more than 80A a few times for more than a few seconds. I did let a friend (a Harley Rider) ride it for a half mile or so, and he just had to see how fast it would accelerate and how fast it would go, so it did pull 120A for a few moments. Anyway, despite that, it seems if I am careful, even around my mountainous terrain, I can get around using only an average of 1AH per mile, at 11.5MPH average, 25.6MPH peak.

So, even around here, looks like my 50AH of batteries will get me about 50 miles range on one charge, if I am light on the throttle. I bet I could get 75 miles on a charge in Kansas ;).

And those couple of cells or banks of cells that my previous 'hard ride' had me worrying about seem to not be bothered if you don't torture them. I kept them monitored for temperature, and they never got above 31°C this time, with the ambient being around 27°C. And all of my cells... er, more accurately, parallel cell banks were within .07 V of each other after the ride. So, that's a good sign.

Well, the guys at the barber shop weren't impressed with the bike when I took it by to show them (they thought their horses were much more useful and interesting), but my Harley riding friend wanted to buy it from me, or at least have me build him one, even after he knew how much it would cost to duplicate my basic design (minus the expensive mistakes I made, of course).
---------------------------------------------------------------------------------------
Hopefully the weather cooperate next Tuesday... I've got a 'babysitter' coming in for the whole afternoon to take care of my responsibilities, and I'm going to see what the bike can do against the 'big mountain' in the photo in the previous post.

Barring something breaking, and covering that ugly paint job, I guess the next thing is building my headlights... Going to be 3 individually controllable Cree and/or Seoul Semiconductor 3 watt LED's, with different optics for different lighting patterns. I know that much. Oh, and a good handlebar mount for a GPS.
 
Well, I guess there aren't going to be any videos, at least in the near future.

I rigged up a helmet cam and went for a quick trail ride this afternoon... and from the time I turned on the power into the controller, before sending any power to the motors, I recorded nothing but static with the occasional negative and distorted images. It worked OK up to that point.
So, speedometers aren't the only thing that needs to be shielded to work around my bike.

I hope the FCC doesn't come after me for violating communications interference laws.

Maybe I could hire me and the bike out to the military or someone as a mobile radio jammer.

I wonder if one of those completely self contained helmet cams would work.

I wonder if even my cell phone would work while I'm riding.

Yeah, I guess that would probably work, since my Pocket PC / GPS works.

Still....

Anyone else notice problems like this?
It isn't just something about the Kelly controller that is causing it, either, as it did the same thing previously with the Wilderness Electric controllers.
 
Well, today was the big test. Today was the day I was going to climb the big mountain to prove that the bike would work as intended.

Fail.

Maybe not "Epic Fail" like falling off the mountain and/or ending up in a ball of fire, but a pretty depressing failure nonetheless.

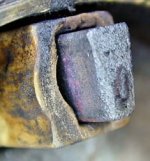
Only made it up about 1/4 of the way when I lost a lot of power; went from about 70 amps to 45 amps total. front hubmotor making a little grinding noise under power.
Turned around and went back down the hill.
theresyerprob.jpg

I really wasn't pushing the bike hard. When I turned around, the hottest cell group in the the rear battery pack that I was monitoring for temperature never got above 35C (95f) , and the controller was barely warm enough to notice. the outside of the motors were a little hotter than I'd like, but not alarmingly so.

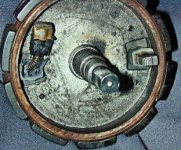
I knew from before that those plastic brush holders on the Wilderness Electric motors were a bad concept and the weakest link in the power train. The windings of the motor are pristine. not a bit of scorching on the lacquer. The commutator is a little bit messed up, but just where the brushes rub... the edges don't appear to have gotten hot

I don't think I'm up to making a more durable brush holder myself. Maybe I can figure out something.... Anyone want to try to make me a couple of them out of ceramic?

Heck, maybe someone with a CNC router could make some out of wood :roll: ... That would probably be better than the plastic crap that the factory makes them out of. :evil:
------------------------------------------------------------------------------------------------------------------
Even if the brush holder hadn't melted, I'm not sure that the bike would have made it... I hadn't really gotten to the steep part yet, and while I wasn't pushing the bike as hard as it was capable of, I still felt underpowered from what I expected. Maybe if I lose a hundred pounds the current design could do it, but that ain't gonna happen.

So, I'm going to have to start over, if I want to be able to do those 14,000 ft Colorado pass roads and trails by eBike.
I guess brushed hubmotors are out, even if I can come up with non-melting brush holders.

So do I go to brushless hub motor(s) and stay sort of stealthy? What's the maximum sustained wattage you can get with a single 53xx motor? I know dual 53xxs would get me there and back, but I'm kind of wanting to lighten the front end up if I can.

Go to a different frame and use a bottom bracket and a lot of gears? That could still be a little stealthy, lighter and geared right, give me good top end and good mountain climbing ability.

Or am I going to have to end up using a different frame and an Etek, Mars or Perm motor, (or maybe dual MY1020s), maybe with a two or three speed range transmission, and give up any semblance of being stealthy to get enough power to climb those tough hills?
 
RLT said:
Anyone else notice problems like this?
It isn't just something about the Kelly controller that is causing it, either, as it did the same thing previously with the Wilderness Electric controllers.
Altrax controllers certainly bash into the FM spectrum... I don't know about vidcam RFI.
 
Yesterday, I pulled off the front motor/wheel and replaced it with the old regular bicycle wheel, thinking that I could maybe still ride the bike if I stick to the flattest routes around town, but it was obvious on the first try that something was wrong with the rear motor too.
--------------------------------------------------------------------------------------------------------------
Let me backtrack for a moment... A couple of months ago some of us were discussing that there were at least two or three variants of the brush holders on Wilderness Electric brushed motors. My two had different holders, a white one and a black one, and there was some concern that the white ones, not having a metal insert might be inferior to the black ones.

Well, the black plastic holder with the metal inserts was the one that melted, even though it was in my front motor, and (presumably) wasn't as stressed as the rear motor, which has the brush holder made of that whitish (now more brownish) material without the metal inserts.
------------------------------------------------------------------------------------------------------------
It seems that the white brush holders are much more durable and heat resistant, but the black ones with the metal inserts are more precise.

The white brush holder from the rear motor is intact, but the brushes themselves are all chewed up, the edge of the commutator plates are partially eroded on about half of the plates (all contiguous, all on one side). The brush springs were pretty weak... I think one of them wasn't even pushing hard enough to make even halfway decent contact, and the braided wire on the other one was actually broken off right where it was connected to the graphite. It worked well enough to move the bike, but I think only about 40% of the power was getting translated into motion.

Between the two motors I think I can assemble the parts to make one work OK until I can get some replacement brushes and holders. I can't find any replacement brush holders from the WE dealers, (one guy said check back in a month or so) and WE themselves haven't answered my email.

Going to try using a Crystallite 409 brush assembly; ordered one from electricrider.com, who says they actually have one in stock.... since rumor has it that the 409 is essentially identical to the WE motors. The brush holder pictured on the electricrider site looks to be identical to the black plastic/metal insert ones.

Well, we'll see.
 
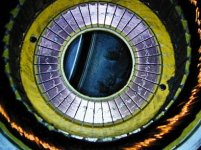
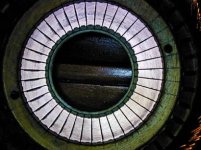
Here are what the commutators look like, after a little light hand sanding to get the carbon off:
FRONT:
FrontCom.jpg
Some damage in the center of the commutators all the way around from where the metal insert of the melted brush holder was shorting them out.
There are some small 'bubbles' of copper that melted off and shorted out between a few of the separate commutator plates that I'm going to have to remove before I can use this motor again, (assuming I can even get new brush holders).
-------------------------------------------------------
REAR:
RearCom.jpg
Notice the left half has erosion of the copper on the edge.
(I'm not sure if that is the leading edge or the following edge.... I'll have to figure that out in the not too distant future).
-----------------------------------------------------
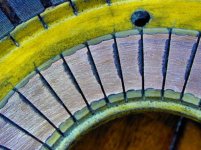
EROSION CLOSEUP:
erosionRear.jpg
I don't know if the weak brush springs, the bad connection on one of the brushes, or possibly a timing problem caused the erosion..... Or maybe a combination thereof. :?: :?: :?:

The brush on side of the black brush holder that DIDN'T melt is in pretty good shape:
View attachment 1
------------------------------------------------------
(Both of) The brush(es) in the white holder are pretty mangled:
whiteBrush.jpg
The metal inserts on the black brush holders seem to hold the brushes more precisely; the white holders allow a little play.

So, it seems that what we REALLY need is a combination of the two kinds of holders: The white material for the base, since it is more heat resistant, but with the metal insert to keep the brushes held in the proper position.
 
Shooweee! I thought I was hard on my We brushed motors. Very interesting build thread! Now I see why you break more spokes than I have.
 
When I actually broke spokes, it was off-road. Just a bit bumpy, no jumps or high speed;, nothing extreme like the BMX /downhillers do. But between my own personal stock of lard which I carry with me at all times and a hundred pound machine, it is too much for those 'recycled tin foil and pot metal' OEM spokes and 'papier-mache' nipples.

No problems at all, so far with the DTswiss replacements, even though they are thinner..
 
Got it back together last night, and just took the first test ride. And surprisingly, I'm seeing a 10% to 15% improvement in power.

I mentioned it elsewhere, but since I couldn't find any WE brush holders anywhere, I thought I'd try some from a Crystallite 409... electricrider.com had them in stock. So, I ordered one, to try, and it worked, despite the brushes being slightly different dimensions, (See the WE-Crystalite interchangeability thread for details: http://endless-sphere.com/forums/viewtopic.php?f=2&t=6366) it seemed to work, at least on the bench. Even though the other brush holder - the white one) didn't melt down, after messing with it a bit to see if I could fit the metal extensions from the black holder to get the best of both worlds, it seemed like the material was kind of getting friable, (even if it was less 'fryable ' than the black ones ;) ) I figured it would be better to replace it too, so I ordered another one.

(I have been very pleased with the service from electricrider.com.... They got my stuff here in just a few days each time)

As before, the wire braid leading to the brushes is extremely wimpy, so I beefed it up with some solder wick, as I think I described up-thread somewhere. This time though, I set the timing while installing the brushes. (Didn't know about that last time I had the motor apart). It is a hassle, having to pull the side plate so often; 5 times on one motor, 7 times on the other :evil: but definitely worth it.

I don't know if it is just setting the timing properly, or that the wider Crystalite brushes themselves provide more optimal timing than the narrow but taller WE brushes, (I rather imagine it is a combination of both) . but the bike runs a lot better than it did before.

The hill that I live on used to take 80 to 88 amps to climb at 16-17 miles per hour, now takes 63 amps to climb at 16 mph, and 82 amps to climb at 20 mph. And top speed now is at least 35 mph on the flat, compared to the about 32 mph from before.

I was going to loctite and tighten up the rest of the bolts and go for a longer ride this evening, but its raining, so I guess it will be another day before I can do more tests.
 
If thetiming were advanced u would definitely pull more amps, the performance gain would be questionable! Did U set for neutral timing, which would give the lowest amp draw and most efficient running? Pics, please?!?!?!?!
otherDoc
 
Yes, I set timing to the minimum amp draw.
Sorry, didn't take any pictures of that..... I didn't think it would be particularly meaningful to photograph. I just followed Fechter's advice and rotated the brush holder a tiny bit at a time until I got the minimum current draw at 12V.
 
Yup! Thats the way!
otherDoc
 
Well another @#@&& brush holder meltdown. :evil: :cry:

I was going fine up a 12-15% grade. 19MPH without really pushing it . After about a mile, it suddenly dropped to half power. I stopped; checked the motor cans, controller; just barely warm.
PIcked up the bike, rear motor won't spin under its own power.

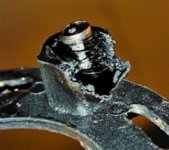
Turned around, cruised home OK with the front motor, took the rear apart to find this:
ADMBH.jpg

The motor itself isn't overheating at all; the wiring is still pristine. It is just the cheap d@#^ plastic they make the holders out of.

Time to order that 5305, I guess.
 
Well, tried a little experiment today; bolted my new 5305 on the back of a $70 Walmart bike, put 24S1P of Headways in a backpack and carefully rode around the block.

I say carefully, because that bike has the worst brakes I ever saw on a bicycle, and I haven't made any torque plates to fit it yet, so I wasn't about to crank down on the throttle.

But from what I have seen, that one 5305 on 72v -40A is about equal in hill climbing ability as my two BD36s at ~48V @130A. Stays much cooler, and vastly out accelerates it. If I wasn't afraid to spin the axle, I'll bet I could have popped a wheelie! (Of course being 40 pounds lighter up front might have something to do with that).

I didn't want to take it off road to see if the the increased 'nimbleness' from having a lighter front end was better for the rough stuff than the added traction of having 2WD until I got the torque plates made and installed, so that question is still up in the air.

Unfortunately, it won't be answered really soon, because my new controller blew up just as I was pulling into the driveway at the end of my test ride. :cry:
Well, good timing if it had to happen, but considering it was under no stress at all when it blew, I gotta curse my continued bad luck. Maybe I can get the torque plates made and installed, and some different brakes by the time I get a new controller.

Anyone know if those Bulldog brakes electricrider.com sells are as good as they say they are?
Or if not, what's the best inexpensive rim brakes? I don't want to spend much on them, because this new bike is really only intended to be a 'test bed' .... The 5305 will either go on the original bike, or I'll buy/build something even stronger, when I get the basics figured out.... But I want to be able to stop when necessary, in the mean time.

Also got the most recently melted brush holder replaced in the 2WD bike. As long as I stay of the looong steep hills, I think that bike will be OK for running errands and having a little fun.
 
Avid Single digits are some of the best rim brakes on the market, and typically go for about $15.

http://www.pricepoint.com/detail/15390-040_AVDS57-3-Parts-159-Brakes/VBrakes/Avid-Single-Digit-5-Brake-2007-offer?utm_source=Googlebase&utm_medium=datafeed&utm_campaign=FTP&offer=IN080GLB.htm&zmam=3075515&zmas=1&zmac=30&zmap=040%20AVDS57
 
RLT said:
Anyone know if those Bulldog brakes electricrider.com sells are as good as they say they are?
Or if not, what's the best inexpensive rim brakes? I don't want to spend much on them, because this new bike is really only intended to be a 'test bed' .... The 5305 will either go on the original bike, or I'll buy/build something even stronger, when I get the basics figured out.... But I want to be able to stop when necessary, in the mean time.

Also got the most recently melted brush holder replaced in the 2WD bike. As long as I stay of the looong steep hills, I think that bike will be OK for running errands and having a little fun.


I have only read bits and pieces of the thread and the post but the part in red caught my eye.
I have recently been fooling with brakes and have found that the center mount brakes seem to suck.
I have not tried bulldog as sold by electric rider
For my bike I found a U-brake adapter in a box at a BMX shop. Along with that I found an old Ubrake and a short-pull lever
Brakes kick arss!

Ask around for a Ubrake adapter.
Make sure you get a short pull lever (mechanical advantage)

I should qualify the above statement with the fact that I know nothing about bicycles. I never even took one apart till I built my electric skin sanding machine (er.. electric cruiser bike)

Let me know if you wan me taka picture

-Patrick
 
Thanks guys. I found a real good deal on both the Avid and the bulldog (Jenson) and bought one of each. My super cheapie bike DOES have both kinds of mounts for rim brakes, so I don't have to look for adapters. And the OEM shimano brakes on the 2WD are actually pretty decent.
 
Back
Top