Ryobi One+ Electric Bike Build

EVBiker2000

100 W
Joined
May 15, 2010
Messages
108
Location
North Texas
The LIPO batteries and I did not get along, so we divorced. Among other things, what really gets me is that most of the rechargeable battery technology out there is just plain hard to get. Hobbyking does seem to reign supreme but I just don't like having to order LIPOs from the web. You get the order after about 2 weeks, and then find out that it was damaged in shipping, or it's defective, or, etc. etc. So I wanted to come up with a way that I would not have to worry about this hassle. I wanted rechargeables that are easy to get, i.e. LOCAL, and cheap enough that it didn't cause me a divorce and broken family. :) I love the 36Volt Lithium Nano Phosphates from DeWalt, but good golly molly, it scares me to have to work for months to save up for these, and then what if I screw one up??? I think I would literally crawl into a fetal position and begin bawling like a baby.

So, I spent about 20 some odd hours reading about rechargeables. After reading some excellent sites, (one of which I'll post below), I have come to realize that all rechargeables have some weirdnesses about them. If batteries and I are going to get along, I need to learn the proper care and feeding of the battery I chose. After much internal debate, walking around the neighborhood, chewing on dry pieces of straw, a few root beers, I've decided to go back to ANCIENT TECHNOLOGY. I have decided to choose NiCads. :shock:

Let the flame wars begin! :lol:

After much reading, I realize now why NiCads were such a failure in the mass consumer market. I surely wasn't told all the information about "exercising" and "conditioning" NiCads, and I'm sure most of you were not either. Among other things, isn't it amazing how guys take their NiCads and LEAVE THEM ON THE CHARGER?!?!? The absolute WORST thing possible to do with a NiCad. The "Dendrite" cystals LOVE that type of environment and grow like crazy. I think for the most part, NiCads and electric bikes can be a great fit. You put the NiCads on a charger, when the charging process is done, you take them off and ride. Absolutely no charging up the NiCads and then allowing them to sit around for days/weeks on end. Not only would that shorten the NiCad life, but NiCads rapidly lose a good chunk of their charge each day anyway.

For me, my electric bike is to be my 2nd Vehicle. I don't want or need something I have to fiddle with everyday. If a battery pack goes bad, I don't want to wait 2 weeks for a new one from Hong Kong. Or if I screw up, I want to be able to walk over to a local store and buy a replacement. I'm going for simplicity now.

So here it is.....the Ryobi One+ Electric Bike Build.
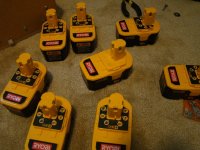
RyobiEVPower.jpg

I chose the 18V Ryobi One+ battery (Model P100) for several reasons. One reason is it is readily available at Home Depot centers around the country. Also, it is pushed heavily by Home Depot who sells a 2 pack for $50. They are 1.7 AmpHr NiCads (15s1p configuration). That is about 30.6W Hours per battery. I'm going for 28 of these for a total of 28*30.6= 857 Watt Hours. They will be wired as 4s7p, or 72Volt, 11.9 AmpHr.

Another reason for choosing the Ryobi One+ is because at some point in the future, if I am not happy with the Model P100, I can easily upgrade to the P104 model (Lithion Ion, 2.4 Amp Hour). The foot print is the same as the P100 model. (There is also a P103 model as well).

I am creating a crude but effective Ryobi battery connector out of 1.25 inch PVC end-caps and some 8-32x1 Brass Flathead screws. By tweaking the distance of the screws, I'm able to create an extremely well fitting connector. I'm also adding a tap to the thermistor connector. Using the temperature is really not the best way to monitor the NiCad charging process. I plan on using the Voltage Delta method, but I'm going to keep the temperature/thermistor connection because I think it provides an extra reading of the charging process....just in case the temp gets out of hand, my charger can shutdown the charging process.
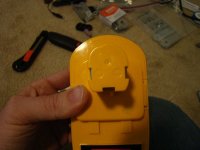
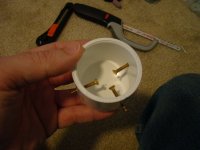
Ryobi Footprint.jpg
Ryobi Connector1.jpg


In this photo, holes are drilled in the end-cap. A machine screw will hold the end-cap to the back wall of the battery box.
View attachment 2
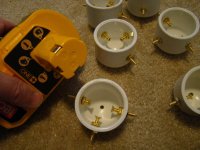
Ryobi Connector3.jpg

Once the connector is on, it takes about 20-25 lbs of pull force to get it off. A really nice snug fit, probably much better than the connection in a cordless drill.
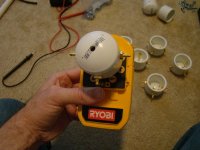
RyobiMated.jpg
 
This is a really good read about NiCads. Also, the real life examples are interesting as well.

Memory: Myth or Fact?
http://www.buchmann.ca/Article10-Page1.asp
 
what are you planning to use for a charger? and fyi. those packs have a klixon thermal switch,not a thermistor.
 
I will be designing my own charger based upon the ATmega 168 micro-controller. Each 18Volt pack will be individually wired to a single charge circuit (not much to the charge circuit, the micro-controller does all the monitoring.) A monster wire harness (which I don't like to do, ugh!), but this is a commuter bike, not a drag racer so the currents are going to normally run 6-7 amps total for the pack. There is 7 parallel strings so each series of 4 batteries will see about 1 amp normally.

Since this is 28 battery packs, I could go with 28 DPDT 20 Amp relays, but that adds alot of cost, alot more moving parts that have to ride all the bike bounces, just more complexity. So, I'll most likely just make a switch panel of 28 DPDT switches. Much cheaper, more rugged, and it only takes about 10-15 seconds to throw all the switches from RIDE mode to CHARGE Mode.

Where did you find out about the thermal switch in the P100 pack? If that's the case then the Ryobi one+ charger must be monitoring the end of charge via the voltage....or worse, they just set a timer and start the charge :shock: . I probably will go ahead and wire it up just to monitor it during charging.
 
recently i aquired well over 100 lbs. of saft 5ah d cell nicads. and i've got two machines running on them so far.the ebike is running 3 36 cell packs in paralel , and the scooter is running 2 32 cell packs in paralel. now the reason i know about those thermal switches is because when i recieved the cells,the only thing i had to charge them with was a ryobi charger.one of my drill packs was dead, so i disected it to use the housing for a plug in for the d cells.and i may be wrong but as far as i can tell,the thermal switch is the main charge termination for those chargers. also my local batteries plus store was kind enough to give me a box full of dead ryobi packs which i've taken the switches from to use in all of my homebuilt packs. i charge all my packs with sla chargers through a relay circuit,so when the switch cools down and closes,the charger stays off.
 

Attachments

  • 02021714.jpg
    02021714.jpg
    135.3 KB · Views: 7,929
  • 02161705a.jpg
    02161705a.jpg
    154.8 KB · Views: 7,929
  • 02191807b.jpg
    02191807b.jpg
    197.4 KB · Views: 7,929
  • 02251946aa.jpg
    02251946aa.jpg
    188.3 KB · Views: 7,929
ok, I took a look at mine and measured it. You are right, it's a thermal switch. But I'm confused because you said the battery cools down and it closes. I think its the opposite. Currently, all the measurements on my Ryobi packs show a dead short from the bottom middle to the side, so the switch is presently 'closed'. I think what happens is when you plug the pack into the Ryobi charger, it checks the thermal switch and if it is 'closed' it starts to charge the battery. If the battery gets hot, the thermal switch opens and the charger senses that and stops the charging. I could be wrong about this but it really doesn't matter for me since I'm making my own charger and will use the + and - connections on the sides.

Here's some more progress shots.

This is the rear rack support board.
RearRackSupport.jpg


Support board with steel angle braces that the battery boxes will mount to.


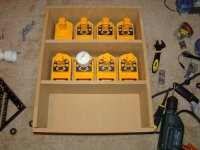
Spent much of the afternoon working on the battery box. It's 1/2 inch MDF board. I'll have to coat it really good with primer and paint in case I ever get caught in a rain storm. I don't really like working with MDF but it's affordable and easy to work with. Plus, I'm pretty much in "proof of concept" mode anyway.

Battery Box 2.JPG


I placed the batteries in the box just to get an idea of the layout. Each section of 4 Ryobi's is 72V, 1.7 Amp Hour. This is just one battery box. The other side of the bike will be a duplicate box. Since this is only 24 Ryobi's, there will be a set of 4 Ryobi's placed in the back. I'll work that out later.

In the picture, the batteries are pointed out towards the camera but when I mount the battery boxes, they will be pointing in. The idea is I can open a hinged door, pull out one or more Ryobi's from their connector, and put in a new pack quickly without having to undo wires, or re-solder connections. Quick and simple maintenance in the future.
Battery Box 1.JPG
 
Yeah, I don't like the weight issue. That's the downside of having the convenience of these things mountable for easy plug in/out. If the proof of concept works after many miles, then I might switch out the MDF battery boxes for thin aluminum sheeting and angles. MDF is dog gone heavy!!
 
The batteries are even heavier..
Not as bad as lead acid, but when you add the box into the equation, things look bad.
Weight balance will be a big issue. weight up so high, and then to the sides.. is the worst case scenario for electric bike handling.

I don't think any rear rack will take 60lbs though, so that's the first problem.

Also, i have heard repeatedly that nicad can't be charged in parallel due to the delta peak detection.
It can explode just like lipo too when the parallel charging goes wrong. I bet cadmium fumes are far worse than lithium-cobalt fumes.

http://www.google.com/search?sourceid=chrome&ie=UTF-8&q=nicad+can't+charge+in+parallel

^--- many many results

Are you going to disconnect each parallel group and charge them separately?

I don't want or need something I have to fiddle with everyday. If a battery pack goes bad, I don't want to wait 2 weeks for a new one from Hong Kong.

Hm.. for one you can get lipos from an American warehouse..
For two, NiCads are being phased out as they are extremely toxic, so availability is going to be a problem down the line. Everyone is generally going lithium..


This sounds like a really bad idea. It sounds more complex than lipo, heavier, less safe, more expensive, and more of a pain in the ass to charge.
 
On my earlier battery box when I had LIPOs I had all the weight up high and it was very easy to handle. My oldest son said he could hardly tell it was there. In this design, the weight is lower to the ground to make up for the heavier batteries. Try to lower the center of gravity. Also, I don't do mountain trails or 'muddin' as they say. It's just a commuter bike made for residential area riding, but when I do some test rides I'll see how it rides.

You are right about the rack. I'll need to add some support since I don't want all the weight to be supported by the rear rack. It is only rated for 50 lbs.

As far as charging, each Ryobi battery will be independently charged with it's own charging circuit. Nothing will be charged in parallel. I really don't think charging any batteries in parallel is a good idea no matter what. Sure it's done, but you lose control of the process.

I expect NiCads to eventually be discontinued years from now, but they have been around since 1899. So I'm not very worried yet. If so, the Ryobi P103 or P104 Lithium Ions have the same footprint. I'm flexible. :)
 
It's funny that we are talking about the weight of the batteries/battery boxes being a problem for handling when I hear guys on the forum talking about how they are concerned about putting their ebikes through undue stress because they weigh between 250 - 300 lbs. I wonder what the handling of that is like when you have 250 lbs sitting at the highest point on the bike. :lol:
 
EVBiker2000 said:
As far as charging, each Ryobi battery will be independently charged with it's own charging circuit. Nothing will be charged in parallel. I really don't think charging any batteries in parallel is a good idea no matter what. Sure it's done, but you lose control of the process.

That sounds like a serious pain in the ass. Worse than any lipo setup i have ever seen.

Nothing wrong with charging batteries in parallel. You don't lose control over anything. Pretty much anything with a good amount of lithium in it will have many cells in parallel. The batteries will level each other out in a parallel group when charging or discharging, it is actually quite ideal.

EVBiker2000 said:
If so, the Ryobi P103 or P104 Lithium Ions have the same footprint. I'm flexible. :)

Yeah, but you will have to change this advanced charger of yours as lithium wouldn't work for you anyomore.

EVBiker2000 said:
It's funny that we are talking about the weight of the batteries/battery boxes being a problem for handling when I hear guys on the forum talking about how they are concerned about putting their ebikes through undue stress because they weigh between 250 - 300 lbs. I wonder what the handling of that is like when you have 250 lbs sitting at the highest point on the bike. :lol:

I weigh 230lbs and 10lbs up high in a rear rack does make the bike more tippy, and i've ridden bikes where there was ~20lbs in the rear rack and it definitely made it feel funny enough to me to feel unsafe. It changes the bicycle's dynamics, which are separate from the rider's. And in fact, the rider is forced to put their weight into the center on most bicycles.
 
No, its easy. I'm used to designing circuits so for me it's no big deal. I don't like being dependent upon a $150 charger. One part blows and I'm scratching my head what to do. With my own circuit it's nothing. As far as Lithium vs NiCad charging, for me it's just changing a few lines of code so no big there either.

I don't like to be dependent upon HobbyKing.com or Icharger. I'd rather be dependent upon Home Depot and ATMEL and myself.

I weigh 180 lbs so adding a 60 lb battery pack just puts me right up to what it most forum members weigh on their bathroom scale. :)
 
I'm looking forward to seeing the NiCd charging setup.

NiCd gets a bad rap, but it has a long life and can deliver plenty of power. Weight is a minor downside.
 
Half inch MDF?? Nothing against the batteries but holy crap, you could put a subwoofer in that box.. Get some thin plywood instead! Stronger and lighter.
 
EVBiker2000 said:
No, its easy. I'm used to designing circuits so for me it's no big deal. I don't like being dependent upon a $150 charger. One part blows and I'm scratching my head what to do. With my own circuit it's nothing. As far as Lithium vs NiCad charging, for me it's just changing a few lines of code so no big there either.

I don't like to be dependent upon HobbyKing.com or Icharger. I'd rather be dependent upon Home Depot and ATMEL and myself.

It's understandable that you would want to 'roll your own' in every situation where it is feasible, however it sounds like it is going to be quite expensive ( and time consuming ) to make such a charger. You will essentially have to make 3-6 separate chargers for each parallel group, and devise a way for the parallel groups to be disconnected and reconnected during the charging and discharging processes. I take it you are going to keep the charger permanently connected to all of the batteries then? That would be the only way to do it, anything else would be a big pain in the ass.

EVBiker2000 said:
I weigh 180 lbs so adding a 60 lb battery pack just puts me right up to what it most forum members weigh on their bathroom scale. :)

Except that the extra 60lbs is going to be sitting above the rear tire, and extended out to he sides. It will dramatically throw off your weight balance, since your battery unit will be 33% of your weight. When you get off the bike, it will want to fall backwards instantly. Parking your vertically will save a lot of space though :lol:
 
you're right about nicads getting a bad rap. once i got over the charging hurdle,i found that they do the job very well.they're lighter than lead and can take a lot of abuse.i charge em hard and i run em hard. the only thing i dont like about them is the amount of space they take up,even more than lead.
 
Worked some hours today on the box, drilling all the holes and adding in the support braces. Since some are worried that this thing will create poor handling of the bike, I made the battery box nuclear hardened with steel braces so when I wreck it will survive the crash....although I might not. :lol:

Box w Mounts.jpg
 
neptronix said:
When you get off the bike, it will want to fall backwards instantly. Parking your vertically will save a lot of space though :lol:

Obviously, you never had a Phoenix Racer on the front. :lol:
 
Work has been keeping me busy, away from some fun. I built the second battery box, basically a copy of the first one. I also wired up the first row of battery connectors.

Sockets.jpg

I put together a small work surface for prototyping the NiCad charging circuitry. This is just to work out the circuit before making a permanent one. The two chips are ATMega168's from Nerdkits.com. The kit comes with a LCD which I mounted at the top. So basically, I can read the status of the batteries when charging/discharging.

Nerdkit.jpg
 
yes, too huge battery boxes, one on each side of the bike. Unless someone is inventing some new battery technology that doesn't cost the same as my monthly mortgage payment, then it is what it is. I have a 25 mile trip...and the only way to get huge distances is to have lots of battery weight....lithium, NiCad, Lead Acid...don't matter....takes lots of batteries to go that far. Lithium polymer is lighter, packs a heck of a punch, but is too expensive, too fragile, and doesn't last as long as NiCad. Don't like how this bike is ending up with all the weight, but just like life, it's a series of trade offs.

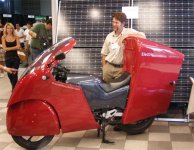
So basically, I have gone from this....


....to this......

solar-motorcycle.jpg
 
I finished the wiring of one side, and also put some steel brackets to hold the two boxes together. I put the unit on the rear rack just to see how it will look. I still need to finish the wiring on the second box, and also add some more bracing in between.

BattBox Angle.JPG

View attachment 1

 
Back
Top