Serengeti Panther Scooter Won't Run

Alright I just checked individual voltages between each of the 15 pins:

0-1 3.656
1-2 3.351
2-3 3.719
3-4 3.469
4-5 3.431
5-6 3.349
6-7 14mV
7-8 3.319
8-9 3.556
9-10 3.698
10-11 3.135
11-12 3.454
12-13 3.705
13-14 3.356
14-15 3.428

I think I somehow didn't measure a cell...since I only ended up with 14 total.
It looks like 6-7 is dead. Would this explain complete loss of power with random periods when it turns on?
 

Attachments

  • IMG_0604.JPG
    IMG_0604.JPG
    39 KB · Views: 2,513
can you take your battery out and expose it so we can count the number of cells and look for loose sense wire connections?

do you know how long the battery is in series and is it a lifepo4 pack or lithium ion?

can you expose the BMS and take a picture so we can tell you how to test the cell voltages at the BMS also if you are having trouble finding all the cell voltages.
 
Yes I'll take it apart as soon as I get home from work.

Unfortunately I'm not sure of the chemistry. Regarding the BMS...it's completely sealed and can't be opened. The battery and BMS are identical to the one Milou describes in this thread: https://endless-sphere.com/forums/viewtopic.php?f=14&t=45741&hilit=serengeti+panther

He made a fantastic diagram that shows how the battery is wired. I included it. The only difference between mine and his is the color of the wires.

Dnmun, it looks like you gave Milou great instructions on how to charge the individual cell that was low, but that the cell still ended up being a dud in the end. Do you think I should try and replace that one cell, so the same thing doesn't happen to me?
 
your sense wire that reads the 15mV may be disconnected from the battery and only makes contact intermittently.

if it really has been sitting at 15mV for all this time the pouch is not gonna recover but the others are way outa balance too.

do you have the same charger?

is it just impossible to remove the battery from the scooter? it needs to be examined closely so i do not know how you can do that without getting it out and unwrapping it from the shrink wrap. the pouch packs have to be in compression anyway. so that needs to be fixed too.
 
Yes I have the same charger that Milou described. I'll take apart the battery further to try and expose the sense wires. Does it have to stay in compression the entire time that I'm trying to take it apart and examine it?

And what's the best way to compress it...duct tape or something similar?
 
the entire pouch pack has to be in orthogonal compression to keep it alive long term. by looking at the pouches from the side you can tell which ones have puffed up already. the battery is dead now so you are gonna have to remove that one to install a new one anyway.
 
I took apart the battery a little more. I measured that cell I was missing...it's at 3.656.
The pen is touching cell number 7, the one that's dead. It's between the blue and purple wires, neither of which look loose. Is that what you meant by sense wire?

Cell 11 is the only one that looks puffed out. It's measuring 3.135
 

Attachments

  • FullSizeRender (3).jpg
    FullSizeRender (3).jpg
    71.9 KB · Views: 2,487
find two blocks of wood as large as the area of the pouches and take a pair of wood clamps and then compress the pack to see if the swelling will go back down.

so if those wires are connected but you cannot measure the voltage at the BMS then there is a disconnection somewhere in between.

it may be in the plug itself. the clips can be forced out backwards by accident while working on it or they get disconnected from the wire itself.
 
I guess I'm a little confused....I was assuming that I can't get a reading because that cell is dead. Even when I try and measure the voltage at the cell (where the blue and purple wires are soldered to the strips of metal) I still don't get a reading.
I can't check the voltage at the BMS, because the BMS cannot be opened. That's why I had to check them at the plug.

I'm sure I'm misunderstanding something that you're saying. Thanks for all of your continued help!
 
i thought you said you measured a voltage on that cell after all. if there is nothing on the tabs then it is dead and you can cut that pack apart. you can cut out the puffed cell too i expect but you have to cut them apart so that you leave behind the tab which has the solder on it so you can resolder the tabs together. the aluminum tab cannot be soldered so you have to cut them so that the nickel piece crimped onto the end is retained because that has the solder where the tabs are connected.

you may be able to reuse that BMS by using just the first 13 channels or buy another one that is 13S. if you can force the puffed pouch back into normal shape with the wood clamps then it may be usable. but compress the entire pack.

i am surprised the battery produced any voltage at all if that cell was so dead. the BMS should have shut off the output mosfets. since the output mosfets appear to be turned on i would even suspect the measurement since i trust the BMS to function when a cell is below the LVC.
 
Ahh, the confusion was my doing. That 3.656 I measured was off of cell number 1, which I didn't include in my initial list. I only measured 14 cells initially, but now I've measured all 15. Cell number 7 has always been dead.


Is this the right replacement to buy? This was one of the only lithium cells I could find that was a similar shape as mine.
http://m.ebay.com/itm/A123-Systems-20Ah-3-2V-battery-/121730256052?nav=SEARCH

That one is 20AH, and mine are 15
 
no. those new pouches cannot be soldered to. they have an aluminum tab and you cannot solder to the positive aluminum tab.

your pack has aged and has developed a lot of internal resistance also so even if you could find a pouch with a nickel tab attached to the aluminum then it would not charge or discharge like the others. so it would be outa balance all the time.

about the only option you have is removing the two bad pouches and making it into 13S unless you can find 2 similar sized and age pouches with the nickel attached to the positive tab.
 
Thanks for all of your help. I think I'll give a go at rewiring it to 13 cells. I'll let you know the results when I'm done!
 
if you can compress the pack and get the puffing to go down on #11 then it may retain enuff charge to use it but when they get really puffy like that it is hard to make them store charge.

to proceed, do the compression first and give it a week to shrink.

in the meanwhile get a set of small alligator clip ended jumper cables at harbor freight. i think they are $2.99 for 10.

cut the sense wires off the pack you have from the top positive end of that dead #7 cell all the way up to the top. cut them off at the tab on top of the cell. no need to unsolder just cut them off. solder later.

so then you have the 6 cells with their normal connection to the sense wire bundle.

the remaining sense wires will be free. you will reconnect them to the battery after you solder a wire across the top of the cell #7. shorting it out totally so the cell disappears in the series. you can even remove it by cutting off the tabs flush with the top of the pouch or do that later after you take the pack back out of compression to work on it.

i recommend using 1/8" thick hardboard for the end plates later when the pack is reassembled and put back into compression but for now while you need to create a lot of force on that #11 i recommend a thicker piece of wood to back up the hardboard end plates. turn the thumbscrews on the clamps so they are tight but not two handed fist turning tight.

tighten just as tight as you can turn it with one hand or a little less.

measure with a ruler so you know how thick it is when you start and let it sit for a week and measure again. if it does not shrink then you can remove it too. squeezing may help restore it but it may not. nobody knows the answer to that, just my circumstantial experiences.

anyway while it is in compression and you have shorted the #7 cell you can start charging it up and forcing it to balance by connecting the sense wires to the tabs of the cells using the jumper wires.

your previous #8 cell is now #7 and so on up to #14. including #11 for now. so it will have the sense wire for your previous #12.

start charging with the charger that you have. it will try to overcharge the pack now but for the time being you can use it as current source to force the pack to balance. depending on what the final voltage needs to be you can later adjust the output voltage for either 13S or 14S or find another charger then.

find the cells with the highest voltage and use the alligator clipped jumpers to connect to the small light bulb (or even to a table lamp plug, to the two legs of the cord), like a flashlight bulb, car headlight or turn or inside light, or even a power resistor if you have one. use that to drain charge off of the high cells down to the level of the lowest voltage cells. do that to all the high cells. drain them down to the lowest voltage cells while you have them in compression. and you can charge while you do this too. but you have to have all the cells connected in series to the proper sense wires and those sense wires have to be plugged in to the BMS so the BMS will turn on for charging. if it does not turn on then we need to figure out why. it may not work with less than 15 cells.

so that is the way to proceed. once we can force the pack into balance and charge and discharge it several times then you can test the capacity of the pack to see if will store enuff charge to be usable. all that is done while the pack is still in the current configuration with the alligator clipped jumpered sense wires.

that is when you will know if #11 can store charge and if it can be used. you may have capacity issues with other cells too. but all that can be worked out before deciding to either keep this pack or buy another 48V 20Ah pack from sun-thing guy.

or by then decide if you will be able to use some of these if they have the full 15A and add to them to make a 24S 72V pack if the controller and electronics will handle it. or even swap out the controller. but battery testing and repair first.

you need a DVM that allows you to measure current also for doing the capacity test but a watt meter is even better and you need one later so go buy one on ebay for $13 or whatever they cost now. but if your current meter will handle the 10A of current then you can use it except your really need two because you have to measure voltage at the same time. so either another DVM or buy the watt meter.
 
Ok, I had the pack in compression for 5 days, unfortunately it didn't really change much in size. I cut out that dead cell #7 flush with the top of the cell, like you mentioned. I also cut off the sense wires from cells 8-15. I'm confused now on how to reattach the sense wires. I feel like I would have to detach the tabs that are stuck together from cells 8-15, and reattach them so that they are back in series. My finger is where cell 7 used to be. Do I need to connect the tabs that the arrows are pointing to, and so on all the way to the end?
 
solder a wire on the solder left behind on the tab on the top of #6 to the solder on the tab on the bottom of what used to be #8.

do not solder anything else. the wire will run from one side to the other since that pouch is now missing.

now your old #8 will become the new #7 and so on up to where the old #15 will become the new #14. you will have one extra sense wire for #15 so you can leave it disconnected.

after you solder the correct sense wires back in place in order, then we can test the BMS to see if it functions without #15 sense wire connected. solder the sense wires back to the solder spot left behind from the old sense wire you cut off. this is why i wanted you to make sure to leave the nickel part of the tab of the positive of the old #7. that gives you something to solder the wire to. you can use 12AWG wire. put tape and plastic or cardboard back over the tabs to prevent them shorting to each other again.

after that we can charge it. it should charge.
 
Ok I soldered the sense wires back in the new order (leaving the number 15 sense wire free), and attached a 12 gauge wire between cells 6 and the old number 8. I also have it in compression.
It looks like the weakest cell is the old number 11, the puffy one, it measures 3.0 V. Should I discharge all of the other cells until they get to 3.0? Or should I just cut that cell out like I did with number 7?
 
when you say weak because it is only 3V do you mean you have been charging it and the cell never climbs above 3V?

if you have some jumper wires with alligator clips on each end, then use a table lamp, connect the two legs of the plug across the parts of the battery outside that #11. so from B11 up to the top B14 and you could even use a 12V light bulb there.

and when that section drops to 3V, then do the other side, from B0 (which is the same as B-) up to B10 which is on top of #10. that would require the 120V light bulb or you could do it in sections of 3-4 channels at a time with a 12V bulb.

then when all of the cells are down to the same level as #11 you can charge with the charger and see how high the #11 will go. it should fill with charge and climb up in voltage with the others. you should be able to charge the entire pack up to 54-55V.

your charger will be putting out a voltage for 15S so the pack will try to balance at about 3.9V so it will be hitting the HVC a lot and you will need to use the 12V light bulb a lot to drain the high cells to force them all up to as close to the same voltage level as possible.

but you wanna try to get that #11 up to 3.65V or so, 3.60 is almost ok, it will be a long hassle to do it.

but getting all of the cells charged up to full voltage allows you to now discharge the entire pack together so you can monitor the voltages as it discharges to see if one cell empties out before the others. this is called a discharge test.

you can use your table lamp to discharge the entire pack into. if you have a watt meter then you can discharge through the watt meter to measure total charge delivered. if you have two DVMs then you can use the 10A scale on one of them to measure the current during the discharge, and record the time it takes until one of the cells reaches the 2V level where the BMS will turn off the discharge. at this point, where the battery has totally discharged from full charge, is where you wanna know the voltages of the other cells. that is how you know the condition of the battery.

that will tell you if you need to remove the #11 cell. if it is really damaged it will discharge totally first and you will see it. it does help a lot to know the total Amp hours it takes to discharge it, but it is not totally needed. just the relative performance to the other cells. based on the voltages on all of the others at the end point.

then recharge the battery with the charger and see how close they all come to the final voltage around 3.8V or so and then you can do the same discharge test a second time and the second time you should get similar numbers and behavior but it can change in balance as you cycle the battery since it has not been at full charge for a long time and the cells need to be reconditioned to full charge after a long period of being undercharged. after several cycles from full charge to full discharge the balance will stabilize again.

lotta explaining but that is the general idea. to force all the cells to full charge and let the BMS balance it and then discharge to see how close they cells behave to each other. that is called balance. where each cell delivers the same amount of charge and goes to the 2V at the same time.

then after doing that and you have a lot of familiarity with the cells we can decide then if it makes sense to remove the #11. i suspect it may have higher internal resistance than the normal unpuffed cells and we can evaluate that later, but just for now try to see how close they are in balance when fully discharged.

lemme know if that makes sense. eventually we can change the charger final output voltage, depending on whether #11 remains or not. hope that helps. seems complicated,and it will be initially, but after you do the discharge it should begin to make more sense what you have to work with in the remaining pack.

then we have to worry about the LVC on the controller if the battery ends up dropping down to 13S. that may be a big problem, and then we may have to find more of the 15Ah pouches. maybe from a used ping pack that someone sells or parts out. that may give you extra cells also so then you could consider going up voltage to 18-20S so upgrading the controller might be needed.
 
I have a question regarding this motor controller wiring. I am having trouble finding a schematic to help me identify which wire from the controller to short to bypass the electronic lock. I have the controller gutted from the same scooter but all the wiring has been salvaged already and am having too much difficulty trying to figure out which wire would have connected to the ignition. Besides the electronic lock signal, are there any other signals that require a specified state before powering the motor?
Thank you!
 
Okay, time for fun facts about Chinese scooters and you really should like this: Probably your Panther is just a generic bike that Serengeti was putting their name on. So you can find others who marketed the same bike, such as Kymco or even the Aeolus E500-Scooter if that's the same one, then use their schematics or even just buy THEIR wiring harness. (GASP!) Of course that means you have to take a good look at several of these and find the right one.

What you want to do in a situation like this, (Should finding the identical scooter fail) but look for a match in your controller with Currie, Razor, etc. This page doesn't all have model numbers, that's their order number, but you might identify one of them as your controller and there's the wringing harness, i mean wiring harness. http://www.electricscooterparts.com/speedcontrollers24volt.html If I'm wrong aout it being 24v there's links at the top for 36v and 48v.

Working on this might make you very good at the sort of internet detective work that makes these jobs possible and still cheap. By the time you're actually working on it you REALLY understand the dang thing.
 
Hi,

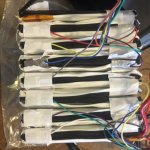
These kind of scooters are very common in China, with a 48V lithium battery they cost about 1500-2000 yuan max.

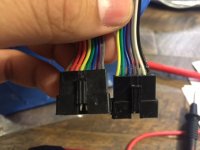
One of the main issues you have with chinese scooters is that the wiring quality is disatrous. Almost nothing is soldered together or properly insulated, and you end up having shorts everywhere. I don't really think that your only problem is coming from your battery, since you said that you had no power at all while turning the key. If your problem was due to one cell being dead, then it should only put the controller in protection mode, so that it stops you at the defined low limit. But while the controller shut down power to the motor, it doesn't cut all power to the rest of the circuit.

That being said, it could also be the BMS who cuts the battery of since it detects that the voltage level in under the limit.

First thing I would try if I were you would be to disconect any non necessary wires from your controller, just keep the followings:
-motor wires + hall sensor, if any
-Battery + and -
-throttle,

Then, plug the ignition wire to the + wire of the battery, your controller should start up, then you can turn the throttle to see if it works. If it doesn't work, check that this is not a throttle issue by disconnecting the throttle and shortening the + side to the signal wire. The motor should then run at full speed.

Some controllers also have 2 wires for quick check, usually 2 single white wires. You just connect them together and the motor should spin. Then disconnect and reconnect them and the motor should go in reverse direction.

If it still doesn't work, just find 4 12V batteries and hook them up together, just to make sure that the problem is indeed coming from your battery. It doesn't make sense to me to start tearing apart your battery if you're not sure that the problem is actually coming from there (even if I know that you have a dead cell that will need to be taken care of anyway). Batteries don't usually die like that, if this batery died it may be because there is a problem elsewhere in your harness so you better check that before.
 
Well, I'll tell you: NOT to say they're sending great quality to the U.S., but they've definitely improved over the last 15-20 years. They must be keeping even worse stuff there than they're sending us. These particular scooters were $2,500 to begin with, then were liquidated at the far more appropriate price of $700.

So I guess there's a question of how much of the old scooter he has. What is he reusing. Not that you're not offering him an easier way, but hey, this is Endless Sphere. We tend to be ambitious around here. He wants to get the whole thing working like it was SUPPOSED to work as new, well how fun. If you read this thread you've seen some of the woes the Panther suffered. You're trying to discourage the guy who might solve the puzzle.
 
I was hoping someone could help because my controller doesn't seem to match any of the wiring charts I could find online (including the ones on your linked page, albeit a good source!). My controller looks like it is the same one that aelb771 posted pictures of earlier in this thread. I am having trouble deciphering which line is which though based on the PCB markings. I have added an image below showing the unidentified wires coming out of my controller still. Any help would be appreciated! In the meantime I will of course continue investigating online...

20160313_215637-e1457925135134.png
 
I am a fool. I missed a third wire on the power connector that just needs to be pulled to Vcc to disengage the electronic lock.
 
Back
Top