Speed Vs. Amp Requirement Graph

xyster

10 MW
Joined
Jan 2, 2007
Messages
3,089
Location
Visualize Rural Sheep
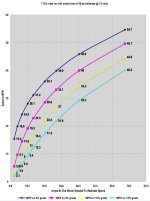
Finding it quite helpful while planning my EV, I originally posted the graph below at the Old V. The variables are calculated from the bicycle speed and power calculator here:
http://www.kreuzotter.de/english/espeed.htm

All I did was dump to Excel the calculator's output for power requirements at different speeds and inclines for a standard MTB rider carrying extra weight, dividing by 74 volts to get the amps needed at the wheel (meaning after subtracting efficiency losses).

I've found excellent agreement between this graph's predictions, and real-life results for my system.
 

Attachments

  • e-bike_speeds_amps.jpg
    e-bike_speeds_amps.jpg
    57.2 KB · Views: 5,423
Speed is not the primary goal of a mountain bike design. If your primary goal was speed then your central focus would be aerodynamics. (and high speed handling) There's a REASON that the Indy cars are so sleek, it's because they realized long ago that for top speed your biggest enemy is wind resistance "by far". (it dwarfs everything else)

:arrow: You might begin thinking about things in terms of ACCELLERATION.

Start to think in terms of 0-40 times in seconds. That's the area that the "big torque" mountain bike beats the slender aerodynamic (low wattage) high speed bike.

:arrow: BUILT RAM TOUGH! (like those "macho truck" commercials)

Top speed isn't your thing... it's RAW POWER!

Embrace the power aspect more...
 
Safe your right but the mountaing bike is just the platform that we work from. Theyre built to take the extra weight they usually have an excess in braking power. Sure to go all the way in performance you would ideally have a custom made machine, a la F1. But for the most of us its the mountain bike sure its not the ideal frame from an engineering standpoint but like i said its what we have and push it we will.
by the way i am impressed with the bike that you built, its rare to see something built from scratch from the bottom up, it really is impressive work

Joe
 
:arrow: Being able to weld is "the" barrior that separates being able to do what you want in bike design verses using what you can buy. If you've never welded before it does take a little getting used to, but it's a rewarding skill to have. Metal working is fun.

All you really need is:

1. Welding torch (or an electric welder which can be purchased for less than $200)

2. A "cut-off saw" which uses composite material. Forget any type of steel band saw or anything like it. The composite saws cut through metal like butter and the composite wheels cost only $5.

3. The newer small circular grinders are cheap ($25) and they are really flexible to a lot of tasks. They use them on "American Chopper" a lot. MUCH easier than the big grinding wheel. (more practical) You can actually cut OR grind with them.

4. Buy some metal tubing that is of the correct thickness.

Between the welder and doing fiberglass you can create whatever your mind imagines... :D
 
Thanks XYster,

This is good info.

I can get a general idea of power I might need to go 20-25mph, depending on the slope. (I enjoy a brisk ride, but my goal is to build a good commuter.)

It gives me a better understanding of what controller and battery setup to use. Of course, I my setup will be different from yours, but learning what performance others are seeing is really helpful.


:)
 
I'd love to learn to weld then DIY my own rides. Cost is a barrier. Welding equipment and supplies isn't cheap.
 
Brazing is usually a suitable option and can be done inexpensively not to mention its easy. When done correctly, brazing is incredibly strong. For anyone interested in welding, I suggest a local trade class to get started.

I am fortunate to have collected a variety of welding equipment over the years. For tubular frame construction, my preference is good ol' fashion brazing and/or torch welding. I've got a good quality MIG setup but it isn't well suited for detailed work. Works well for tacking parts in preparation for final beads with a torch.

Brazing chrome moly isn't recommended though.

My preference for detailed work is TIG but I have yet to be able to justify the significant investment in a quality machine of my own.
 
v_tach, I have never heard of brazing not being good for cro-mo, it is the way nearly all better bikes were made not that long back.
Also the way I build mine.
Brazing is a better option for the home builder due to it's ease of use and no danger of blow through on thin walled tubing etc.
 
The nice thing about welding with a torch is that you have a lot of flexibility in what you can do. It's probably the most versatile way to go if you are welding steel. I'd like to be able to weld aluminum because my "Delta Box" design intentions would be perfect for it. For now I'm going to do it in steel, which is a little heavy, but at least I know it won't suddenly break.

:arrow: To do brazing don't you need some sort of prebuilt tube joint to plug into?

For welding you can just slap one tube onto another and weld it and if you think it's not secure enough you can add a metal brace to it. It's crude, but if you select the right tube sizes and put the right amount of bracing you can do okay.
 
Richard Finch's popular welding book warns against brazing 4130 - which is bad information and gets repeated a lot. Schwinn brazed thousands of 4130 frames - as have dozens of other companies and custom builders. Most of my bikes (HPV and motorized) have been brazed 4130 - NO problems ever with any joints over thousands of miles.

Brazed joints without lugs must be mitered precisely and have a decent sized fillet. If it is done well, the joint is beautiful, smooth, and very strong.

One of the Reynolds steel alloys for bike building is identical to 4130 - I forget which one.

For fine bicycle level work, brazing is my favorite process. I don't do that sort of thing anymore, which is why I do everything with a MIG unit now.
 
i suppose your the person to ask. Something i always wanted to know, is it possible to braze or weld aluminum to steel.
Joe
 
I'll answer for him... no. (people have done it but it's very complicated and the results aren't great)
 
The information I was taught regarding brazing chrome moly was that high nickel content brazing rod and silver alloy were the appropriate choices. Its the common brass rod that I was warned against.

I know brazing had been used in bicycle manufacturing for many years, I just figured some variant of the high nickel content or silver alloy was being used. Since it requires a higher temp, acetylene is required rather than the DIY MAPP gas outfits you can buy at the local home center.

Rohorn is knowledgeable and well experienced so his information is no doubt on the money... thanks Bob, good info as usual.

Leeps, I've seen some techniques demonstrated that will join aluminum to steel but by brazing not welding. I don't think any of it had enough tensile strength to be used structurally.
 
V-tach, thanks!

I built my first bike (powered by a harley engine.....) using 85,000psi nickel/silver brazing rod. It was an absolute pain to work with. It shrinks like crazy and requires a lot of heat to flow right. One experienced bike builder got a chuckle out of that when I told him about that. But it did work. Nickel-silver alloys are commonly used to braze carbide to steel tooling.

There are a lot of different brazing alloys out there - I forget which ones are the good ones for frame building. But a lot of the experienced guys get their brazing rod and flux from Henry James, a framebuilding supplier. I'm leary of welding shops where the sales guy just says "Uh, this is brazing rod, it's all the same" and can't/won't break out the spec sheet.

Which reminds me - the flux is very very important. Using flux coated rod is a flaming pain, since the flux seems to turn to glass and is near impossible to remove with non-destructive methods. Good flux (when not overheated) is easy to remove with hot water.

One big hazard with brazing is that, if the joint is overheated, the brazing alloy will boil and become far weaker as some of the elements depart. That's why the FAA won't allow brazed primary structures.

The only common and popular method I'm aware of for welding aluminum to steel is to run and engine without oil.......
 
Well,

I'm no brazing expert, but I used two MAPP gas torches and 1/16" brass rod to braze my recumbent together and it's plenty strong. As a test before I built the bike, I brazed two steel tubes together, put the finished part in a vise, and proceeded to pound the crud out of it with a large hammer. The metal pipe broke and the place where I made the braze was solid as ever.
 
Swordman, you only quoted selected lines from my post and it puts my words out of context... I think. :?

It was the other brazing alloys that required acetylene, not the typical utility brass rod which works fine with MAPP as you noted. From what I've been told, MAPP will work with the higher temp alloys, its just not as efficient and you'll burn through the little bottles very quickly.

I don't have a lot of personal experience with MAPP. I've always used acetylene since its what I have on hand.

As far as brazing chrome moly with brass rod, I've done it as well in the past but its not my preference.
 
I removed the quotes. It really didn't add anything to my message and I wasn't trying to take your comments out of context.
 
Is brass or bronze used for brazing?
 
Swordman said:
I removed the quotes. It really didn't add anything to my message and I wasn't trying to take your comments out of context.
Sorry if I misunderstood. The lines from my post you had selected to quote made it seem to me as if I suggested MAPP was not appropriate for typical brass rod.


D-Man, there is both brass and bronze brazing rod available. Honestly I don't know enough about what is more appropriate for different applications but I use the term brass generically. I'd imagine the properties very similar. The material I use is actually bronze rod.

As far as parts fit, it should be as close as possible since brazing depends on capillary action of the filler material. I don't know any exact specs but I'd say anything over about a 1/16" gap is too much. They say the most time consuming and important part of a quality paint job is preparation. I say fitment is at least as important for a durable brazing or welding job. I spend more time fitting than I do with actual brazing or welding.

I get my brazing materials at a local welding supplier. About $6 for a pound of rods
 
Aluminum can be "connected" directly to steel and any other thing that can be silver soldered.

I have done it for years. The most complicated thing I built was a Crosley car manifold. It had 4 intake ports (aluminum) BRAZED to the silver solder coated steel plate that bolts to the head. The 4 exhaust (steel) headers were welded. That was in 1960. The rod was from the Eutectic company.

Don
 
Back
Top