Stealth Bomber QS205/Kelly KLS7218S Upgrade

Joined
Sep 26, 2013
Messages
5,095
Location
Texas
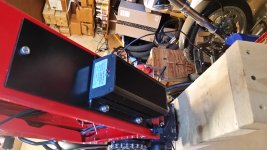
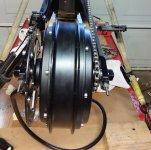
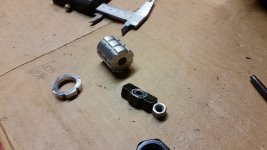
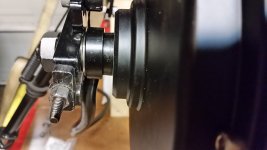
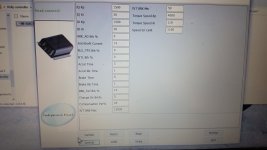
To avoid confusion this bike is a Stealth Electric Bicycles 2013 Bomber #412 made in Australia, not a chinese clone. It came stock from the factory equipped with a Crystalyte 5403 motor, 65 amp Infineon controller, Cycle Analyst V3 computer, and a 72v 18ah LiFePo4 battery. It was accuately advertised as a 4500w, 50 mph bike. I've never had any complaints about the performance, and it's always been as dependable as an anvil, but after 9 years it suffered it's first major failure. A hall sensor went out, and instead of turning it off right away, I tried to ride it home, and the controller also failed. Rather then go back with stock parts, I decided to upgrade to more modern componets, so I purchased a new QS205 motor advertised as 5000w, and a Kelly KLS7218S controller which is a 80 battery amp, and 200 phase amp controller. I replaced my battery 2 years ago with a 72v, 35ah, with a 100 amp bms which is still in good shape. Since the CA in built into the frame I decided to utilize it for the speedo, and volt meter finction, but the wattage readout became redundant with the Kelly controller so I didn't hook that part of it up. I've been riding the new setup for almost a month, and it's been working great with noticeably more acceleration, and slightly higher top speed of 55 mph. The efficentcy seems a little better too, I estimate 5 to 8% better range at the same speeds. Overall performance is a mild 20% improvement over stock, and the bike feels, and rides exactly like it always has, only faster.

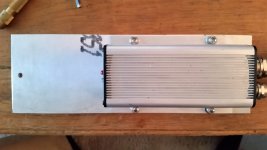
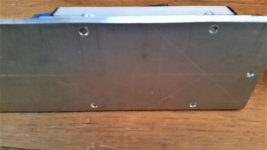
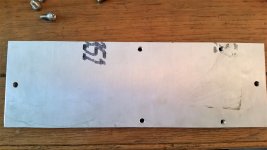
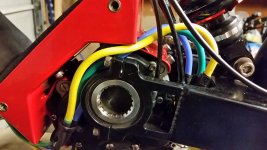
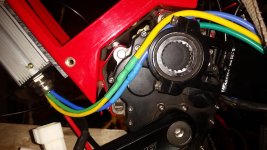
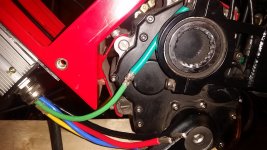
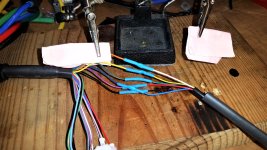
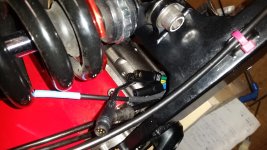
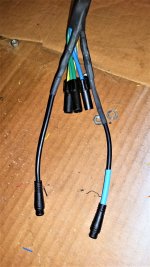
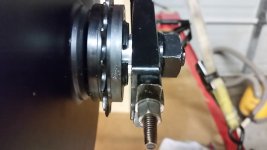
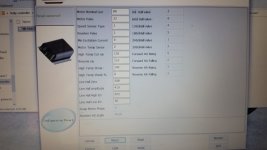
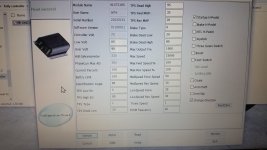
I'm going to describe this process in reverse, starting from now, and going backwards in time. This is how the final result looks.Sur Ron seat number 1 rs.jpg
 
Last edited:
The Kelly controller has a different mounting pattern than the stock controller, which mounts on 2 bolt holes in the center of the underside of the frame. I didn't want to drill more holes in my frame, so I devised an adapter made from 1/4" aluminum plate that mounts to the stock bolt holes, and the Kelly is mounted to the plate. !/4" is thich enough that I was able to tap holes into the plate, and mount the controller with 4 bolts screwed directly into the plate without the need for nuts.
 

Attachments

  • controller B.jpg
    controller B.jpg
    1.3 MB · Views: 178
  • 20221005_155016.jpg
    20221005_155016.jpg
    548.3 KB · Views: 177
  • 20221005_155029.jpg
    20221005_155029.jpg
    497 KB · Views: 177
  • 20221005_153205.jpg
    20221005_153205.jpg
    648.1 KB · Views: 177
The all the controller wires were too short, so I had to solder new wires to the correct legnths. I used 6g for the phase wires, and 8g for the battery wires. I chopped all the big ass Kelly plugs off, and installed waterproof Julet cables in their place including 6 conductor cables for the halls. I used XT150 connectors located in the same stock position near the swing arm pivot so the rear wheel can be easily removed from the controller for tire replacement. This is exactly the same as stock.
 

Attachments

  • Phase wires.jpg
    Phase wires.jpg
    1.4 MB · Views: 178
  • 20221008_231027.jpg
    20221008_231027.jpg
    1.6 MB · Views: 178
  • 20221008_213829.jpg
    20221008_213829.jpg
    1.9 MB · Views: 178
  • 20221006_205624.jpg
    20221006_205624.jpg
    960.8 KB · Views: 178
  • Hall wires.jpg
    Hall wires.jpg
    1.4 MB · Views: 178
All the cables from the motor were way too long so I chopped them, and added the appropriate connectors. Here you can see the junction where the motor connects to the controller at the swing arm.
 

Attachments

  • Halls motor side location.jpg
    Halls motor side location.jpg
    1.6 MB · Views: 174
  • Halls motor side.jpg
    Halls motor side.jpg
    1.4 MB · Views: 175
Mounting the motor to the swingarm wasn't very difficult as long as you're not planning to use regen, which I wasn't. Regen would be a problem with this setup because it will loosen the axle bolts. No regen, problem solved. I had the same problem with the stock setup too, so I got used to never using it. The stock swingarm has 168 mm dropout width. The QS205 is said to have 150mm dropout measurements, but my freewheel stuck out a little bit past 150mm. This required a spacer for the right side with a OD small enough to fit inside the freewheel, and long enough to take to the extra space in the dropout. Centering the motor in the swinarm required only a washer on the left, and he spacer I needed for the right side was 5.8mm wide, with an OD small enought to fit inside the freewheel, and the hole in the center had to fit over the axle. I couldn't find one to buy, so I ended up having to make one by hand. This was probably the hardest part. I suggest finding a machine shop to make you one. I used a piece of a billet aluminum from a shifter peg from my old Road King. Luckily QS put a long axle on the motor that's almost exactly the same overall width as the stock axle. There was a slight problem with the stock torque plates. The axle flats are the same 10m for both motors, but the QS axle is a little bigger diameter, so I had to file some metal away to make it fit on the axle.
 

Attachments

  • motor install.jpg
    motor install.jpg
    577.7 KB · Views: 174
  • Spacer right side.jpg
    Spacer right side.jpg
    949.9 KB · Views: 172
  • Spacer 5.8mm.jpg
    Spacer 5.8mm.jpg
    1.4 MB · Views: 173
  • Spacer left side.jpg
    Spacer left side.jpg
    1.1 MB · Views: 174
Lacing the rim is straight forward, but the QS motor is smaller diameter so I needed longer 138mm spokes. To help the brakes handle the extra power I went up to 220mm rotors.

[youtube]fXesPM72PDQ[/youtube]
 
These are my settings for the controller.
 

Attachments

  • control 10 20.jpg
    control 10 20.jpg
    1.3 MB · Views: 176
  • Motor 10 20.jpg
    Motor 10 20.jpg
    1.2 MB · Views: 176
  • Vehicle 10 20.jpg
    Vehicle 10 20.jpg
    1.5 MB · Views: 176
That pretty much covers most of the process. I'll be glad to answer any questions owners might have that I haven't covered.
 
This is an update after 8 months of use. I didn't really keep track of my mileage since installation, but I estimate 2000 miles so far. I've had zero problems, and have no complaints. I'm very pleased with both the Kelly 80 amp Sinusoidal controller, and the QS205 80 amp motor.

It's kind of unfair to directly compare my 9 year old stock 65 amp Infineon, square wave controller, and Crystalyte 5403 motor, but it's hard for me not to. In 2013 they were state of the art, and I was never disappointed, but time, and technology finally caught up.

I'm happy to report the new setup is better in every way, which is not really surprising. I feel like there's only slightly better acceleration from 0 to about 16 mph, but after that there's a big difference. With the exact same wheel, and tires I've picked up an 5 additional mph. Where it used to start struggling around 45 to get up to 50 mph , now it zooms past 50. A lot of times now I find myself cruising in traffic at 50 mph on partial throttle without realizing I'm going that fast. I always admired how quiet my motor was, but now it's even quieter at every speed.

One more thing, and this is a big one, efficiency is better too. I'm seeing greater range out of my same 2 year old, 35 amp battery. Range never really was an issue after getting a this battery, because I only really have a 50 mile butt, but the difference is, now I can go about 10 mph faster, and get the same, or better range. All my riding buddy's are amazed at the range I'm getting when riding with them.

So to summarize, My bike is now faster, quieter, and has better range, without losing any reliability. I attribute this success to how well matched all the main components are to each other. My battery has a 100 amp bms, which is prefect for a 80 amp controller, and the motor is rated for 80 to 100 amps, so no component particularly stressed even running at full power.
 
Wow very detailed and very clean modification. You know you mentioned that lag from 0 to 16 mph..and your phase current is locked out, My friends 5k watt stealth clone had the sabvaton locked version and couldn't change the phase amps he had the lag also he replaced the controller where he could adjust phase amps and his bike seems to improve. I'm not an expert but waiting for my 8kw watt clone I have ordered. Your bike looks brand new and I don't have the skills to mill..or tools. Beautiful bike.
 
Back
Top